This CE Center article is no longer eligible for receiving credits.
In recent years, green roof technology has become an accepted sustainable design strategy as the benefits and advantages have become better known and proven design options have become more available. A corresponding interest is emerging among designers and owners who are also considering installing vegetated green walls on the outsides of their buildings or on interior walls. There have been a number of historical or traditional strategies to add vegetation to walls, such as installing a trellis system, but recently the option of truly living walls has become viable. The overriding concept of such a green wall is based on planting or mounting a series of living, growing plants on a vertical surface. In response to this interest, there are now several manufacturers of green wall systems currently offering solutions to North American architects.
Overview of Vegetated Living Walls
Introducing vegetation onto building surfaces is hardly a new concept. The Greeks and Romans as far back as the third century BC are known to have used grape arbors on their villas for the fruit they produced and the shade they provided. Medieval and Renaissance Europe saw many prestigious castle walls become covered with ivy or other plants that led to a similar desirable practice on buildings in America. In fact, in 1956 sportswriter Stanley Woodward (NY) coined the phrase “Ivy League” as a direct reference to the ivy so commonly grown on the buildings of some of the most respected educational facilities in the country. What is new is the recent research and application of systems and designs to optimize the benefits of vegetation on buildings without causing any harm to the building. During the 1980s and 1990s green wall research and development efforts were boosted by incentives offered in Germany which gave rise to collaborative efforts of landscape architects, scientists, and private companies. Part of the basis of some of the German research is the observation that man made surfaces like roofs and streets influence urban microclimates through solar radiation changes. As a result of these changes, air temperatures inside buildings also rise and lead to discomfort or increased energy consumption for cooling. A logical solution to create more comfortable air temperatures inside and outside of buildings is to add green plants to façades and roofs, thereby using the natural processes of the plants to create comfort.
The two key fundamental natural processes that plants provide are 1) evaporation of moisture from the soil or growing medium and 2) transpiration of moisture out of the leaves of the plants into the atmosphere. Collectively these two processes carry away excess heat and the term evapotranspiration is used to refer to their combined activity. According to some experiments in Berlin, extensive green roofs were found to transfer as much as 58 percent of net incident radiation into evapotranspiration during the summer months thus providing significant cooling. Green façades were also studied where plants provided shade during summer, while during the winter, when the plants lose their foliage, the sun’s radiation was able to pass through the glass-front of the building. In the summer months it was observed that a significant cooling value was achieved.
 |
Orchard Shopping Mall roofdeck, Singapore Photo courtesy of Tournesol Siteworks LLC |
In recent years, green roof technology has become an accepted sustainable design strategy as the benefits and advantages have become better known and proven design options have become more available. A corresponding interest is emerging among designers and owners who are also considering installing vegetated green walls on the outsides of their buildings or on interior walls. There have been a number of historical or traditional strategies to add vegetation to walls, such as installing a trellis system, but recently the option of truly living walls has become viable. The overriding concept of such a green wall is based on planting or mounting a series of living, growing plants on a vertical surface. In response to this interest, there are now several manufacturers of green wall systems currently offering solutions to North American architects.
Overview of Vegetated Living Walls
Introducing vegetation onto building surfaces is hardly a new concept. The Greeks and Romans as far back as the third century BC are known to have used grape arbors on their villas for the fruit they produced and the shade they provided. Medieval and Renaissance Europe saw many prestigious castle walls become covered with ivy or other plants that led to a similar desirable practice on buildings in America. In fact, in 1956 sportswriter Stanley Woodward (NY) coined the phrase “Ivy League” as a direct reference to the ivy so commonly grown on the buildings of some of the most respected educational facilities in the country. What is new is the recent research and application of systems and designs to optimize the benefits of vegetation on buildings without causing any harm to the building. During the 1980s and 1990s green wall research and development efforts were boosted by incentives offered in Germany which gave rise to collaborative efforts of landscape architects, scientists, and private companies. Part of the basis of some of the German research is the observation that man made surfaces like roofs and streets influence urban microclimates through solar radiation changes. As a result of these changes, air temperatures inside buildings also rise and lead to discomfort or increased energy consumption for cooling. A logical solution to create more comfortable air temperatures inside and outside of buildings is to add green plants to façades and roofs, thereby using the natural processes of the plants to create comfort.
The two key fundamental natural processes that plants provide are 1) evaporation of moisture from the soil or growing medium and 2) transpiration of moisture out of the leaves of the plants into the atmosphere. Collectively these two processes carry away excess heat and the term evapotranspiration is used to refer to their combined activity. According to some experiments in Berlin, extensive green roofs were found to transfer as much as 58 percent of net incident radiation into evapotranspiration during the summer months thus providing significant cooling. Green façades were also studied where plants provided shade during summer, while during the winter, when the plants lose their foliage, the sun’s radiation was able to pass through the glass-front of the building. In the summer months it was observed that a significant cooling value was achieved.
|
Orchard Shopping Mall roofdeck, Singapore Photo courtesy of Tournesol Siteworks LLC |
Elsewhere French botanist Patrick Blanc displayed the first “Plant Wall” in 1994 as a true hydroponic system, not dependent on soil as the growing medium for the plants. The same year, the first indoor living wall used for bio-filtration was displayed in Toronto, Canada. And in Japan, the “Bio Lung” became the landmark of the EXPO 2005 Aichi, symbolizing the wisdom of nature by featuring over 300 green wall panels from various systems. It uses 3,500 square meters of vegetated wall systems that are made for the purpose of improving the environment of busy city areas where an enormous amount of CO2 is emitted. Bio Lung was born to introduce plants in these urban areas with densely packed buildings where there is very little or no suitable open space left to grow plants on the ground or other horizontal surfaces.
In this country, the City of Seattle, Washington has been a leader by adopting, in 2007, a program called The Green Factor. As a result, it is now required that all new developments must have 30 percent vegetation coverage, or the functional equivalent (e.g., permeable surfaces in commercially zoned areas). A building applicant, architect or landscape architect chooses from a menu of landscape strategies including large trees, permeable paving, rain gardens, green roofs and green walls, similar to the German Green Area Factor. The main drivers of the program include improving microclimates, reducing the urban heat island effect, maintaining and improving soil function and water quality, and enhancing the quality and quantity of plant and animal habitats.
 |
Recent work such as Patrick Blanc’s hydroponic walls in France show new ways to make green walls viable.
Photo courtesy of Tournesol Siteworks LLC |
As the research, development, and application of different types of vegetated wall systems have grown in recent decades, it is important to be clear on the distinctions between these types and the common current nomenclature being used:
- “Green walls” is an all-encompassing term that is used to refer to all forms of vegetated wall surfaces. However, there are two major system categories that fall under this term’s rubric: green façades and living walls. These two terms, as defined below, will be the focus of this article.
- A ‘Green Façade’ (or façade greening), are systems in which climbing plants or cascading groundcovers are trained to grow onto and over specially designed supporting structures. There are two primary types of green façades: modular trellis systems, and cable / rope wire systems. Both of these systems afford a high degree of design flexibility since they can be wall mounted, freestanding, or used as columns. Modular trellis products can be installed vertically in either a wall mounted or freestanding application. Cable/rope wire systems can span long distances, but special or complex designs may defeat the simplicity of the system. Green facades with climbing plants are assembled on site, drawing on common skill sets (e.g., carpentry), virtually eliminating the need for specialized design and installation professionals. Nursery plants are usually planted at the base, sometimes in intermediate planters or on rooftops, and may take some time before growing in to achieve full plant coverage. Pruning and pinching may be required as part of a regular maintenance plan.
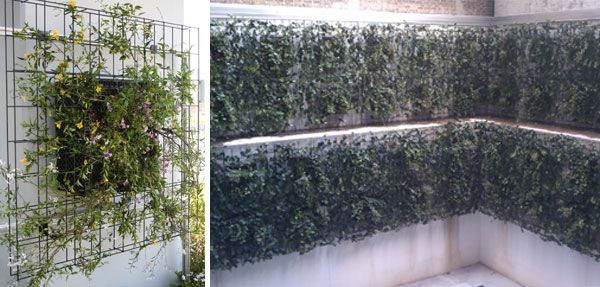 |
A modular trellis hybrid system as part of a green façade. Photos courtesy of Tournesol Siteworks LLC |
 |
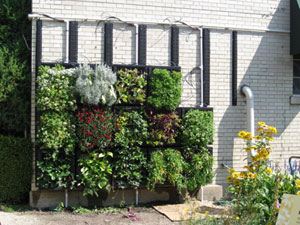
Living Walls can take many different forms, colors, and textures. Photos courtesy of Tournesol Siteworks LLC |
- A ‘Living Wall’ is an integral part of an exterior building envelope system or an interior wall. In either case, a living wall is comprised of distinct panels that are either pre-vegetated or planted on site and include growing medium or liquid nutrient. The panels are installed into or on top of a frame and can either be secured to a structural wall or designed to be self-supporting. The living wall panels are typically made of plastic, expanded polystyrene, clay, or concrete and can support a great diversity and density of plant species (e.g., a lush mixture of groundcovers, ferns, low shrubs, perennial flowers and/or edible plants). They can also be used to create stunning and creative visual designs on walls. When used for interior applications, living walls can provide natural bio-filtration of indoor air.
- A ‘Landscape Wall’ is an exterior engineered living structure that is designed to stabilize a slope, while having the advantage of supporting vegetation cover. They provide the structural strength to resist the lateral forces exerted by angles greater than the natural angle of repose of soil and protect the slope against erosion. This type of green wall has also been frequently used for noise attenuation purposes. Since this type of application is not usually affixed to a building, it is pointed out here for clarification, but is not the focus of the remainder of our discussion here.
Regardless of whether a green façade or a living wall is selected, all green walls share many of the same benefits and follow essentially similar design processes.
Design Goals and Green Wall Benefits
The benefits of green wall systems apply not only to the individual buildings that they are a part of, but also their surrounding community. Indeed, a concentration of buildings with green walls has the collective potential to make a dramatic impact on that community. This concept was developed and popularized in the Garden City Movement in England and in the US in the 1900’s and continues today. Further, the work of the US Green Building Council and the LEED® program has promulgated the building specific and community benefits of creating green buildings, some of which can be accomplished through green wall systems as discussed further below:
- Urban Heat Island (UHI) Reduction. The urban heat island (UHI) effect is the temperature increase in urban centers caused by the replacement of “natural vegetation with pavements, buildings, and other structures necessary to accommodate growing populations” (Wong 2005). These impermeable surfaces convert sunlight to heat, while the disappearance of vegetation and construction of tall buildings prohibit the occurrence of natural cooling processes such as evapotranspiration and wind. UHI has been shown to increase the incidence of smog days and summer time demand for cooling. It has been reported that as many as a thousand people in the US die each year due to extreme heat, a figure higher than all other weather events combined. The reintroduction of vegetation into urban environments promotes the occurrence of natural cooling processes through evapotranspiration since the sunlight absorbed by vegetation would otherwise be converted into heat energy. These processes contribute significantly to the reduction of ambient temperature in densely packed urban environments. Furthermore, with strategic placement of green walls, plants can create enough turbulence to provide wind breaks cooling air at the same time as it slows it down.
- Building Energy Efficiency. Greening a building’s envelope is one technique used to improve its thermal properties through external temperature regulation. Those structures located in more extreme climate zones are exposed to a higher degree of fluctuating conditions and require more energy to maintain constant interior conditions than those in milder climates. Green walls have been shown to reduce temperature fluctuations at the wall surface from 5 to 30 ºC (41 to 86 ºF). The natural processes that contribute to this improved energy condition include wind, shading, and evapotranspiration.
- Improved Exterior Air Quality. Air quality is directly linked to the UHI effect. A reduction in urban temperatures (e.g. through the reintroduction of greenery) would positively affect air quality through the reduction of smog days and the reduction of air born particulates. Beyond the temperature benefit, plants directly absorb carbon dioxide while giving off oxygen in their life-dependent process of photosynthesis. This natural air filtering and processing of one of the more significant greenhouse gases is a notable improvement to air quality. Further, plants can act as collection sites for dust and other air particles. Leaf surfaces collect dust particulates until they are washed to the ground during a rainstorm. The degree to which plants can fulfill this air quality improvement function depends upon the Leaf Area Index (the ratio of total upper leaf surface of vegetation divided by the surface area of the land on which the vegetation grows) meaning that, the greater the leaf surface, the more particulate matter a plant or green wall will retain. Therefore, dust and particulate matter counts can be reduced by as much as 75 percent downwind of urban plantings. Similarly, fumes and bad odors can be intercepted by plants or even masked by the scent of some plants to further improve air quality.
- Improved Interior Air Quality. Living walls located inside of buildings can directly contribute to improved interior air quality. It is commonly acknowledged that most North Americans spend 80 to 90 percent of their time indoors and as a result are highly influenced by the effectiveness of interior air circulation systems. Poor indoor air quality can be caused by such things as inadequate ventilation and chemical contaminants from indoor or outdoor sources. Scientific testing has established a list of indoor plants that have the ability to filter at least three of these chemical contaminants: benzene, formaldehyde and trichloroethylene. Benzene is a solvent used in ink, oil, paint, plastic and rubber. Formaldehyde is present in virtually all indoor environments: urea formaldehyde resins are used in foam insulation, particleboard and pressed-wood products; it is also present in tobacco smoke, natural gas and kerosene. Trichloroethylene is used in metal degreasers, dry cleaning solvents, inks, paints, lacquers, varnishes and adhesives. Green walls that use appropriate plants can act as natural “bio-filters” for these chemicals as well as others when implemented as part of an integrated building strategy.
- Urban Agriculture. There is an emerging trend to grow more local food, particularly in urban locations. Green wall systems are well suited for this possibility as long as several design factors are addressed that influence their ability to produce food. These include the level of desired maintenance (food growing and harvesting requires more maintenance than ornamental plants), the level of nutrients available, sun exposure, and the height of building.
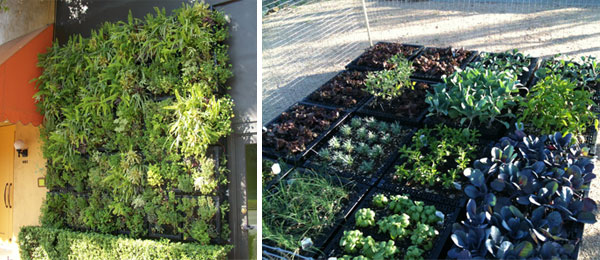 |
Chef Mario Batali's Pizzeria Mozza restaurant in Los Angeles grows a variety of vegetables and herbs on this living wall on premises.
Photos courtesy of Tournesol Siteworks LLC |
- On-site Waste Water Treatment. Currently, cities occupy approximately 2 percent of the surface of the planet but house 50 percent of the inhabitants of earth. Every day 180,000 more people become city inhabitants. All of this population creates, among other things, a demand for waste water treatment. Innovative ways to naturally treat waste water on site are being seen in some of the most urban areas. For example, the proposed Editt Tower in Singapore is under construction and is an attempt to address this issue. According to Ken Yeang, Architect, it will house “a fascinating system of water collection… involving a sculptural rain scoop on the roof and a system of water collection that scallops down the façade combined with a proposal to recycle gray water through soil filter beds in the vertical landscaping.”
- Increased Biodiversity. Biodiversity is defined as the variation of life forms within a given ecosystem. Biodiversity boosts the overall ecosystem productivity where each species, no matter how small, all have an important role to play in that ecosystem. The benefits of biodiversity, even in urban environments include stabilization of local ecosystems overall and aesthetic and psychological benefits for inhabitants. However, despite the benefits of designing for biodiversity, not all building owners would like to attract wildlife and would rather repel insects, birds, and mammals. It is possible to discourage their presence through careful design of a green wall. One of the primary techniques used to repel wildlife is the selection of plants that do not fruit, go to seed or offer a food source. Similarly, climbers with small leaves and with a thinner profile cannot provide nesting sites for birds and small animals. Projects with thick layers of foliage can be pruned once a year and deadwood removed to limit this occurrence.
- USGBC LEED® Credits. Currently not many green wall projects have been specifically LEED® certified, since they are not explicitly incorporated into the standard. Nonetheless, green walls can contribute to points in all of the categories of this voluntary rating system. Since LEED® has been adopted by many municipalities as a minimum construction standard the use of green walls can help achieve certification at any targeted level.
- Marketing and Green Branding. The trend of users and developers toward greener buildings continues to be an important marketing consideration. Part of this phenomenon is related to the commitment of so many people to green technologies including green procurement, green roofs, and green walls. According to facilities.net “In New York City, landlords with attractive green features are definitely able to charge a premium. Tenants interested in green features are either petitioning landlords to make green improvements to space they already lease or are doing their own green renovations.” This trend is fueled in part by employers that are finding easier employee recruiting and lower employee turnover in green buildings. Developers are also finding easier lease outs, lower turnover of tenants, and increased property value due to increased efficiency.
- Building Façade Protection. It is a common misconception that green walls will always damage the structure to which they are affixed. If the building façade is in good repair then clinging vines or other plants will not threaten its integrity. However, when a façade is in poor shape or defective, plants should be grown on a separate structure (e.g., metal cables or trellises) that is kept away from the wall. If periodic maintenance of the building façade is required, then the green wall system should be able to be removed or hinged out of the way while keeping plants intact. Of course, damage to a building structure or façade can in fact be caused by other things such as UV radiation, rain, snow, wind, and thermal variation. A green wall, whether a green façade or living wall system, will shield the building from all of these things and can thus help to extend the useful life of the building façade.
- Aesthetic Improvement. Aesthetic improvements in clinical settings have been demonstrated to lead to psychological improvements (e.g. increased patient recovery times). But in the everyday built environment, (exterior and interior) things such as blank or stark concrete walls and fences along transportation corridors and buildings are hardly an appealing aesthetic and are described more as blight on the landscape. These areas are opportunities for improvement through greening.
- Noise Reduction. In some cases, green walls can be used to soften or deaden sound inside or outside of buildings. Factors that affect a green wall’s ability to reduce noise levels include depth and composition of the substrate or growing medium as well as the plants selected and their overall coverage.
- Local Job Creation. Green walls draw upon multiple disciplines for their design, installation and maintenance. As the demand for this technology increases, so will the demand for professionals who specialize in green wall installations.
Green Wall Design Process
A common source of confusion in a green wall design is the basic determination of who should be responsible for each phase of the specification, design, installation and maintenance of the system. Typically, an architect working in conjunction with a landscape architect does the overall system design, usually with the input of a manufacturer or supplier of a green wall system and a horticulturist or nursery specialist. Specific portions, such as an irrigation system for the green wall (whether using captured rain water or potable water) can be laid out either by the landscape architect, a mechanical engineer, an irrigation consultant, or the installing contractor. Manufacturers also often provide irrigation strategy recommendations that can be modified as local codes and conditions require. The first key to a successful process, then, is to clearly identify who on the design team carries the primary responsibility for each portion of the total system and who acts in a secondary, supporting role. Not to be overlooked is the role that the building owner or user will play in operating and maintaining the finished green wall installation since their willingness or capability to do so may well influence design decisions. The process outlined below is typical of most building design processes but focused on the specifics of a green wall system.
- Establish the Scope and Design Objectives of the Green Wall Project. Obviously, the overall building type, (industrial, commercial, residential), building size, and the basic building program need to be established first and respected throughout the entire design process. But things like the solar orientation and form of the building will have a direct relationship to a green wall which will need to be developed concurrently. Toward that end, the specific design objectives of the green wall should be identified and agreed upon to inform the earliest design decisions. Is the intent to focus on exterior factors such as urban heat island reduction, building energy efficiency, and outdoor air quality? Is a living wall desired for the inside as a design element or for bio-filtration of indoor air? Is the building pursuing LEED® certification at any level? Are more innovative solutions being sought? Whatever the answers to these questions or others, it is best to discern them earlier rather than later so that appropriate design decisions can be made efficiently.
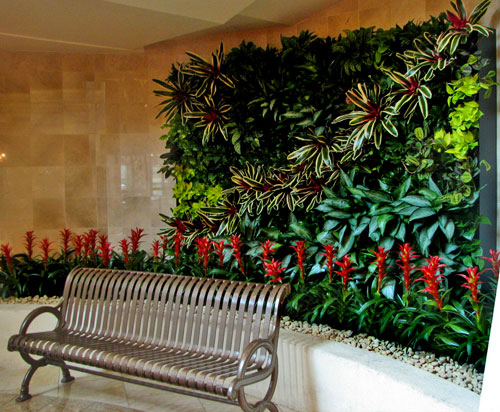 |
Living wall at Horseshoe Casino (Hammond, Indiana), implemented as part of an integrated building strategy. Photo courtesy of Tournesol Siteworks LLC |
- Site Analysis. Just like planting gardens, the specific site conditions are critical for success of a green wall. Hence, a full site inventory and assessment is the best way to determine optimized green wall locations, system selection and planting design. This inventory should include the basics such as solar exposure and availability as well as anticipated exposure to weather elements such as high winds, hail, or snow. Additionally, it will be important to become familiar with the typical climate conditions that affect growth including annual and monthly average rain fall, typical temperature ranges and fluctuations, and soil conditions if the ground is to be used for a green façade.
- Budget Determination. With the basics above determined, there are still a number of variables that will influence the initial cost and ongoing maintenance costs of green walls. First it needs to be decided if a green façade or a living wall or a combination of the two is preferred to meet the design objectives and address site resources / constraints. Generally speaking, a green façade system that uses plants growing from the ground costs notably less than a full living wall with planters supported on a frame. Of course, the height of such a green façade is limited by the height of the plant growth, whereas the full green wall overcomes that through multiple plantings stacked one above the other. Hence, a combination may be appropriate in some cases. For general budgetary purposes, a typical manufactured material-only cost for a living wall (stainless rails and framesets, recycled modules) can be expected to cost approximately $60 to $90 per square foot, depending upon the scale of the installation. The “all-in” cost, including plants, soil, irrigation, and installation, may result in twice the manufactured material only amount. By comparison, a green façade system might cost about half of a living wall system. Every installation is different of course, and local labor and material costs will vary, but typically an experienced supplier or installer should be able to provide a reasonable estimate for a system during the design process. When looking at installation costs, note that plants will most likely require at least six months lead time to ensure that they are available to meet a construction schedule. Ordering early may save money since the greater the lead time the lower the cost in many cases.
Beyond the first cost of the system, maintenance costs should be reviewed with the owner as well. Different green walls will require different levels and types of maintenance. A living wall will inevitably be more expensive to maintain than a green façade due to the complexity of the system. However, the aesthetic goals and the plant selection used in a green façade can also impact the degree to which maintenance is required (e.g., dead heading flowering plants). Decisions regarding the degree to which maintenance is required will have a direct impact on the owner or user’s ongoing costs to maintain a healthy, appealing outcome.
- Plant Type Determination and Selection. A wide variety of plants may be used in both green facades and living walls. Many living walls are comprised of pre- vegetated panels that are installed on a frame that is freestanding or attached to a structural wall. A wide diversity of plants can be used in this manner: perennials, edibles, native plants or drought tolerant plants. Indoor living walls must use tropical plants that are adapted to low light levels and consistent temperatures. Considerations when picking plants for a wall include the appropriate plant selection for the horticultural conditions (the zone), the micro-conditions of the installation (temperature, sun exposure, wind), desired maintenance schedule, the soil profile of the system (the thickness of the growing medium), and of course, the desired look of the wall. A few varieties that have been successful in these types of installations are listed in the table below. By no means is this a definitive list—actual project success will depend upon a qualified review of the horticultural considerations listed above. One thing to keep in mind—the thicker the soil profile the more root space the plants will have to thrive throughout the life of the project.
Vine-type plants |
Ferns |
Hedera helix var. – Ivy varietals
Gaultherias procumbens – Wintergreen
Ficus pumila – Climbing fig
Vaccinium ovatum – Huckleberry
Clematis pitcheri – Bluebill
Clematis alpina – Alpine clematis
Clematis macropetala – Downy clematis
Lonicera sempervirens – Trumpet honeysuckle
Lonicera albiflora – Western white honeysuckle
Ampelopsis brevipedunculata – Porcelainberry
Parthenocissus tricuspidata – Boston ivy
Parthenocissus quinquifolia – Virginia creeper |
Athyrium felix-femina & var. – Lady ferns
Blechnum spicant – Deer fern
Polypodium glycyrrhiza – Licorice fern
Dryopteris expansa – Spreading wood fern
Dryopteris affinis – Golden-scaled male fern
Polystichum acrostichoides – Christmas fern
Polystichum polyblepharum – Japanese tassel fern |
Sedges & Grasses |
Color/Ground covers |
Carex caryophylllea – Spring sedge
Carex dolichostachya – Gold fountains sedge
Carex morrowii – Japanese sedge
Carex cherokeensis – Cherokee sedge
Carex perdentata – Sand sedge
Carex planostachys – Cedar sedge
Eragrostis intermedia – Plains lovegrass
Nolina texana – Texas sacahuista |
Euonymus japonicus microphyllus & var. – Euonymus boxleaf varietals
Begonia var. – Begonias
Phlox subulata – Moss pinks
Allium senescens subsp. Montanum – Mountain garlic
Allium tanguticum – Ornamental chive
Campanula carpatica – Bellflower
Dianthus var. – Carnation groundcover varietals
Coronilla varia – Crownvetch |
Sedum Varieties |
Most sedums will perform well in this type of application. Consult with your local grower to discuss availability and appropriate varieties. |
|
Examples of plants suitable for green wall applications.
Courtesy of Tournesol Siteworks LLC |
- Determination of Growing Medium. Different systems are designed to use and contain soil differently. In a green façade system, the ground is typically the growing medium so it needs to be prepared, fertilized, and irrigated based on the needs of the plants selected. In a living wall, the growing medium is set into an isolated container mounted on a frame therefore it requires a specified range of chemical and physical properties with microbial activity. Some modular systems use peat blocks as the growing medium while other living wall systems are completely hydroponic (e.g. all water with nutrients). Most typical is a carefully selected mix that is usually highly inorganic, consisting of blends of calcined clay, expanded slate, sand, perlite, vermiculite and similar minerals. Organic components usually make up less than 10 percent of the mix. It is also strongly recommended that mixes test, saturated, to weights less than 50 lbs/per cubic foot. The use of non-decomposing inorganic mix is especially important in living walls since this provides the lowest levels of ongoing maintenance. Organic components do provide beneficial nutrients to the plant as they decompose, but may require premature replacement of the module.
- Water Supply and Irrigation Design. An irrigation system is not just usually - almost always required to ensure survival of green walls. A living wall can be irrigated with potable water, collected rainwater, or water from an integrated gray water recycling system. If on-site rainwater collection is implemented, water can be stored in an underground cistern or above grade storage tank, activated in most cases by a pump. A water pressure of 45 to 55 psi may be required to operate a drip irrigation system for individual panels or the top of a wall assembly. Because of the nature of the soil systems recommended above, and the vertical nature of the planting, not much water is retained in the soil for the plants. For that reason it is strongly recommended that an automatic drip irrigation system is used with living walls. This irrigation strategy is relatively straight forward. An irrigation main is run below the green wall and lateral lines are attached alongside every other rail. At the top of each level of modules, the lateral is pierced with a multi-outlet pressure-compensating drip emitter system whereby the water is simply allowed to drip through the top of the module, fed from above. The desired irrigation application rate would be small amounts, frequently, to reduce the amount of un-retained water drainage. A moisture sensor can be added to the irrigation specification, if desired. Because of size or site conditions, it might be necessary to have several irrigation zones. A dual check valve (back flow preventer) is mandatory when using a fertilizer injector to avoid potable water contamination.
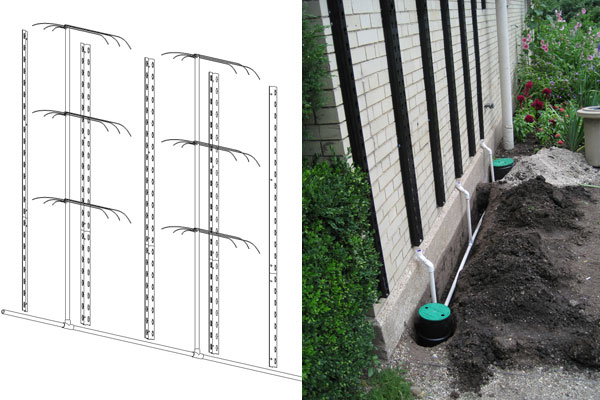 |
 |
Irrigation systems in diagram form and during installation.
Photos courtesy of Tournesol Siteworks LLC
|
Because the soil mix doesn’t provide much in the way of nutrients, fertilizer will need to be regularly applied to the plants. A fertilizer injector (“fertigation”) can be installed as a component of the irrigation system if desired. It is a common, inexpensive way to reduce maintenance and guarantee the longevity of the plantings. Finally, given that living walls are vertical, consider drainage at the base of the wall. It is important to avoid standing water at the base, since it may attract unwanted rodents. A drainage channel can either be attached to the bottom of the rail or to the wall below a living wall if required (for example, on a very tall wall or a wall over a doorway). Base drainage options can include a bed comprised of drainage material such as river rock or cobble over a perforated drainage line or a gutter installed at the bottom of a wall connected to a landscape swale, a storm water system, or a water storage/ recirculation system.
- Integration with other building systems An important overall design consideration is the integration of the green wall system with the rest of the building systems. Obviously such things as the building envelope type, windows and any window washing equipment will play into a green façade or living wall design coordination. Structurally, there is usually very little if any impact. In a well designed system, the modules in a living wall system are typically held in place with a series of supports extending at most up to 8 feet. Hence, there is never more than approximately 125 lbs. of weight on any given anchor on any point in the wall (assuming a 50 lbs/pcf soil is used, without a wind load). As a result, there is no practical limit to the height of the wall (no “stacking issues”), simply the height to which the client is willing to do maintenance on the system. From the standpoint of weather and waterproofing, the supports & modules of a living wall usually provide a minimum of 2.5 inches of clearance between the soil and the wall. You can expect humidity to be somewhat higher in the areas between the building wall and the green wall system. Although there is no water running down the walls, the wall should still be waterproof. For concrete structures use elastomeric paints. For metal, wood frame and other structures consider rubberized or thermoplastic membranes (EPDM, TPO, etc.) or others as appropriate. In all cases, however, all penetrations for anchors, fasteners, or other uses must be fully sealed.
- Installation Direction. The assembly & installation of a green façade or living wall system is typically done by a local contractor, even one with little experience. The growing-in of plants takes place at a local nursery or grower’s facility, often using their labor for module assembly, soil filling, planting, growing, and any necessary acclimation. Either the grower or the installing contractor would transport the fully grown modules to the site. The contractor would execute the final steps. In a green façade, he would plant the modules or free growing plants as appropriate. In a living wall, he would fasten the framesets onto the modules, hang the units and install the final irrigation elements. Traditionally the installing contractor will be responsible for the first three months of maintenance on the living wall, and then the project is handed off to a maintenance contractor. Sourcing plants for custom living walls should begin a minimum of 12 months prior to installation to allow for seed collection, propagation in seed trays as plugs, and testing, especially if using native or custom plants. At least one month prior to installation, the building envelope consultant, architect or the project manager should inspect the structural wall for water tightness. The general contractor should clean the wall and provide clear access to the site. When installing on a new building, always make sure that the green wall is installed last as it might get damaged by other trades.
Interior applications have a completely different set of requirements and horticultural conditions. Specifically, interior plants are typically subject to lower light levels than exterior plants, and need to be replaced due to decline more often than exterior plants. There are also issues with directional lighting and water that complicate matters. Often, rather than direct planting into a soil profile, a system that uses acclimated plants in modular grow-pots slid into cachepots without holes creates a system that is easy to maintain, and allows the irrigation system to be integrated into the frame.
When complete, a successful design process will address and overcome the top 5 challenges related to green walls:
- Improper irrigation (under- or over-watering, installation errors).
- Failure to consider the different microclimates between one part of a living wall and another part (different light, heat, humidity conditions).
- Incorrect plants specified by architects for climate/lighting.
- Incorrect growing medium used.
- Indoor applications with insufficient light for plant survival.
It should also be noted that most building codes do not make any provision for green walls and as such when undertaking one of these projects, a designer will most likely have to educate code administrators about the technology and its applications.
Maintenance Considerations
Maintenance should have been considered during the definition of the project’s scope and a preliminary maintenance plan should be established as a part of the design phase in order to ensure the long-term success of the project. Maintenance for green walls is different than for horizontal surfaces (i.e., green roofs). The vertical orientation of the vegetation may make maintenance access difficult and may require that maintenance personnel adapt traditional landscaping techniques, while bearing in mind that each plant has its own requirements. Therefore, it is important to manage client expectations by communicating the intricacies of the green wall, by pointing out the varieties of plant used and any seasonal changes called for, and to be specific about the anticipated maintenance plan and the associated costs.
Maintenance can be divided into three elements:
- Building/structure inspections will ensure that the green wall doesn’t cause significant damage to the building by catching problems before they become critical. Typically the wall and its surroundings, including drains and gutters, should be inspected a minimum of once per year. Random modules should be removed from the rails to inspect the wall and rails behind. The condition of the wall and its waterproofing, the rail anchors, the rails, drains and gutters should be checked. Should a significant problem exist, a thorough inspection (removing all modules) may be called for. Clogged drains and gutters should be cleared.
- Irrigation inspections are recommended several times per year. The valves and fertilizer injectors should be checked for function, and the irrigation pipes checked for leaks. The modules should be examined for plant health, as a proxy for irrigation function. Should the plants in a module look out of the ordinary, check the emitters during a watering cycle to ensure that they function properly. Consult with the original irrigation specification to determine the proper end-of-season winterization (if required), or suggested maintenance schedules. The original irrigation specification should also include a recommended initial irrigation frequency and time, based upon the season and plant requirements.
- Regular maintenance to the plants will be required once they are removed from the nursery and planted in the ground or hung on the rails until they stabilize. This may require weekly inspection/correction for the first few weeks, extending to monthly, then assuming that the plants specified thrive in the wall, should be an infrequent (bi-monthly or quarterly) affair. Issues to look out for include pest infestations, plant disease, weed growth, over- or under-fertilization, and soil erosion. The plants may require some pruning to prevent overgrowth. Should an entire module of plants suffer decline (due to a broken drip emitter, for example), it may be easier to replace an entire module than attempt to replant and grow in the field. The same frameset may be used with a new module.
Case Study: Interior Wall Rooftop Lounge With Green Walls |
Location: San Diego, CA
Green wall type: Interior living wall system (uses plants in 6”/1 gal nursery pots)
Completed: March 2010
Cost: $20,000
Maintenance: weekly attention
Site Analysis: A highly unusual site – an open-air rooftop lounge, with walls on 4 sides but open to the sky. Because of overhang, plants will likely receive no rain, not much direct sunlight. Team chose interior living wall system for this reason.
Plant List: Living wall utilized sub-tropical plants acclimated to medium light levels. These would typically be used in interior applications. Because of the sub-tropical climate of San Diego, these plants will thrive even in exterior conditions.
Irrigation: Plumbed line from a main water source. The system utilizes plants in their grow pots, dropped into cache pots with no holes. The irrigation water is fed into the bottom of the cache pot, and a felt wick takes up the water into the roots of the plants. While there were initial issues with the multi-outlet drip emitters not being pressure-compensating, the contractor was able to dial the system in by changing to individual drip emitters of different flow rates.
Maintenance Program: Initially the contractor visited the site twice weekly. Once the irrigation system was stabilized the frequency was reduced to weekly, with the intention of further reducing it to a bi-weekly maintenance cycle.
Lessons Learned: The contractor shared these lessons from installation:
- The complexity of installing a living wall between 8’ and 16’ high should not be underestimated. It complicated the entire project, and took more time than imagined.
- Gain experience on the system prior to doing it in a client’s location. By acquiring a green wall frame and putting it through its paces prior to installation, the contractor was able to better understand how the plants would react in the project, and reduce the problems once the job moved to the maintenance phase.
- Nevertheless, the communication lines between installation crew and maintenance crew need to be more open. There were many small changes and accommodations that should have been communicated to those doing the maintenance.
- Critically, the design needs to be considered not just for the initial presentation, but how it will be several years down the road. The plant selection, combined with maintenance needs to be carefully considered in the context of the installation long before the project goes in.
|
Conclusion
A well designed green wall will add notable benefits to the building and community where it is located. Proper design using the input of numerous related professionals can help assure an end result that everyone is proud of. With proper inspection and maintenance, a green wall system should be able to easily last 10 to 20 years or more. Incorporating this very green technology into a building project can help achieve some notable green building design objectives, contribute to the value of the project, and improve the health and welfare of the people who use or inhabit the building for years to come.
Peter J. Arsenault, FAIA, NCARB, LEED-AP is a practicing architect, sustainability consultant, and free-lance writer based in New York State focused on work related to design, sustainability, and technology solutions nationwide. He can be reached at www.linkedin.com/in/pjaarch
 |
Tournesol Siteworks is a national leader in products that connect landscape and architecture. Since 1979 they've manufactured pots, planters, irrigation systems, site furnishings, and most recently living wall and green building components for commercial construction projects. With a wide variety of manufacturing capabilities, they customize standard product platforms to realize any designer's vision for the urban environment. Let them be your link between landscape and architecture. tournesolsiteworks.com |