Green Walls: Integrating Nature into Buildings


Green Wall Design Process
A common source of confusion in a green wall design is the basic determination of who should be responsible for each phase of the specification, design, installation and maintenance of the system. Typically, an architect working in conjunction with a landscape architect does the overall system design, usually with the input of a manufacturer or supplier of a green wall system and a horticulturist or nursery specialist. Specific portions, such as an irrigation system for the green wall (whether using captured rain water or potable water) can be laid out either by the landscape architect, a mechanical engineer, an irrigation consultant, or the installing contractor. Manufacturers also often provide irrigation strategy recommendations that can be modified as local codes and conditions require. The first key to a successful process, then, is to clearly identify who on the design team carries the primary responsibility for each portion of the total system and who acts in a secondary, supporting role. Not to be overlooked is the role that the building owner or user will play in operating and maintaining the finished green wall installation since their willingness or capability to do so may well influence design decisions. The process outlined below is typical of most building design processes but focused on the specifics of a green wall system.
- Establish the Scope and Design Objectives of the Green Wall Project. Obviously, the overall building type, (industrial, commercial, residential), building size, and the basic building program need to be established first and respected throughout the entire design process. But things like the solar orientation and form of the building will have a direct relationship to a green wall which will need to be developed concurrently. Toward that end, the specific design objectives of the green wall should be identified and agreed upon to inform the earliest design decisions. Is the intent to focus on exterior factors such as urban heat island reduction, building energy efficiency, and outdoor air quality? Is a living wall desired for the inside as a design element or for bio-filtration of indoor air? Is the building pursuing LEED® certification at any level? Are more innovative solutions being sought? Whatever the answers to these questions or others, it is best to discern them earlier rather than later so that appropriate design decisions can be made efficiently.
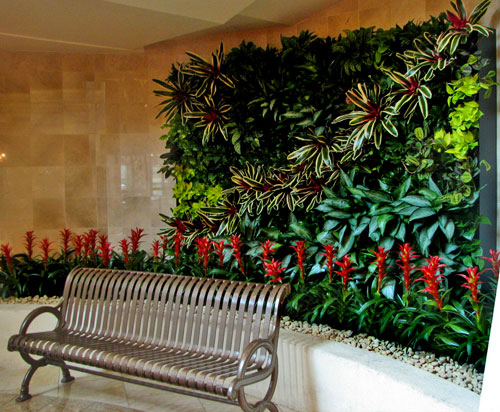 |
Living wall at Horseshoe Casino (Hammond, Indiana), implemented as part of an integrated building strategy. Photo courtesy of Tournesol Siteworks LLC |
- Site Analysis. Just like planting gardens, the specific site conditions are critical for success of a green wall. Hence, a full site inventory and assessment is the best way to determine optimized green wall locations, system selection and planting design. This inventory should include the basics such as solar exposure and availability as well as anticipated exposure to weather elements such as high winds, hail, or snow. Additionally, it will be important to become familiar with the typical climate conditions that affect growth including annual and monthly average rain fall, typical temperature ranges and fluctuations, and soil conditions if the ground is to be used for a green façade.
- Budget Determination. With the basics above determined, there are still a number of variables that will influence the initial cost and ongoing maintenance costs of green walls. First it needs to be decided if a green façade or a living wall or a combination of the two is preferred to meet the design objectives and address site resources / constraints. Generally speaking, a green façade system that uses plants growing from the ground costs notably less than a full living wall with planters supported on a frame. Of course, the height of such a green façade is limited by the height of the plant growth, whereas the full green wall overcomes that through multiple plantings stacked one above the other. Hence, a combination may be appropriate in some cases. For general budgetary purposes, a typical manufactured material-only cost for a living wall (stainless rails and framesets, recycled modules) can be expected to cost approximately $60 to $90 per square foot, depending upon the scale of the installation. The “all-in” cost, including plants, soil, irrigation, and installation, may result in twice the manufactured material only amount. By comparison, a green façade system might cost about half of a living wall system. Every installation is different of course, and local labor and material costs will vary, but typically an experienced supplier or installer should be able to provide a reasonable estimate for a system during the design process. When looking at installation costs, note that plants will most likely require at least six months lead time to ensure that they are available to meet a construction schedule. Ordering early may save money since the greater the lead time the lower the cost in many cases.
Beyond the first cost of the system, maintenance costs should be reviewed with the owner as well. Different green walls will require different levels and types of maintenance. A living wall will inevitably be more expensive to maintain than a green façade due to the complexity of the system. However, the aesthetic goals and the plant selection used in a green façade can also impact the degree to which maintenance is required (e.g., dead heading flowering plants). Decisions regarding the degree to which maintenance is required will have a direct impact on the owner or user’s ongoing costs to maintain a healthy, appealing outcome.
- Plant Type Determination and Selection. A wide variety of plants may be used in both green facades and living walls. Many living walls are comprised of pre- vegetated panels that are installed on a frame that is freestanding or attached to a structural wall. A wide diversity of plants can be used in this manner: perennials, edibles, native plants or drought tolerant plants. Indoor living walls must use tropical plants that are adapted to low light levels and consistent temperatures. Considerations when picking plants for a wall include the appropriate plant selection for the horticultural conditions (the zone), the micro-conditions of the installation (temperature, sun exposure, wind), desired maintenance schedule, the soil profile of the system (the thickness of the growing medium), and of course, the desired look of the wall. A few varieties that have been successful in these types of installations are listed in the table below. By no means is this a definitive list—actual project success will depend upon a qualified review of the horticultural considerations listed above. One thing to keep in mind—the thicker the soil profile the more root space the plants will have to thrive throughout the life of the project.
|
||||||||||||
Examples of plants suitable for green wall applications. Courtesy of Tournesol Siteworks LLC |
||||||||||||
- Determination of Growing Medium. Different systems are designed to use and contain soil differently. In a green façade system, the ground is typically the growing medium so it needs to be prepared, fertilized, and irrigated based on the needs of the plants selected. In a living wall, the growing medium is set into an isolated container mounted on a frame therefore it requires a specified range of chemical and physical properties with microbial activity. Some modular systems use peat blocks as the growing medium while other living wall systems are completely hydroponic (e.g. all water with nutrients). Most typical is a carefully selected mix that is usually highly inorganic, consisting of blends of calcined clay, expanded slate, sand, perlite, vermiculite and similar minerals. Organic components usually make up less than 10 percent of the mix. It is also strongly recommended that mixes test, saturated, to weights less than 50 lbs/per cubic foot. The use of non-decomposing inorganic mix is especially important in living walls since this provides the lowest levels of ongoing maintenance. Organic components do provide beneficial nutrients to the plant as they decompose, but may require premature replacement of the module.
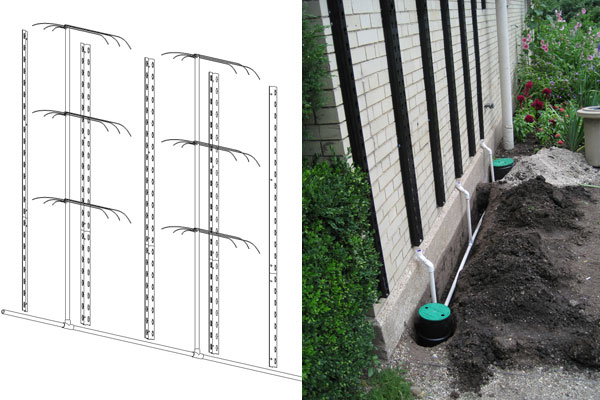
- Water Supply and Irrigation Design. An irrigation system is not just usually - almost always required to ensure survival of green walls. A living wall can be irrigated with potable water, collected rainwater, or water from an integrated gray water recycling system. If on-site rainwater collection is implemented, water can be stored in an underground cistern or above grade storage tank, activated in most cases by a pump. A water pressure of 45 to 55 psi may be required to operate a drip irrigation system for individual panels or the top of a wall assembly. Because of the nature of the soil systems recommended above, and the vertical nature of the planting, not much water is retained in the soil for the plants. For that reason it is strongly recommended that an automatic drip irrigation system is used with living walls. This irrigation strategy is relatively straight forward. An irrigation main is run below the green wall and lateral lines are attached alongside every other rail. At the top of each level of modules, the lateral is pierced with a multi-outlet pressure-compensating drip emitter system whereby the water is simply allowed to drip through the top of the module, fed from above. The desired irrigation application rate would be small amounts, frequently, to reduce the amount of un-retained water drainage. A moisture sensor can be added to the irrigation specification, if desired. Because of size or site conditions, it might be necessary to have several irrigation zones. A dual check valve (back flow preventer) is mandatory when using a fertilizer injector to avoid potable water contamination.
 |
|
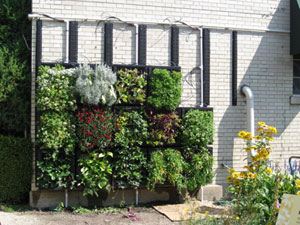 |
Irrigation systems in diagram form and during installation. Photos courtesy of Tournesol Siteworks LLC |
Because the soil mix doesn’t provide much in the way of nutrients, fertilizer will need to be regularly applied to the plants. A fertilizer injector (“fertigation”) can be installed as a component of the irrigation system if desired. It is a common, inexpensive way to reduce maintenance and guarantee the longevity of the plantings. Finally, given that living walls are vertical, consider drainage at the base of the wall. It is important to avoid standing water at the base, since it may attract unwanted rodents. A drainage channel can either be attached to the bottom of the rail or to the wall below a living wall if required (for example, on a very tall wall or a wall over a doorway). Base drainage options can include a bed comprised of drainage material such as river rock or cobble over a perforated drainage line or a gutter installed at the bottom of a wall connected to a landscape swale, a storm water system, or a water storage/ recirculation system.
Notice