Artisanry, Architecture, and North American Glass Tile


Installation and Inspiration
The promise and potential of tile mosaic and large-format glass tiles are evident to most architects. What is less obvious, however, are the specification and installation techniques most likely to ensure a flawless, expert finish process.
After the design team settles on a concept for the glass tile application, it is valuable to refer to the TCNA Handbook for Ceramic, Glass, and Stone Tile Installation (TCNA Handbook) to specify and design better—and to ensure attention is paid to the right concerns during the construction administration (CA) phase. “These standards are written for architects, designers, general contractors, and tile contractors in an effort to help all players in the ceramic tile industry communicate clearly and ensure successful installations,” according to James Woelfel, president of the National Tile Contractors Association (NTCA).5
The TCNA Handbook provides detailed information on the primary mosaic installation approach, the direct bond method. This ANSI standard referenced by TCNA is A108.16: Installation of Paper-Faced, Back-Mounted, Edge-Mounted, or Clear Film Face-Mounted Glass Mosaic Tile, which was reaffirmed in 2010. “Recommended for use with all mounted mosaic glass tile,” says TCNA, this standard provides detailed guidance on how to apply thinset, aligning the tile depth, removing the paper face, and adjusting the tile. For large-format tile, a similar standard is under development by TCNA, which is informally called the Large Format Method.
Mosaic Installation
For the primary way to set mosaics, the direct bond method, the trained installer applies thinset mortar with the proper trowel thickness, using a gauge to confirm thinset depth across the subject surface. This method also helps ensure full coverage and a complete bond, says Nibler. Because most glass tiles are transparent, the installer then smoothes out the lines with the trowel’s non-notched side to achieve a uniform surface with no visible lines. (A common error for less-experienced trade workers is that the lines from the notched side of the trowel—left as is for ceramic tile applications, for example—leave an unappealing grid or linear pattern visible under the glass mosaic.)
After this step, the installer applies the mosaic sheets to the thinset with light, even pressure, the paper side away or toward the installer. Savvy installation teams periodically check the thinset for skinning, or slight drying, which requires removal and reapplication of the mortar cement. To ensure the flattest and most uniform mosaic surface, installers lightly tap the sheets with a wooden beating block and finish hammer. This is especially helpful across sheets to level and unify sheet transitions. For walls, after about 15 to 30 minutes, the installers lightly wet the face papers, keeping them wet with a damp sponge; this eventually causes the glue to release.
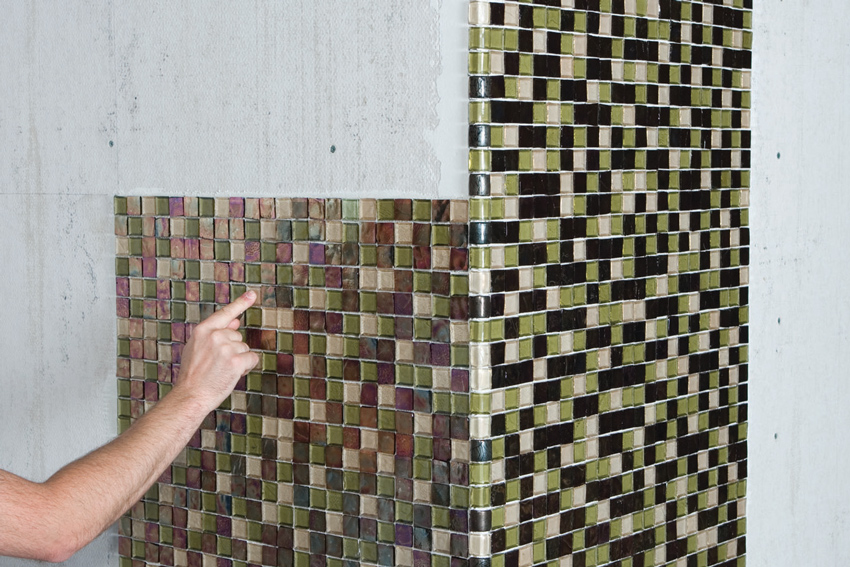
Photo courtesy of Oceanside Glasstile
For mosaic installation with paper facing, installers lightly tap with a wooden beating block and finish hammer and later lightly wet the face papers to release the glue. Then the paper is peeled while the setting material is fresh to allow for adjustments.
Installers then peel the paper from the tile, starting at a corner, to see the mosaic below. This method, in which the paper is removed while the setting material is still fresh, allows for individual tile adjustment as well as visual inspection of color consistency. The goal is a consistent overall field of mosaic tiles, without traces of the sheet pattern at transitions. After 24 hours or more of curing, the installation team uses water and a nylon scrub brush to remove residual glue from the tile.
Large-Format Installation
The application of large-format glass tiles, which can range from 2.5-inch squares and up to 10-inch squares and larger, is substantially similar to mosaic glass tile installation. Yet there are a few notable exceptions.
First, the installers gauge the thinset and smooth out trowel lines, just as in the mosaic tile application. Generally, more thinset is used because these large tiles weigh more than mosaic tile elements. The large-format tiles are also carefully cleaned of contaminants and then 100 percent backbuttered with thinset to ensure good coverage and adhesion with a 100 percent bond, and also to provide complete coverage of the translucent tile for their best installed appearance. Unlike most mosaic applications, large-format tiles require the use of spacers for uniformity of spacing.

Photos courtesy of Oceanside Glasstile/Chipper Hatter
Completely covering the back of a large format tile with thinset, also known as back buttering, ensures the best possible appearance of translucent tile.
Pool Design
Installation methods for pools, water features, and other submerged water applications are different in several important respects. “Considerations when selecting tiles for pool designs include tile size and dimensional ratios,” says Amy Denny, co-owner of Alpentile, an installer specializing in glass tile pool and spa projects. “Large-format glass tiles have been known to fracture along a waterline as a result of thermal shock.” According to manufacturers, long rectangular shapes can be less stable at the center of the tile and prone to fracturing, especially if installation methods are substandard. Thickness of the tile and its overall design will also affect performance and durability.
Architects should study each product and consider how the shape, thickness, and design will function in a pool environment. Manufacturer product testing and recommendations provide good overall guidance, says Alpentile’s Denny. That’s why many architects look for manufacturers with a good quality track record and knowledgeable, available technical staff members.

Photos courtesy of Oceanside Glasstile/Michael Woodall
For pool applications of glass tile, the pool wall substrate must be properly constructed, durable, and dimensionally stable. In addition, glass tiles for these applications must be annealed (slow cooled) for best performance.
While the industry develops new standards for glass tile manufacturing and specification in pools, architects need to control as many variables as possible, including the proper construction of the pool walls, for example. Even properly installed thinset tile bond cannot perform adequately unless it is on a durable and dimensionally stable substrate.
In addition, as mentioned previously, the process of annealing (slow cooling) is essential to relieving internal stresses that may be caused during manufacturing. Annealed glass is a suitable specification for tile many types of applications, says JZA D’s Zinder, including outdoor and underwater locations where environmental conditions can lead to fracturing caused by thermal shock. For better durability and reduced chance of breakage, annealed glass-tile products are employed in these landscape and exterior applications. (For more details, see the Poolside with Glass Tiles sidebar below.)
Poolside with Glass Tiles
Glass tiles elevate swimming pools and water features in a way that calls to mind classic design, luxury appointments, and handcrafted artisanry. But selecting materials isn’t as easy as choosing the schematic concept. High-caliber products and expert craftsmanship are essential to these custom, multilayered systems in a difficult and potentially corrosive environment prone to thermal stresses.
As temperatures swing, materials are tested to their limits: expansion and contraction, chemical interactions, and changing water quality demand specialized materials designed for the task. Some glass products are too fragile for the pool environment or may not have undergone requisite testing. Glass tiles with inclusions (weak points) or made with an accelerated annealing (cooling) processes likely have invisible, unresolved stresses that under certain conditions will release (shatter).
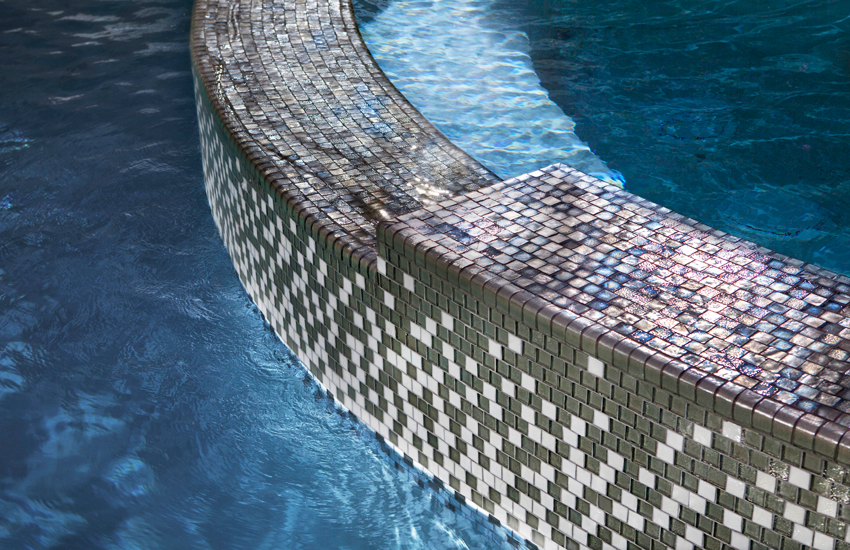
Photo courtesy of Oceanside Glasstile/Michael Woodall
Key considerations for glass tiles in pools, spas, and natatoriums include tile size and dimensional ratios because long rectangular shapes can be less stable at the center of the tile and may be more prone to fracturing.
Key considerations for the specification of glass tiles for pools and natatoriums include tile size and dimensional ratios. “Long, rectangular shapes can be less stable at the center of the tile and thus prone to fracturing,” says Amy Denny, co-owner of Alpentile, an installer specializing in glass tile pool and spa projects. “I study each product and imagine how the shape, thickness, and design will function in a pool environment.”
Similar to other designers and installers, Denny recommends asking the manufacturer for data on product testing and recommendations. For pools, three types of mosaic mounting systems may be offered: mesh (back) mounted, plastic film (face) mounted, and paper (face) mounted. The paper-face system affords 100 percent contact with the setting material, she explains, and it does not limit creative options. Plastic film face-mounting requires the setting material to harden before the sheets are removed, making it more challenging to adjust the tiles during installation.
Mesh systems, on the other hand, are typically not recommended for pools: the semi-rigid backing does not allow the 95 percent contact between glass tile and setting material, which some codes require and many experienced installers recommend, she adds.
Last, many grouts and thinsets may not survive the rigors of pool water. The owner-operator of the pool should test such water variables as pH, calcium hardness, and total dissolved solids (TDS). Maintenance of the installed glass tiles should include regular cleaning with a stiff brush to remove the scale accretion on glass tiles near the waterline.
Notice