Best Practices, Installation, and Finishing Options for Western Red Cedar


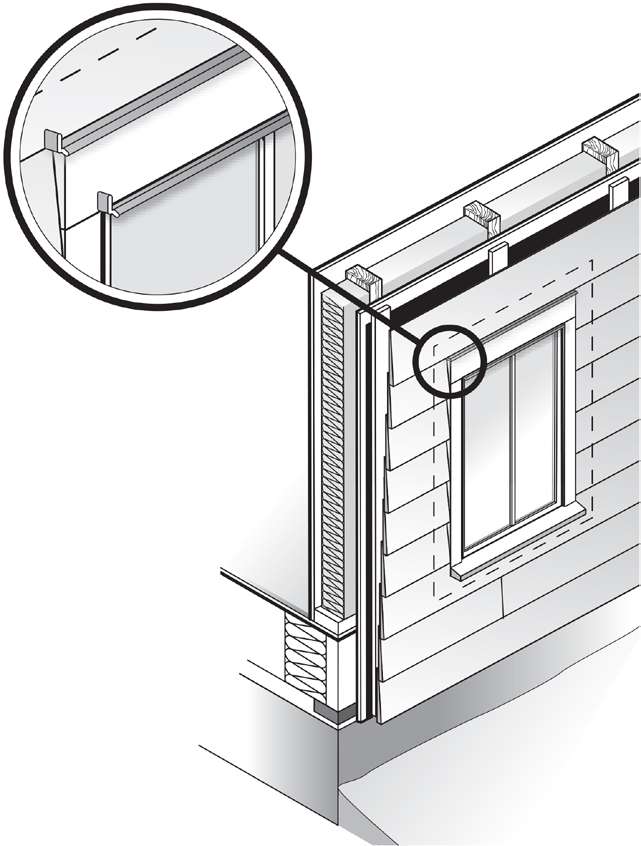
Image courtesy of Western Red Cedar Lumber Association
This corner flashing of a window installation has additional head trim flashing to direct water further outward.
Door and Window Flashing
The purpose of flashing window and door headers is to intercept water behind the siding and direct it to the outside, and to redirect water flowing down the face of the wall to flow away from the wall opening. Moisture can accumulate behind the siding as a result of rain penetration through the siding, water vapor diffusion, or leakage of moist air from the interior or condensation.
An additional head trim flashing is required at the head of the window/door to direct water further outward, beyond the thickness of the window.
Fascia Flashing
The purpose of fascia flashing is to support the shingle edge and to provide a drip edge to prevent water from running back underneath the roofing shingles and down along the fascia and soffit.
Preformed eave flashing/drip edge should be installed under the starter course of the shingle roofing. The extension of flashing supports the edge of shingles. If eavestroughs (rain gutters) are used, the flashing edge also helps to direct the water into troughs. Fascia flashing protects both the soffit and the fascia board, and provides a drip edge at the bottom edge to direct water away from the building.
Caulking
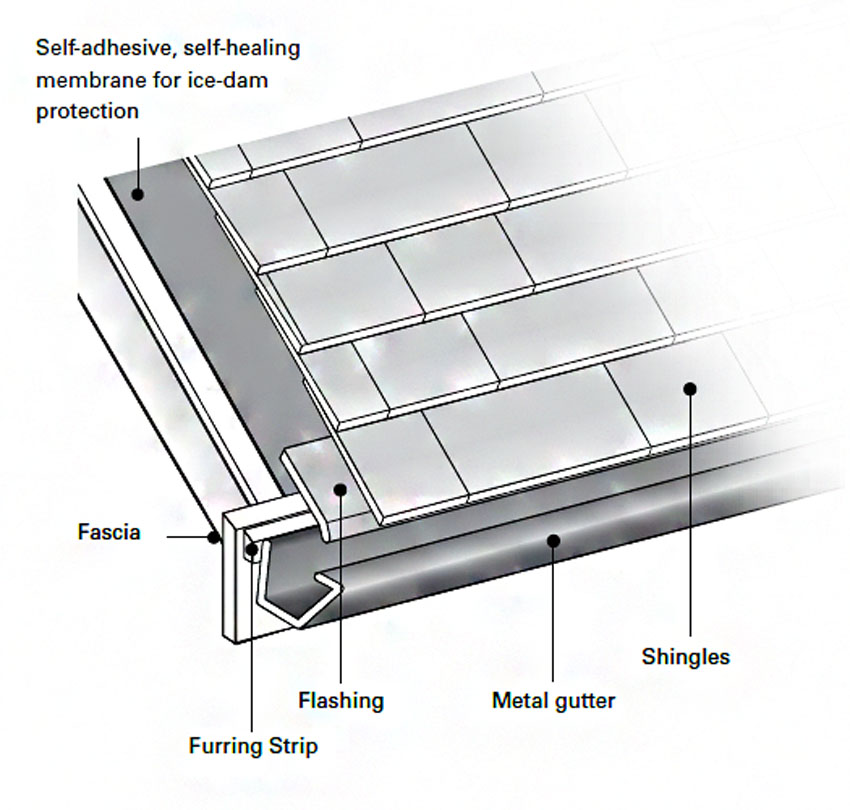
Image courtesy of Western Red Cedar Lumber Association
Shown is an example of fascia flashing in relationship with all other components of a roof, including gutters and shingles.
Use high-performance acrylic latex, acrylic, acrylic silicone, polyurethane, polysulfide, or terpolymer rubber caulks or sealants to seal gaps around windows, doors, corners, and other exterior joints that are exposed to potential water intrusion. Pure silicone and clear caulks do not work well on WRC and are not recommended. Caulking is not a permanent solution and as such requires regular maintenance. If not inspected and maintained, caulking may fail and trap water, causing unwanted air and water intrusion that can lead to damage. Do not rely on caulk as the only barrier to moisture penetration. Do not caulk areas that will prevent moisture from escaping the wall cavity (e.g., above, below windows, doors, and around flashing).
Roof and Ground Clearance
Siding and trim that extend down to a roof (dormers, second floors, etc.) and decks require a minimum of a 2-inch gap to avoid wicking. Trim, such as water table or skirt boards, must be a minimum of 6 inches above the grade.
Installing Bevel Siding (or Clapboards)
When installing bevel siding or clapboards, spacing for the siding should be laid out beforehand. The number of board spaces between the soffit and bottom of the lowest piece of siding at the foundation should be such that the overlap is as per the table below.
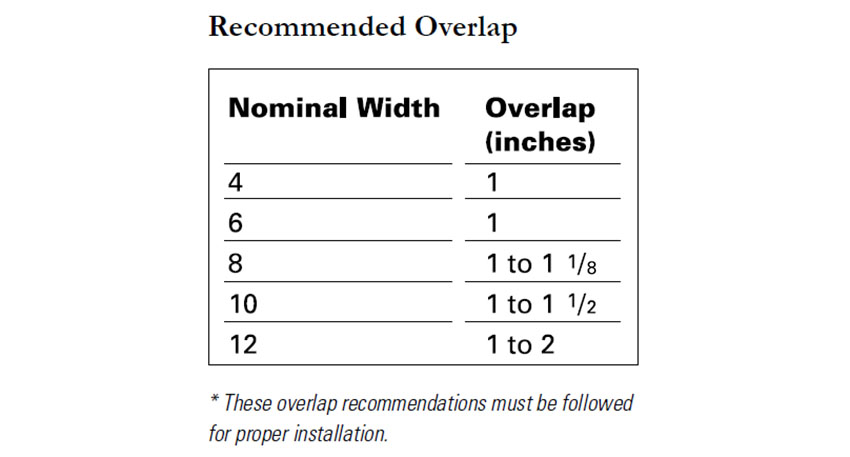
Image courtesy of Western Red Cedar Lumber Association
This table shows the recommended overlap (in inches) when installing bevel siding.
Start with the bottom course using a furring strip to support the lower edge. Each succeeding course overlaps the upper edge of the previous one by a minimum of 1 inch. Rabbeted patterns are self-spacing, but leave a 1⁄8-inch gap to allow for expansion. Where possible, the bottom of the board that is placed across the top of the windows should coincide with the window cap.
Bevel siding should be face-nailed to sheathing and studs with 11⁄4 inches penetration into solid wood using one nail per piece spaced at a maximum of 24 inches on center. Place nail just above the overlap. Take care not to nail through the overlap of two pieces.
Do not reduce the siding overlap recommendations. Doing so could result in damage from wind-driven water. Use the larger overlaps for wider and/or unseasoned sidings to allow for shrinkage and expansion. Take care not to overdrive fasteners. Butt joints between boards should be staggered and meet on studs. Fit siding snugly to other pieces and to trim.
Installing Tongue and Groove
Tongue-and-groove siding can be installed horizontally or vertically. In horizontal application, start at the bottom and work up with the groove edges facing downwards. Siding up to 6 inches wide can be blind nailed with one siding nail per bearing toe-nailed through the base of each tongue. Wider siding should be face nailed using two nails per piece. Nails must penetrate 11⁄4 inches into solid wood.
In vertical application, start at one corner with grooved edge toward the adjacent wall. Use a level or plumb line to ensure that the first board is installed plumb. The grooved edge of the first board may have to be trimmed to ensure a flush fit. Vertical siding is nailed to horizontal blocking lines installed between studs or to furring strips. As with horizontal installation, pieces up to 6 inches can be blind nailed and wider pieces should be face nailed.
Installing Lap Sidings
Lap sidings can be installed horizontally or vertically. For horizontal applications, start with the bottom course and work up with the channels pointing upwards. Allow a 1⁄8-inch expansion gap between pieces if the siding is air or kiln dried. Do not nail through overlaps. For siding up to 6 inches wide, use one nail one inch up from the lap.
Face nail with two nails per piece for 8-inch and wider patterns. Space nails 21⁄2 to 3 inches apart. For vertical applications, siding should be nailed to horizontal blocking or furring strips.
Installing Board-and-Batten Siding
Board and batten is a vertical pattern created using cedar boards and battens of various widths for a wide range of appearances. For nominal 6-inch boards spaced a 1⁄2 inch apart, battens should overlap by a least 1⁄2 inch. With wider boards, increase batten overlap proportionately. While there are no set widths for board-and-batten siding, an attractive combination is 1x3 battens with 1x10 boards.
Siding should be nailed to horizontal blocking lines or to furring strips. Boards up to 6 inches wide should be fixed with one nail per bearing driven through the center of the board. The overlying batten covering the gap between boards should be attached with one nail per bearing, the shank passing between the edges of the under boards. Use two nails per bearing on boards 8 inches and wider, placing the nails 21⁄2 to 3 inches apart.
Outside and Inside Corners
There are three main methods used for outside corners. The choice depends primarily on the desired appearance but also the experience and skill of the installer.
Mitered corners offer a professional-looking finish. They are most commonly used with horizontally applied siding applications such as bevel. Mitered corners require good carpentry skills. They must fit tightly for the full depth of the miter.
Corner boards are a popular and easier alternative to mitered corners. The thickness of the corner board will depend on the thickness of the siding. The most common are nominal 1-inch or nominal 5⁄4-inch thick. Width is a matter of taste and proper proportion. Corner boards are applied with siding fitting tightly against the narrow edge of the boards, allowing for expansion and an adequate caulking bead. The corner boards and the ends of the siding are nailed to the sheathing and corner studs, which anchor the wood for a maintenance-free joint. Designing roofs with an eaves overhang to protect corners from weathering also helps ensure trouble-free joints. Always apply primer or stain to end cuts.
Woven outside corners are a third option for horizontal siding installations. In this case, adjoining wall pieces alternate end-grain exposure.
Field Joints
When butt-jointing siding, cut ends at 45-degree angles to form an overlapping joint. This is particularly important for vertical installation. Ensure joints meet on studs, blocking, or furring strips with the nail penetrating solid wood at least 1¼ inches
Methods for Success
All cedar siding patterns are face nailed, with the exception of the narrow profiles of tongue and groove. Blind nailing is an option with 4-inch and 6-inch tongue and groove in certain climatic conditions. Proper installation techniques are critical to the success of the WRC project, as following best practices can ensure best performance for the product. When installing, ensure that all wood is acclimatized and installation practices follow all local and national building codes and manufacturers’ installation recommendations.
Notice