Sealants in the Field
As mentioned previously, sealants are a vital part of any building’s construction. They help protect the building envelope from unwanted air and water intrusion. Because the building envelope is a system, it’s best to make sure the whole system is sealed properly during construction. Construction of a building typically starts with the foundation, the floor joists, and a subfloor. High-quality adhesives provide exceptional seals between building materials that make up the entire exterior of the building. This includes subfloors and baseboards, siding and brick walls, and more. While walls and floors are solid structures, the areas where they meet create gaps that must be filled.
While the technology surrounding sealants has been slow to change over the years, modern advances in technology have allowed engineers and scientists to create new sealants that reduce shrinkage, are more UV resistant, and also are more resistant to dirt and dust collection. These new and improved building materials should be used in new construction, and they also can be used in building repairs to ensure the most effective and long-lasting seal in the building envelope.
When applying approved sealants in the field, it’s important to properly prep the surface area. The area should be clean, dry, and free of all contaminants, including dust, dirt, old caulking or sealants, paint, and any other materials that could prevent the sealant from adhering to the building materials.
To determine what types of materials the sealant can adhere to, refer to the ASTM C920 classification. Each material should have a rating and classification that clearly states what materials are ideal for the sealant. Matching the right sealant to the right joint is the key to ensuring the building is properly sealed to create a durable and sustainable structure. To better understand this, let’s explore the different types of joints in more detail.
Fillet Joint
A fillet joint is formed when two surfaces come together to form a right angle. The dimensions of A and B must be a minimum of ¼ inch. The sealant bead must be tooled to ensure contact to both substrates during application with a nozzle or spatula. Dimension C must be a minimum of ⅜ inch. If either dimension A or B is less than ¼ inch, the sealant’s adhesion performance and ability to sustain joint movement capability will be compromised. The reduced sealant volume in the space will diminish the sealant’s ability to accommodate joint movement.
If dimension C is under the standard ⅜ inch minimum, overtooling could potentially reduce the sealant volume necessary to accommodate joint movement.
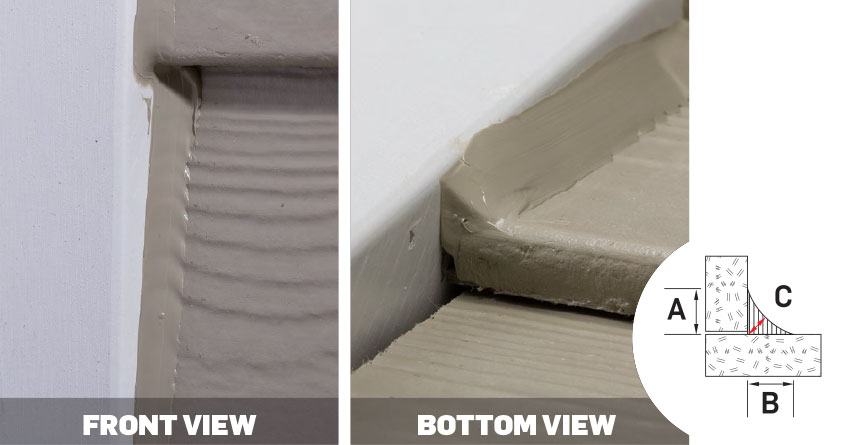
A fillet joint is formed when two surfaces come together to form a right angle. The sealant used to join these two surfaces is triangular in shape. This is an example of a fillet joint sealed using best practices.
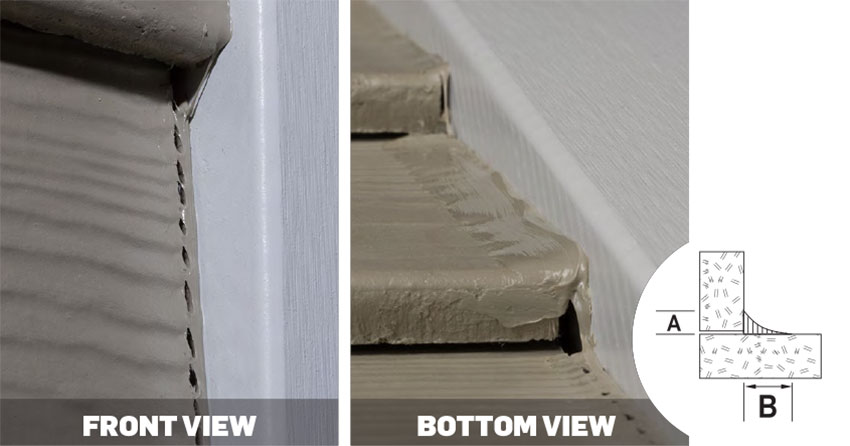
This is an example of an unreliable fillet joint with an unbalanced bead.
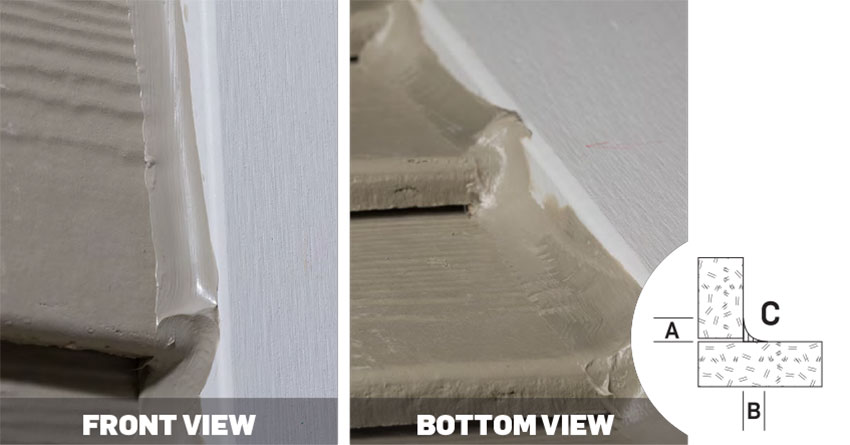
This is an example of an unreliable fillet joint with an overtooled bead.
Control Joint
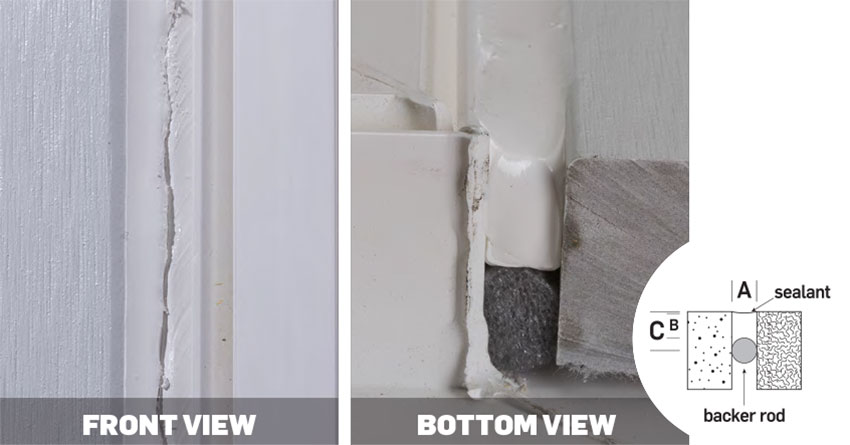
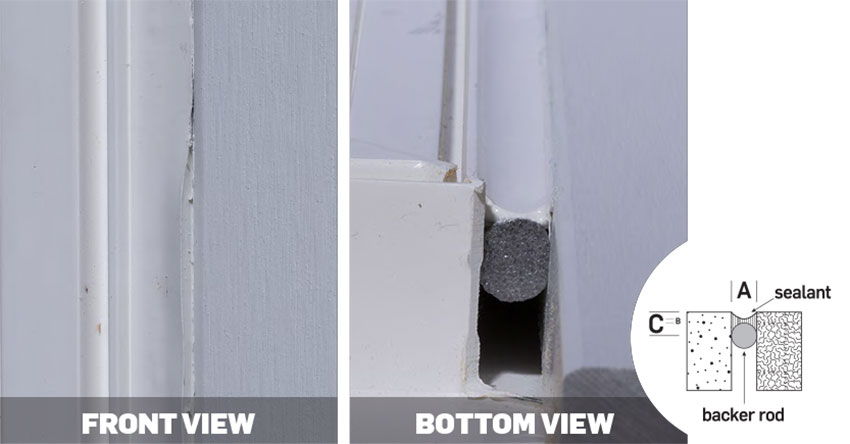
A control joint is formed when two similar or dissimilar materials meet or when substrates do not form a right angle. This joint will require both a backer rod and sealant for a proper application. Dimension A must be a minimum of ⅜ inch or a maximum of ⅝ inch. Dimension B must be a minimum of ¼ inch deep. Dimension C can be a maximum of ½ inch. Inject the bead as a concave shape. Use a tooling spatula that is sized to the joint width.
If Dimension C is beyond standard maximum depth, then the joint movement will be weakened and may cause fissures and fractures. If Dimension B is beyond the standard maximum depth, the sealant will be slow to cure and may compromise sealant performance. If Dimension B is below the standard depth, excessive sealant may be removed due to over-tooling, and the sealant will not provide optimum performance.

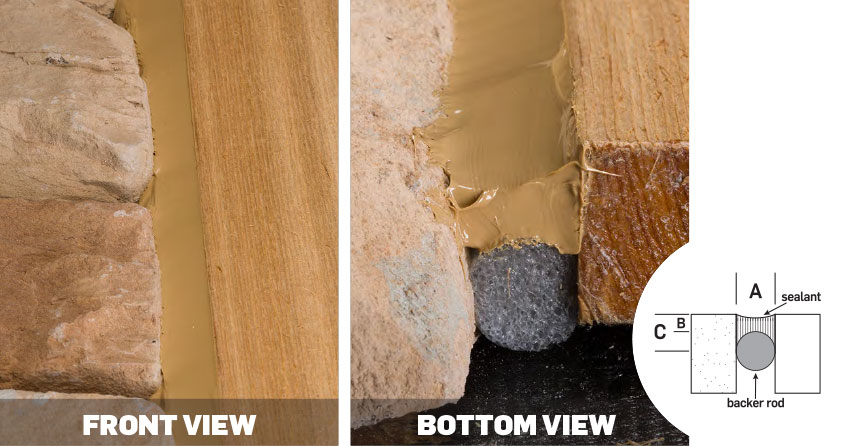
A control joint is formed when two similar or dissimilar materials meet or when substrates do not form a right angle. This joint will require both a backer rod and sealant for proper application. This is an example of a control joint sealed using best practices.
This is an example of an unreliable control joint with an unbalanced bead.
This is an example of an unreliable control joint with an overtooled bead.
Dynamic Joint
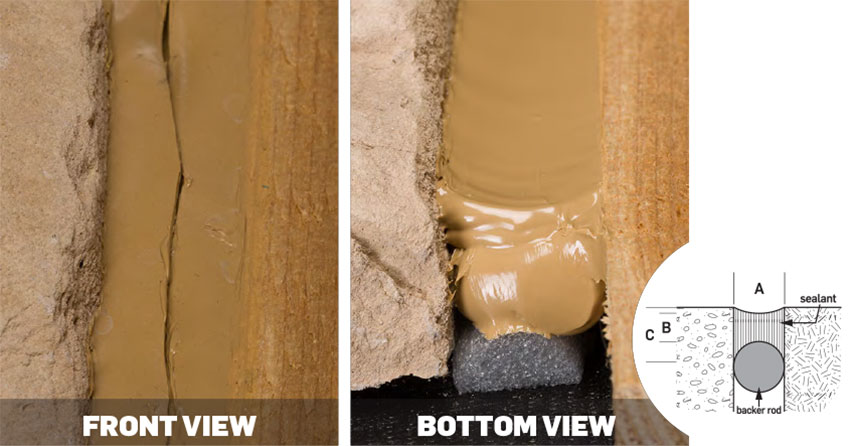
A dynamic joint is formed when sealant joints exhibit a high level of expansion and contraction due to fluctuation within the substrate and the building design. Dimension A must be a maximum width of ⅝ inch. Dimension B must be ⅜ inch in depth, and Dimension C must be a maximum depth of ½ inch. When applying the bead, use a concave shape. Use of a tooling spatula is recommended.
If Dimension C is behind the standard maximum depth, it can debilitate joint movement and cause fissures and fractures. If Dimension B is beyond the standard maximum depth, the sealant will be slow to cure and it may compromise performance. If Dimension B is below the standard depth, excessive sealant may be removed due to over-tooling, and the shallow depth of the sealant will not provide optimum performance.
A dynamic joint is one that exhibits a high level of expansion and contraction due to fluctuation with substrate and building design. This is an example of a dynamic joint sealed using best practices.
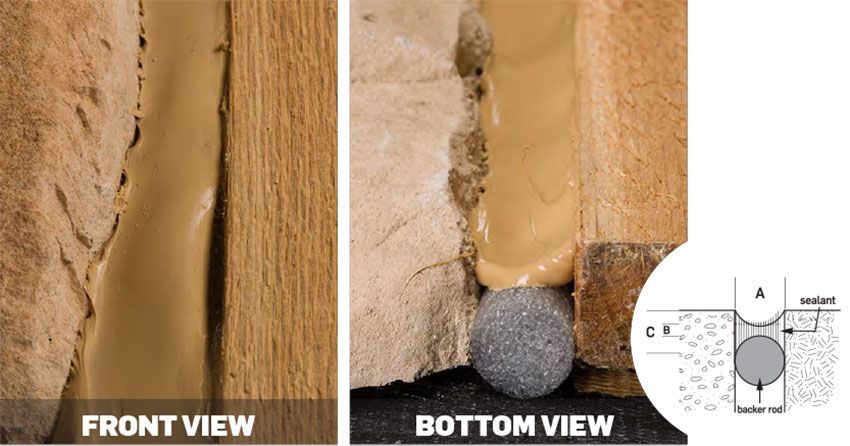
This is an example of an unreliable dynamic joint with an unbalanced bead.
This is an example of an unreliable dynamic joint with an overtooled bead.
The building envelope is the vertical, horizontal, and sloped plane where the interior and the exterior of a building meet. This includes floors, crawl spaces, ceilings, windows, doors, the wall and roof assemblies (consisting of framing and insulation), and areas around plumbing pipes and electrical wiring. The building envelope is a comprehensive system that, when properly designed and installed, protects the building from unwanted water intrusion, controls air movement between conditioned and unconditioned spaces, and greatly improves the energy efficiency of the building.
To properly seal a building envelope, the key is to treat the entire structure and building envelope as if it is one system. If any part of the system is compromised, the seal of the entire structure can deteriorate and cause serious and costly damage.
The building envelope most commonly consists of the following five critical barriers:
- a deflection barrier to deflect water and elements away from the structure;
- a water protection barrier, which is an integrated assembly of materials to seal out and drain water from the building envelope;
- an air barrier to stop the movement of air from going in and out of the structure;
- a vapor retarder to slow the movement of humidity and moisture; and
- a thermal barrier to control the temperature variations between the exterior and interior conditions.
When working as expected, these five components help keep the occupants safe by improving indoor air quality (IAQ) and creating a more durable structure free from the risk of mold and mildew through water intrusion. They also improve the thermal qualities of the building, reducing energy use, which saves money on utility bills and helps conserve resources.
The design and execution of this complex systems approach varies by building, area, and climate. However, one truth is constant across all climate zones and regions—like a chain, a building envelope is only as good as its weakest link. The most vulnerable areas of the building envelope are gaps created where either different building materials meet or where joints or seams are located. For example, where window frames interface with exterior siding or where building wrap overlaps.
According to the California Energy Commission, approximately 40 percent of air that infiltrates into a residential building comes from doors, windows, and plumbing penetrations. Properly sealing the areas around these openings can significantly decrease air and water intrusion.
Other major areas where air infiltration occurs is at floors, walls, and ceilings. According to the same report, approximately 36 percent of air infiltration happens in these locations. Another 16 percent of air infiltration occurs around fireplaces. Five percent of air infiltrates through fans and vents, and 2 percent infiltrates around electrical outlets.
During construction, layers of the walls, floor, and subfloors are sealed when they are installed to protect the interior of the building against the elements. Attics and ceilings are insulated and sealed using various materials to ensure that conditioned air does not escape into the attic or allow unconditioned air to enter through vents or chimney penetrations. Siding also must be adequately sealed so that water doesn’t permeate through, introducing the potential for mold growth and possibly causing walls to rot. While these main structural components of the building are sealed during installation, gaps around these areas can allow air, dust, moisture, and humidity to penetrate the opening, thus allowing contaminants to seep into the walls and floors, creating an unhealthy living space, costly repairs, and strain on the HVAC system.

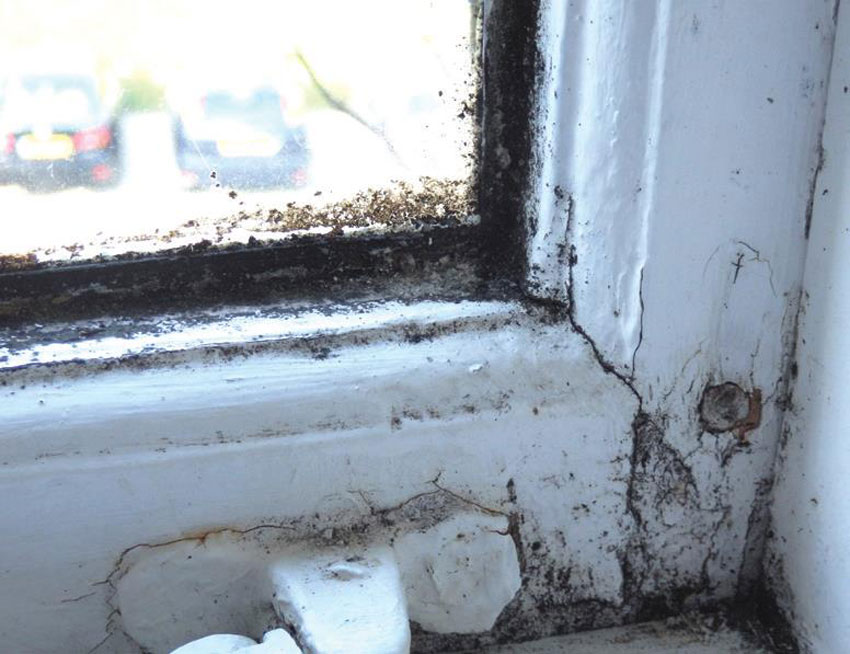
When moisture penetrates the building envelope and gets inside the walls of a building, it may not be noticeable at first. This water intrusion can cause serious wall damage as well as toxic mold and mildew.
One of the greatest potential problems that can arise from a poorly sealed building envelope is water intrusion. Water damage that could have been prevented by properly applying a small amount of quality sealant can cause hundreds, even thousands of dollars in structural repairs if left untreated. This can happen as water penetrates doors and windows, but it also can occur when water penetrates through gaps in the siding and seeps into the walls. It’s important to seal gaps between dissimilar cladding transitions as well as areas around chimneys and air vents. Often attics contain batt insulation that, when it gets damp or wet, can lose its ability to insulate while also becoming a breeding ground for harmful contaminants.
Additionally, a leaky building envelope can increase the amount of energy required by the building’s HVAC system to keep the conditioned air at a comfortable temperature year round. This can lead to increased energy costs and unnecessary wear and tear on the HVAC system.
All of these potential issues can be prevented with the proper application of quality sealants. Since gaps are often between two very different types of building materials, it’s important to make sure the sealant can properly adhere to both materials. For example, a brick wall could have an opening for a wooden door. The gap between the wall and door would need to be sealed with a material that would properly adhere to both building materials as well as maintain its rigidity and flexibility as needed. We’ll discuss these sealant materials, their characteristics, and application techniques throughout this course.
Sealants and the Building Envelope
An effective and necessary way to properly seal the building envelope is through the use of interior and exterior gunnable sealants, window, door, and gap polyurethane spray foam, or sealing tapes and membranes. These sealants can be applied to spaces between walls, windows, roofs, floors, and around plumbing and utility penetrations. They can be used at intersections between different building materials; for example, between a metal pipe and a wooden ceiling. They also can be used outdoors where they are exposed to the elements; for example, around skylights and water spigots. The remainder of this course will focus on the types and classifications of exterior and interior gunnable sealants.
With the advancement of technology and evolving methods of construction, greater demands are placed on sealants these days. Prior to the introduction of central heating and air-conditioning, many windows were designed and built small to prevent cold air from entering the building in winter and to limit solar gain, or sun exposure, in summer. Today, structures are built with more and larger windows, in part thanks to effective HVAC systems but also due to improved weatherproofing technologies.
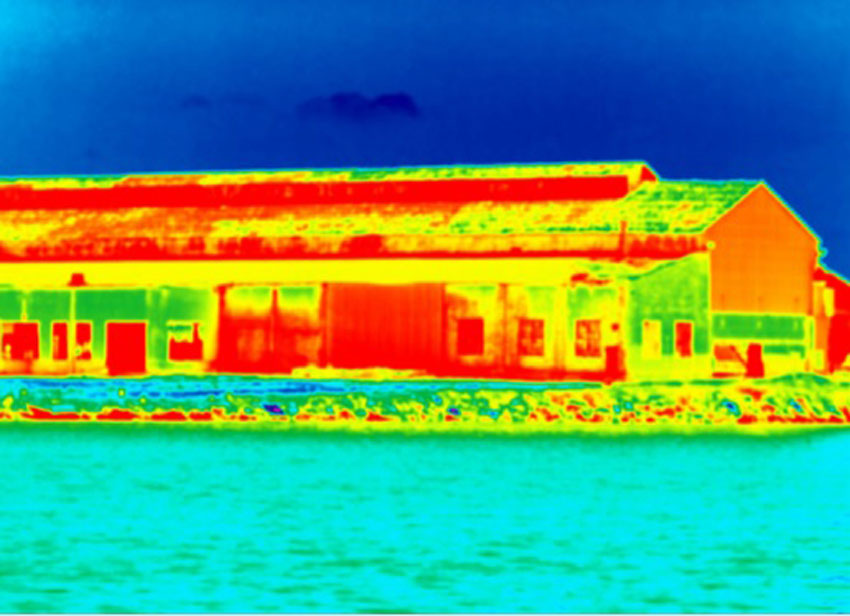
The average home can reduce air infiltration significantly with the windows, doors, and siding properly installed and sealed. This image shows just how much heat is being lost from this poorly sealed building.
While HVAC system technology has improved, these systems still are vulnerable to unnecessary wear and tear if there are gaps in the building envelope that allow unconditioned air to get into the conditioned space. In new construction, HVAC systems are selected based on the size of the building, climate, number of windows and openings, sun exposure, and more. Furnaces and cooling systems are selected and installed to perform at a certain level with the expectation that the building envelope will be sealed. If areas around the windows, doors, chimneys, skylights, and other penetrations are not sealed—allowing unacceptable amounts of air to flow in and out of the building—the HVAC system will need to work harder to maintain the expected level of comfort inside the building. Consequences of a poorly sealed building envelope include a loss of energy efficiency and increased energy costs.

Source: U.S. Department of Energy
The HERS index is a measurement of a home’s energy efficiency. The HERS Index Score provides lots on information about the energy efficiency of a home.
To prevent these costly repairs, technology and stricter regulations have led to evolving methods of construction. Today, building codes are much stricter and contain much tighter building envelope requirements than in years past. The Home Energy Rating System (HERS) Index is nationally recognized as a standard for inspecting and calculating a home’s energy performance. Homes are rated and scored based on energy performance. New construction projects often have better HERS scores than older buildings thanks to better technology and building materials. There have also been improvements made to building envelope sealants and how building professionals and homeowners can determine where to make improvements and seal gaps that allow air and water intrusion. New materials now last longer and are more durable against cracking, chalking, and aging. We’ll discuss sealant standards and classifications in more detail later in this course.
Once a building is sealed, it is possible to determine where air is infiltrating the building envelope. Most gaps are too small to notice, while other penetrations may be easy to detect, such as the draft felt from under a door jamb or the curtains moving in the breeze when the windows are closed. The first step is to do a visual inspection by walking around the exterior of the structure, inspecting all areas where two different building materials meet. This includes but is not limited to areas around all exterior corners, where siding and chimneys meet, around spigots, where siding and brick meet, and around windows and doors. Inside the building check areas around electrical outlets, electrical and gas entry points, attic hatches, vents, fans, wall- or window-mounted air-conditioners, baseboards, switch plates, door and window frames, and entry/exit points for dryer vents. Discolored or dirty surfaces, especially around insulation, may be signs of gaps and open spaces. If checking for gaps during the day, look for areas where light infiltrates an area. If checking for gaps in the dark, check for light infiltration using a flashlight.
In some cases, it may be worth hiring an energy professional to perform a blower door test to detect air intrusion throughout the building.
Any gaps should be sealed to prevent unwanted air and water intrusion. Generally speaking, interior sealants should be used for gaps that are less than ¼ inch wide. Exterior sealants can be used in gaps that are ¼ inch to 1 inch.
Classifications and Sealant Attributes
To better understand how to evaluate and specify the appropriate sealant, let’s take a look at the basic attributes, characteristics, and classifications of sealant products.
Attributes of Sealant
The three main attributes of sealants include flexibility, durability, and adhesion. Flexibility refers to the hardness and joint movement of the sealant. Durability refers to the sealant’s ability to withstand heat, aging and discoloration, cracking, and chalking. Adhesion refers to how well the sealant adheres or sticks to the building materials. To allow for good adhesion, areas must be cleaned prior to applying caulk or sealant. Remove any old sealant, caulk, or paint using a putty knife, screwdriver, solvent, and brush. Most sealants require the area to be completely dry for best adhesion results and to avoid moisture being sealed into the space. The material must have adequate curing conditions and be left to dry for the required time. Not properly following the manufacturer’s instructions can cause a sealant to crack or age much faster. Some sealants dry clear, while others are colored to match adjoining building materials.

Before applying sealants, all surfaces should be clean, dry, and free of all contaminants, such as old caulk, dust, grease, and any other materials that could hinder adhesion.
The combination of three attributes—flexibility, durability, and adhesion—is what makes sealants so effective in sealing the building envelope. These attributes work in unison to make the sealant strong and effective.
There are multiple kinds of joints that can be found between building materials and many different types of building materials with varying adhesive qualities. The four main joint types are fillet joint, control joint, dynamic joint, and bedding joint. We’ll discuss the proper way to fill each of these a bit later in the course. But first, it’s important to determine what kind of material should be used when sealing openings and joints.
Classification Standards
To help builders and homeowners determine which sealants are best for a given application, industry associations provide performance standards to classify and rate sealants. Classifications are driven by ASTM C920, which is the Standard Specification for Elastomeric Joint Sealants that are cured single- or multi-component cold-applied elastomeric sealants. Using this standard, sealants are tested in the following categories: staining and color change of single- or multi-component joint sealants, flow properties, indentation hardness, tack-free time, adhesion and cohesion of sealants under cyclic movement, effects of accelerated weathering, adhesion and peel, extrusion rate, effects of heat aging, weight loss, cracking, chalking, and durability of sealants after being immersed in liquid.
The ability to withstand weathering, heat aging, cracking, and chalking are measures of performance of the sealant when exposed to the elements. Measurements around staining and color change are performed on light, porous materials. When selecting a sealant, it’s best to pick one that meets or exceeds all categories of the standards.
Following are the specifics on how the ASTM C920 standard classifies sealants by type, use, grade, and class.
Type
The two types of sealants are Type S (single component) and Type M (multi-component). Single-component sealants are easy to use, require no mixing, and less labor. However, they have longer cure times and the materials are more expensive. Multi-component sealants contain two or more components that are chemically cured. They have a faster cure time and a more consistent performance, but mixing the components requires extra labor and can create quality control issues.
Use
The ASTM C920 standard also rates items based on their usage related to exposure and their usage related to material. T stands for “traffic” and is given to sealants that are used in joints that experience vehicular or pedestrian traffic such as door jams. NT stands for “non-traffic” and is used in horizontal joints that are not exposed to traffic, and for joints in walls, windows, etc., I stands for “immersible” and is given to sealants that can be used in areas that may be submersed in water.
The ratings based on usage in relation to material are as follows: M is for sealants that can be used in contact with mortar. G is glass. A is for aluminum. O is for sealants that can be used in contact with all materials other than mortar, glass, and aluminum. Sealants can have multiple materials listed in the rating.
Grade
The ASTM C920 standard grades consist of Grade P for pourable or self-leveling sealants, and Grade NS for no-sag sealants. Grade P sealants are used for horizontal applications and generally contain sealants for traffic use. Grade NS sealants are used for both traffic and non-traffic conditions, mainly for vertical joints and sloping horizontal joints.
Class
After being tested using the ASTM C920 standard, sealants are classed in one of five categories: ASTM Class 12, ASTM Class 25, ASTM Class 35, ASTM Class 50, and ASTM Class 100. As the classification number increases, the movement capability of the sealant also increases.
Class 12 sealants are capable of handling movement with either contraction or expansion of 12.5 percent of the original joint width. Class 12 sealants are great for joints with little to no movement.
Class 25 sealants can handle contraction or expansion movement up to 25 percent of the original joint width and are designed for use with joints that have a moderate amount of movement.
Class 35 sealants can handle contraction or expansion movement up to 35 percent of the original joint width and are designed for use with joints that have a moderate amount of movement.
Class 50 sealants can handle contraction or expansion movement up to 50 percent of the original joint width and are designed for use with joints that have a moderate amount of movement, typically in building facade systems and glazing applications.
Class 50/100 sealants can handle contraction movement up to 50 percent and expansion up to 100 percent. These sealants are designed for a lot of movement and are used in building facade systems in areas that experience high winds or seismic movements.
Example
All of these characteristics and attributes can be included in a product’s rating. Here’s an example of how an ASTM C920 rating would appear on a sealant spec sheet:
Type, S Grade NS, Class 50, Use, NT, M, A, and O. This means that the sealant is single component; a no-sag sealant; has 50 percent expansion/compression; can be used in non-traffic applications; and works with mortar, aluminum, and other materials
Sealants in the Field
As mentioned previously, sealants are a vital part of any building’s construction. They help protect the building envelope from unwanted air and water intrusion. Because the building envelope is a system, it’s best to make sure the whole system is sealed properly during construction. Construction of a building typically starts with the foundation, the floor joists, and a subfloor. High-quality adhesives provide exceptional seals between building materials that make up the entire exterior of the building. This includes subfloors and baseboards, siding and brick walls, and more. While walls and floors are solid structures, the areas where they meet create gaps that must be filled.
While the technology surrounding sealants has been slow to change over the years, modern advances in technology have allowed engineers and scientists to create new sealants that reduce shrinkage, are more UV resistant, and also are more resistant to dirt and dust collection. These new and improved building materials should be used in new construction, and they also can be used in building repairs to ensure the most effective and long-lasting seal in the building envelope.
When applying approved sealants in the field, it’s important to properly prep the surface area. The area should be clean, dry, and free of all contaminants, including dust, dirt, old caulking or sealants, paint, and any other materials that could prevent the sealant from adhering to the building materials.
To determine what types of materials the sealant can adhere to, refer to the ASTM C920 classification. Each material should have a rating and classification that clearly states what materials are ideal for the sealant. Matching the right sealant to the right joint is the key to ensuring the building is properly sealed to create a durable and sustainable structure. To better understand this, let’s explore the different types of joints in more detail.
Fillet Joint
A fillet joint is formed when two surfaces come together to form a right angle. The dimensions of A and B must be a minimum of ¼ inch. The sealant bead must be tooled to ensure contact to both substrates during application with a nozzle or spatula. Dimension C must be a minimum of ⅜ inch. If either dimension A or B is less than ¼ inch, the sealant’s adhesion performance and ability to sustain joint movement capability will be compromised. The reduced sealant volume in the space will diminish the sealant’s ability to accommodate joint movement.
If dimension C is under the standard ⅜ inch minimum, overtooling could potentially reduce the sealant volume necessary to accommodate joint movement.
A fillet joint is formed when two surfaces come together to form a right angle. The sealant used to join these two surfaces is triangular in shape. This is an example of a fillet joint sealed using best practices.
This is an example of an unreliable fillet joint with an unbalanced bead.
This is an example of an unreliable fillet joint with an overtooled bead.
Control Joint
A control joint is formed when two similar or dissimilar materials meet or when substrates do not form a right angle. This joint will require both a backer rod and sealant for a proper application. Dimension A must be a minimum of ⅜ inch or a maximum of ⅝ inch. Dimension B must be a minimum of ¼ inch deep. Dimension C can be a maximum of ½ inch. Inject the bead as a concave shape. Use a tooling spatula that is sized to the joint width.
If Dimension C is beyond standard maximum depth, then the joint movement will be weakened and may cause fissures and fractures. If Dimension B is beyond the standard maximum depth, the sealant will be slow to cure and may compromise sealant performance. If Dimension B is below the standard depth, excessive sealant may be removed due to over-tooling, and the sealant will not provide optimum performance.
A control joint is formed when two similar or dissimilar materials meet or when substrates do not form a right angle. This joint will require both a backer rod and sealant for proper application. This is an example of a control joint sealed using best practices.
This is an example of an unreliable control joint with an unbalanced bead.
This is an example of an unreliable control joint with an overtooled bead.
Dynamic Joint
A dynamic joint is formed when sealant joints exhibit a high level of expansion and contraction due to fluctuation within the substrate and the building design. Dimension A must be a maximum width of ⅝ inch. Dimension B must be ⅜ inch in depth, and Dimension C must be a maximum depth of ½ inch. When applying the bead, use a concave shape. Use of a tooling spatula is recommended.
If Dimension C is behind the standard maximum depth, it can debilitate joint movement and cause fissures and fractures. If Dimension B is beyond the standard maximum depth, the sealant will be slow to cure and it may compromise performance. If Dimension B is below the standard depth, excessive sealant may be removed due to over-tooling, and the shallow depth of the sealant will not provide optimum performance.
A dynamic joint is one that exhibits a high level of expansion and contraction due to fluctuation with substrate and building design. This is an example of a dynamic joint sealed using best practices.
This is an example of an unreliable dynamic joint with an unbalanced bead.
This is an example of an unreliable dynamic joint with an overtooled bead.
Bedding Joint
A bedding joint is a type of sealing joint that is parallel between two planes to bond and seal both surfaces together. Dimension A must be a ⅜ inch rounded sealant bead. Apply the sealant to the substrate and minimize pressure when applying the sealant to maintain a rounded bead. Another acceptable way to apply the bedding bead is by compressing sealant between both substrates. Avoid excessive substrate movement after compression. Movement of the substrate can smear the sealant and break down the sealant’s capacity to maintain a gasket seal. This leaves an insufficient amount of sealant to accommodate joint movement and allows air and moisture to penetrate the gap.
When selecting a sealant to be used in the joints listed above, it’s important to check the ASTM C920 specifications and classifications to see which sealants best fit your application. Make sure the sealant will adhere to all of the types of building materials around the gap. Also ensure that the classification allows for the proper expansion and compression required to fill the space and the joint type. When the appropriate sealant has been applied, all that’s left is to let the sealant cure and dry. Check for any shrinkage or cracking while the sealant cures.
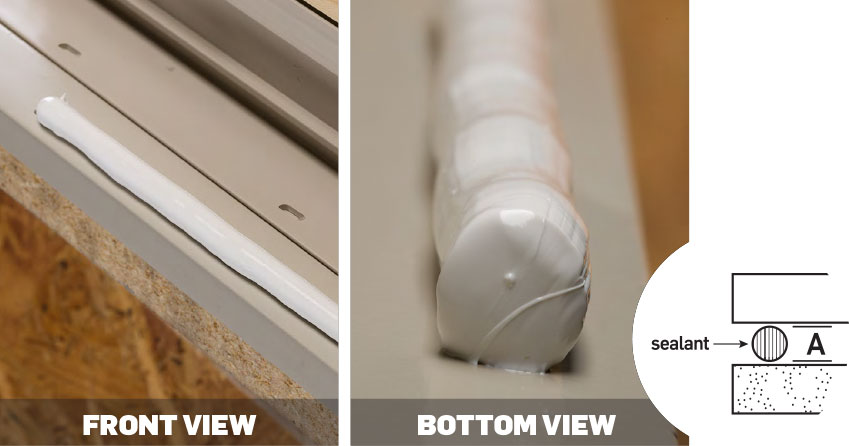
A bedding joint is a type of sealant joint that is parallel between two planes to bond and seal both surfaces together. This is an example of a bedding joint sealed using best practices.
This is an example of a bedding joint sealed using best practices.
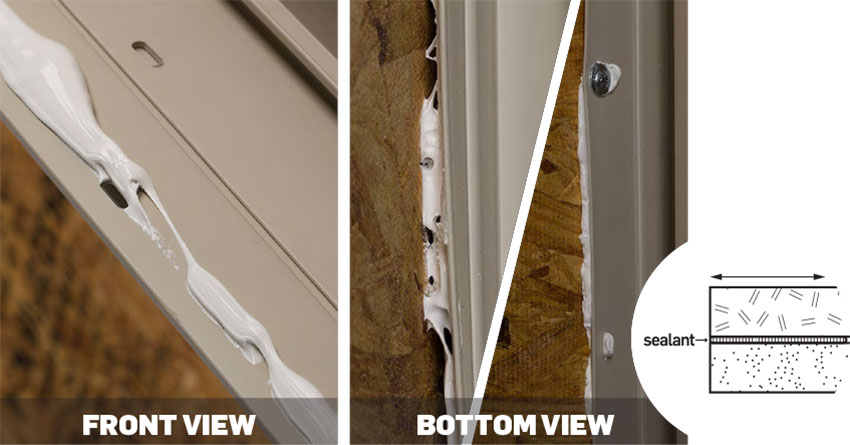
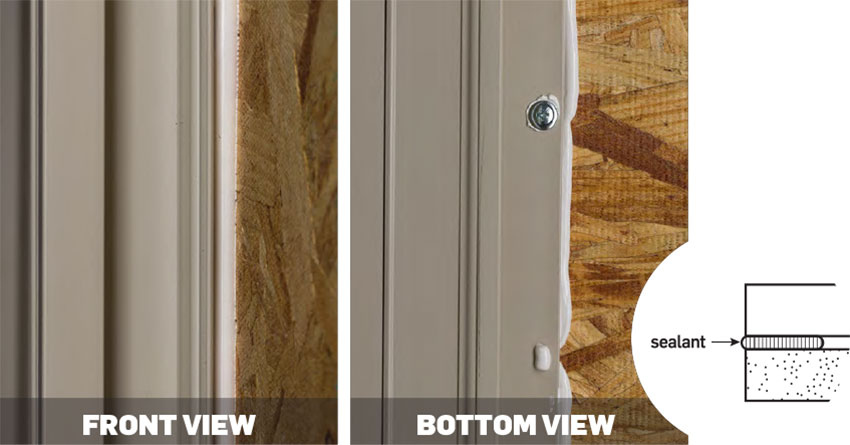
This is an example of an unreliable bedding bead because the substrate movement will smear the sealant, breaking down the capacity to maintain the gasket seal.
Conclusion
Sealing the building envelope with high-quality sealants can not only provide a more comfortable environment inside, but it can also make the building more energy efficient and the structure more stable. Thanks to industry standards and technological advances, quality sealants are not only available on the market but easy to identify and apply. Throughout this course, you’ve learned how to identify gaps in the building envelope, select the proper sealant based on its materials, classifications, usage, and properties, and effectively apply it to protect the building from the elements.
Resources
Article:
Majka, Paul. “A Systems Approach to the Building Envelope.” Builder and Developer. Web. 10 Nov. 2017.
U.S. Department of Energy – Codes:
Air Leakage Guide. Building Technologies Program. U.S. Department of Energy. Sept. 2011. Web. 10 Nov. 2017.
Case study:
“SoCal weather: Mother Nature’s velvet fist.” OSI. Web. 10 Nov. 2017.
Software tools for windows and building envelope:
“Windows and Building Envelope.” U.S. Department of Energy. Web. 10 Nov. 2017.
Identifying and air sealing the building envelope PPT:
“Identifying and Air Sealing the Building Envelope.” U.S. Department of Energy. July 2012. Web. 10 Nov. 2017.
Andrew A. Hunt is vice president of Confluence Communications and has been a writer and consultant in the green building and building science industry for over a decade. He has authored more than 100 continuing education and technical publications as part of a nationwide practice. confluencec.com
 |
Henkel’s Adhesive Technologies group is a global leader in adhesives, sealants, and functional coatings with brands including Loctite® and OSI™. OSI™ stands for innovation, not only in products but in the total process that ensures that building professionals have the right products, the right application, and the right methods to complete their jobs. www.ositough.com |