This CE Center article is no longer eligible for receiving credits.
Selecting a Mounting System
In addition to the LED display itself, it is essential to select a high-quality mounting system, as this factors significantly into the appearance of the display. Ideally, the mount must be able to make up for inconsistencies in the flatness of the wall surface.
“The wall you are attaching to is never that precise, so you have to have a system that is able to mount to that non-flat surface and create a perfectly flat mounting surface for the LED cabinets themselves,” explains Grant Wylie, director of AV product management, Draper Inc., Spiceland, Indiana.
Consequently, the highest-quality mounts offer precision via Z adjustment for the structure, plus X, Y, and Z adjustments for every LED cabinet in the display. This then enables the face of an LED video wall to be perfectly flat all the way across, as minute adjustments can be made at the cabinet level. If the wall is not flat, seams in the LED will show, and the video wall will not appear seamless.
Oftentimes, engineers will mention adjust-ability of the X, Y and Z axis. This is in reference to the placement of the LED cabinet on the mounting structure. Horizontal (left right) adjustment would be the X axis of adjustment, vertical or height adjustment would be the Y axis of adjustment and in and out would be the z-axis of adjustment.
A tolerance of 1⁄10 the pixel pitch should be maintained while assembling an LED display in order for the image to remain seamless. So if the pixel pitch is 1.2 millimeters from the center of one LED to the next, then the attachment needs to be able to maintain within 0.12 millimeter of tolerance in all axes from one cabinet to the next. This means that there needs to be some means to adjust every LED cabinet independently, in and out, on the mount so that the front face has that precision.
In order to fully develop, manufacture, and install an LED display system, a high level of planning is required. Toward this end, several questions need to be addressed, such as the following:
- Are lifts required for installation?
- Where is the access to the displays?
- How will the display be mounted and installed? On a wall or a floor stand?
- If the wall is built, are architectural drawings available?
- Is a bezel or shroud for the sides of the display required?
- Will the display be recessed into a wall?
- Where will the controllers be located in relation to the display?
- Is it close enough to run CAT, or does the contractor/vendor need to run fiber?
- Is a rack needed for the LED hardware?
- Is a light sensor/brightness sensor required?
- Is remote power control or a power conditioner needed?
- Is there three-phase power within 50 feet of the display location?
- Is power redundancy required?
- If indoors, has the HVAC been sized to accommodate the added BTUs the display will introduce into the environment?
Photo: Matt Oberer
Precise design and alignment are key components of a successful LED installation. Precision is required to preserve the LED’s seamless capabilities, resulting in a finished product that best represents the original design intent.
Curved video walls can be created using flat LED cabinets installed at an angle or faceted to create a display face in the shape of an arc. The main difference between a faceted curve display and a flat display is that each column of LED cabinets is separate from the next and all alignment between them is set and held by the mounting structure.
In contrast, flat LED cabinets have alignment features that help to provide perfect alignment from cabinet to cabinet; however, these alignment features cannot be used when the LED cabinets are placed at an angle next to each other.
Mounting the Display
When attaching an LED mounting structure to a building, the engineered connection should be specific to the material that the mounting structure is attaching to, including wood studs, plywood, cinder block, concrete, and iron.
One application that does require additional work is a metal studded wall. Typically not designed to support an external load, these walls are often used in office retrofits where the existing walls are ripped out and a metal stud floating wall, not secured to the ceiling structure, is built. Consequently, any kind of counterweight would topple the wall over. To prevent this, the wall needs to be reinforced with bracing and plywood on the exterior surface.
If for some reason there are issues with attaching to a wall, mounting to the floor can be more cost-effective than reinforcing the wall. One type of floor mount is a structure that stands on its own, for example, in a hotel lobby. With a floor-mounted structure, the four key elements that must be determined are the floor type, the floor structure that will support the weight, how high the display will be off the floor, and the acceptable depth of the structure.
In attaching an LED display to the ceiling, if it is an existing build, the ceiling structure should be reviewed to make sure it can adequately support the weight. The display will then typically utilize a truss system to attach to the ceiling. Alternatively, it can be suspended with a rigging system. In either case, it is important that the support has backup safety measures in place.
For both wall and standing structures, there are additional considerations if the video wall is curved. A curved wall that is concave provides more depth and immersion, whereas a convex curved wall can wrap around a column. Essentially, a curved wall lets the design fit the space.
Curved walls can be faceted or smooth. A faceted wall uses flat LED cabinets to create a curve with brackets. The faceted curves require extremely precise structure and installation. That said, faceted walls are less expensive, easier to install, and allow for finer pixel pitches compared to custom-manufactured smooth-curved LED displays. However, they are not good for tight radii.
Smooth-curved walls are more aesthetically pleasing and present less drastic color shift from cabinet to cabinet. At the same time, a smooth-curved display does not support the finest pixel pitches, and installation can be more challenging. Smooth-curved LED displays can be either concave or convex.
It is important to point out that all LED cabinets have different mounting hole locations and sizes. Unlike LCD, there are no VESA mounting interface standards for LED mounting hole layout. Consequently, each LED manufacturer and each LED cabinet series has unique cabinet dimensions and mounting bolt-hole placement.
This essentially means that every display is custom manufactured, which means that the mounts must be custom designed for every LED cabinet and its attachment points. Some manufacturers have created mounting systems for specific LED cabinets, and some offer a mount that can scale up and down in size, and support any configurable size and aspect ratio.
As noted, an LED wall mount serves as the interface between a usually inconsistent wall surface and a very flat surface to which the LED cabinets can be attached. With precise X, Y, and Z positioning, the LED display presents a consistent, seamless look.
While a high level of precision is required of any LED video wall structure, this is especially true of NPP displays. The very tight pixel spacings—2.5 millimeters and below—create a detailed and crisp visual, so tight tolerances on the structure are imperative. LED video walls, by nature, are attention-grabbing displays and are frequently used to present some stunning content. Consequently, it is important that the structure not detract from the overall impression. To hide the visible edges of the structure, an attractive trim is required. Some manufacturers offer a black or matte black trim surrounding the LED cabinets to help the mount blend in and appear as minimalized as possible. If the design aesthetic is to achieve an industrial or mechanical look by showing the structure, then it should have an attractive finish.
Another issue is corrosion prevention/protection, even if for aesthetic reasons. Rust spots are very undesirable and could create a false impression that the structure is weak. To prevent this aluminum, galvanized coatings and properly applied paint or powder coat finishes can be used.
Yet another issue is determining if the LED display is front or rear serviceable. With the former, access is much easier, as technicians can go in, remove the LED modules on the front face of the display, access all of the components inside, and service them. In addition, the display can be installed flat to the wall.
While the vast majority of products are front serviceable, several manufacturers still produce rear serviceable systems. Because the LED display needs to project out from the wall to allow for access, this counterbalances the weight. Consequently, architects need to verify that the wall could support the structural load with the display extended out at its farthest distance from the wall.
When installing LED displays, the size of the structural components can potentially pose a challenge to transporting the components to the installation location. For example, displays are frequently 20 to 30 feet wide by 20 to 30 feet tall, however components used to build the display oftentimes need to be able to fit through smaller access points like a service elevator. Consequently, to enable transport of smaller sections, architects should verify that the components can quickly and easily attach together in the final installation location..
As part of the project delivery process, a detailed and outlined process of how the LED cabinets and mounting system will be transported and assembled together is an encouraged best practice. This includes the order of operation for building the system, installing the LED cabinets and the mount, and completing the finish work around the outside of the display. The installation location should be clearly vetted and marked, and during the installation, technicians should make sure that everything is square, level, plumb, and aligned properly. This entire process should be chronologically outlined and precise.
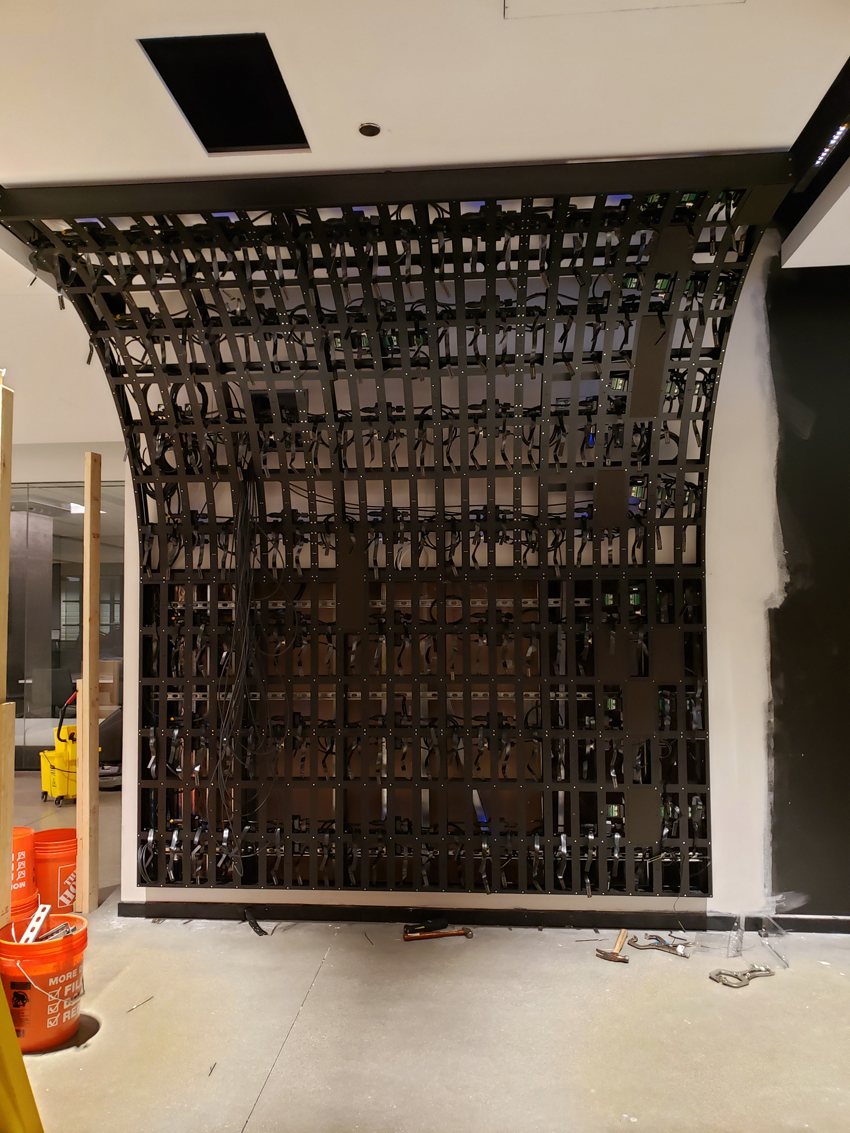
Photo courtesy of Draper Inc.
LED technology can create unique spaces and experiences. It is important that the supporting structure have the same flexibility and modularity to take advantage of LED’s capabilities.
Versatile, energy efficient, and attention grabbing, light-emitting diode (LED) displays are growing in popularity as an effective signage option in a wide variety of applications. An emerging technology, tens of thousands of LEDs combine to present a bright, beautiful, eye-catching display in pictures, videos, and other formats.
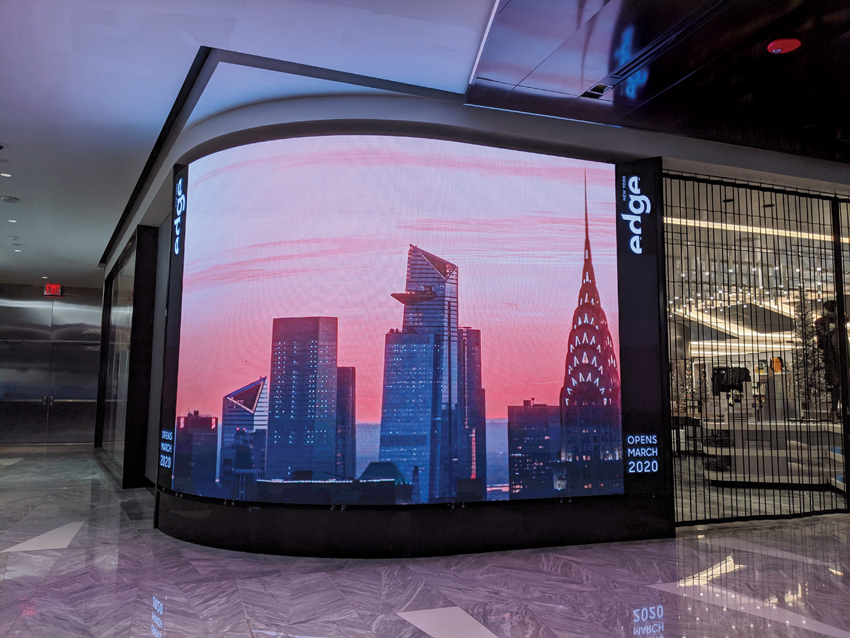
Photo courtesy of Draper Inc.
The versatility of LED means it can work in nearly any space—inside or out. Uses include wayfinding and advertising.
From advertising the latest sales to restaurant menus to corporate branding to public information messaging, LED displays are an effective way to communicate key information.
To optimally design, size, and mount these displays, an in-depth understanding of LED display technology, mounting systems, installation parameters, and project planning is essential. Further, the LED display will only show the highest visual quality if it is mounted with a high quality structure capable of offering very high level of precision while also providing micro adjustments for installation alignment.
Comparing LED to LCD and Projection
In analyzing LED, the technology offers a number of advantages in the realm of lifespan, brightness, power use, and configurability.
For starters, LED displays are capable of operating 80,000 to 100,000 hours before reaching their half-life. In comparison, the half-life of liquid crystal display (LCD) is 50,000 hours, and with laser projection, it is 20,000 hours.
Putting this into perspective, an LCD video wall lasts approximately five years and needs to be serviced annually to calibrate color and brightness, whereas an LED display can last for approximately 10 years and can be re-calibrated at the pixel level, helping the display to look like new its entire life. Consequently, when calculating the initial setup, lifespan, and maintenance, any LCD/LED cost gap quickly closes.
In addition to longevity, LED technology has the ability to be exceptionally bright, with levels ranging between 800 and 10,000 nits. Nits is the measured intensity of visual light emitted from the display, with one nit equaling one candela per square meter. In contrast, LCD video wall displays range from 350 nits to 700 nits, and projection offers a range from 1,000 to 40,000 lumens of projected light onto the screen.
These brighter outputs allow LED displays to compete with direct sunlight, which is a noted advantage for outdoor and window displays.
“The most obvious advantage with direct-view LED is the largest and brightest video images without the noticeable seams that you see with LCD video walls and with contrast ratios that you just cannot achieve with projectors,” states Scott Simpson, CTS-D, DMC-D-4K, audiovisual consultant, associate, PAE, Portland, Oregon.
Contrast ratio is key to LED performance. Contrast ratio is usually measured in a dark room. A projector and screen system can have a very high contrast ratio; however as ambient light is added to the environment, the contrast ratio goes down due to the reflection of the ambient light on the screen. Eventually, the contrast ratio winds up being so low that the image can no longer be seen. The ambient light on the screen is brighter than the light from the projector.
The design of most modern LED displays that utilize SMD LED solutions reduces the amount of reflective ambient light from the face of the display. The SMD which houses the RGB LED's typically has a dark gray face with a matte finish to reduce reflection and remain dark in color when the LED is in the off state. Additionally, the space between the LEDs is typically filled with a black sub-straight that also has a mat finish. The black color helps to improve contrast in bright ambient conditions and the matte finish helps to reduce reflections from the surface.
Additionally, LED displays specifically designed for outdoor usage in direct sunlight have a substrate surrounding the LEDs that incorporate small shading elements to prevent sunlight from shining on the LED and reflecting back to the viewer.
To better qualify a display’s brightness, it is important to understand emissive, transmissive, and reflective technologies. LED displays emit light directly from the display. This emitted light helps create sharp and high contrast visual appearance because the LED’s light can be easily calibrated to be brighter than surrounding ambient light and the light emitted is not diffused in any way.
LCD displays use a transmissive display technology, which means light is emitted from a backlight and transmitted through the LCD layer to create a visible image. The LCD layer diffuses the light which results in a much more subtle appearance and lower contrast.
Projection uses a reflective technology that does not perform well in bright ambient light conditions. This is due to the reflection of the surrounding ambient light on the surface of the screen, which washes out the image and results in very poor contrast.
As opposed to LED displays, which can selectively brighten or darken each pixel, , LCD and projection technologies historically use a light source projecting a constant brightness over the entire active image area, although some LCDs have a dynamic backlight that works similarly to an LED display which helps reduce power consumption. Because of this, the power consumption will be fairly constant regardless of the content being shown. Further, commercial applications are typically set at the brightest available setting, which also consumes the most power.
Because LED is an emissive technology where light is emitted directly from each LED or pixel, the power consumption is directly related to the brightness of the content shown on each pixel. So, with proper content creation, focusing on darker backgrounds with higher contrast, an LED display can yield lower power consumption.
In typical indoor applications, LEDs are generally set to a level that is below 50 percent of the display’s capable brightness. If content is created with power saving in mind, and an ambient light sensor is employed to manage the brightness throughout the day and night, the overall power consumption will be even lower, as the black areas will remain unpowered, and the overall display will dim and brighten as ambient conditions allow.
Regarding configurability, LED offers a high level of flexibility since the video walls do not need to fit within a certain standard aspect ratio, such as 4:3 or 16:9. The LED display uses LED panels which are often a quarter of the size or smaller of a traditional 55-inch LCD video wall and allow for a modular display configuration, so arrays can be 2x2, 2x4, 2x8, or any number of configurations. The LED video wall can also be quite large and still deliver a high-quality image.
Another advantage is the way in which the LED cabinet are designed to fit together seamlessly. This allows for content to be displayed without any visual interruptions of seams between displays, as is seen in LCD walls. While both LED and LCD can display the same content from multiple sources, the seams in an LCD video wall can interrupt or cover over text in the content.
Whereas LED has traditionally been a costly technology, this has been changing. In recent years, a narrow pixel pitch (NPP) LED display would have cost the end user roughly five times or more than LCD or projection for the same size video wall display. But today, the price gap is getting closer to equal.
In making a cost comparison, this depends on the pixel pitch of the LED display, which is the spacing of the pixels. LCDs and projectors typically have a fixed pixel quantity of roughly 2 million or 8 million depending on full high-definition or 4K, which is a horizontal display resolution of about 4,000 pixels, so the cost per pixel is not directly related to the number of pixels. An LED display has a varying quantity of LEDs (pixels) based on the total size of the display and the pixel pitch, which is defined as the space between pixels. If a display has a pixel pitch of 1.9 millimeters as opposed to another display of the same size using a 2.5-millimeter pixel pitch, the 2.5-millimeter display will have roughly 24 percent fewer LEDs and cost roughly 24 percent less even though the display size is the same.
Overall, the total cost of LED ownership is typically lower because LEDs last much longer.
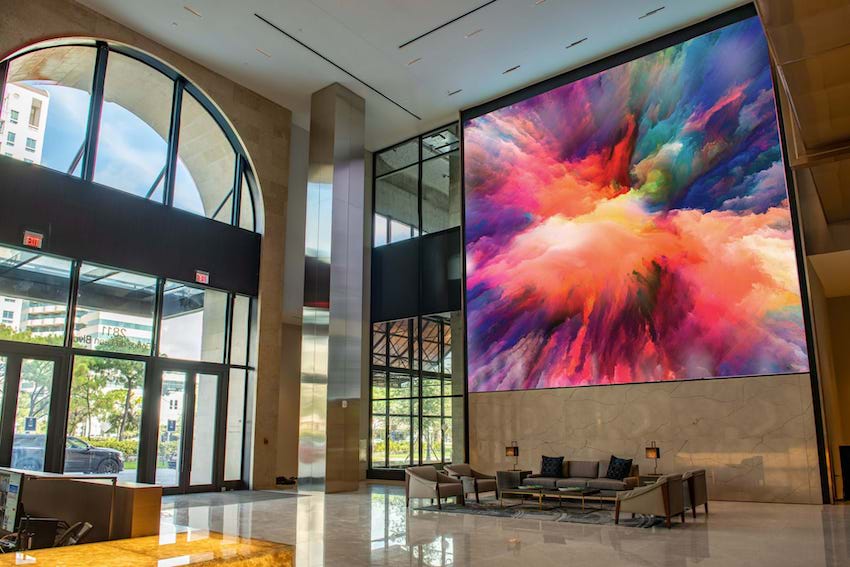
Photo courtesy of Courtesy of Planar
The Plaza Coral Gables - Coral Gables, FL., DirectLight X LED - 26 x 26 Video Wall with custom Draper support structure, Developer: Agave Ponce, LLC, Integrator & Installer: Pro Sound & Video
LED Evolution and Applications
Offering some historical background on the technology, the first visible LED was invented in 1962, and the first LED display was created in 1968. However, video applications only emerged in the 1990s. In 1995, a 1,500-foot-long, 90-feet-high LED video display was erected at The Fremont Street Experience in Las Vegas. And in 1997, a portable video display was designed for a U2 Concert Tour.
Prior to this, the earlier displays used low-resolution, single-color LEDs that were only capable of displaying words. With the emergence of full-color (most notably blue) LEDs, it became possible to show pictures, animations, and video clips in full color.
Today, 4K displays with a horizontal pixel count of 3,840 are quickly becoming the standard, with 8K and beyond also achievable.
LED technology has already overtaken LCD displays in the market.
By leveraging quality, brightness, and efficiencies, LED displays have found their place in numerous applications, including retail, hospitality, entertainment, stadiums, corporate, banking, health care, education, and transportation.
As the most popular application, the retail sector has embraced LED displays for digital advertisements, promoting products and services, delivering customized content, increasing new product visibility, providing wayfinding, and driving business to certain areas. Some retailers are turning their store’s interior walls or exterior facade into tools for messaging and grabbing attention.
The next most common application, hospitality, includes hotels, motels, restaurants, cafes, and bars. These establishments are utilizing LED display solutions for advertisements, menus, food displays, and entertainment.
Anticipated to be the fastest-growing application, transportation facilities are actively displaying advertisements and announcements on LED displays in airports, railway stations, metro stations, and bus stands. Further, the displays are appearing on buses, cabs, trains, and trams.
In the corporate realm, LED signs provide wayfinding for visitors, deliver important information to employees, and broadcast a company’s corporate message and philosophy. The displays can be found in assembly areas, waiting areas, high-traffic atria, meeting rooms and training centers.
In the education sector, large-scale information displays are used in media centers, student unions, and sports facilities. Some schools have leveraged dynamic functionality via interactive elements that can be accessed by touch or a motion response.
Houses of worship are another well-known application. On a simple scale, lyrics and pre-service announcements can be displayed in sanctuaries, entry areas, multipurpose facilities, or as exterior signage. On a more advanced level, LED can be applied to create dynamic, inspiring presentations or create a live concert environment.
In production environments, designers are using LED video walls to create virtual sets that can be quickly and easily changed. For live broadcast, the introduction of LED walls gives the production a more dynamic feel and allows hosts to share more information through the use of graphics.
At government and Department of Defense facilities, LED displays are delivering fine pixel pitch, wide viewing angles, seamless displays, superior picture quality, and fast refresh rates that modern command and control centers require for a more immersive experience.
Additionally, one key aspect LED offers over other technologies is the brightness factor allows for command and control center lights to remain on. Monitoring staff no longer must sit in a dark room to effectively view displays. This helps reduce eye strain and fatigue and increases safety when personnel move about.
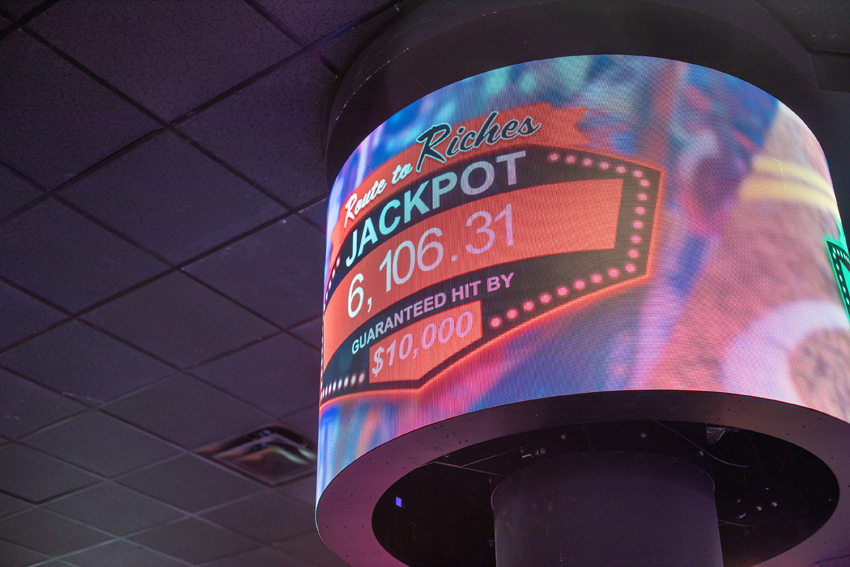
Photo: Matt Oberer
As pictured here at the Route 66 Casino in Albuquerque, New Mexico, an advantage of LED technology over LCD is that there are no seams, even on a curved screen, so there is no visual interruption to information or flow.
Delving into the Technology
A light-emitting diode is an electronic semiconductor that converts electric energy into visible light. The chemical compound used within an LED determines its color, brightness, and power efficiency.
There are essentially three types of LED packages: DIP, SMD, and COB. Dual in-line package (DIP), the oldest of the technologies, has a higher optical decay, and lower color rendering index and efficacy than the later surface-mount device (SMD) variety. However, DIP LED is still used in certain applications where it remains better suited, such as outdoor displays, on account of its higher brightness level. DIP is less costly and waterproof, while SMD is better in viewing angle, precision of image, and reducing weight and bulk.
Chip on board (COB) is the newest technology, but it is used in a very limited capacity primarily due to high manufacturing costs. COB technology places the discrete red, blue, and green LEDs in each pixel on a printed circuit board that mechanically supports and electrically connects all the electrical or electronic components. This allows for tighter spacing of the pixels and, more importantly, higher contrast ratios because the area between the LEDs can be filled with black resin. This contrast between the bright LEDs and the black background provides superior viewing characteristics in nearly all environmental conditions.
Direct-view LED (dvLED) is considered an additive technology in that each time an LED panel is added to the X- or Y-axis, the overall pixel count/resolution of the videowall is increased. LED displays are specified based on the viewing distance of the audience to determine the spacing from pixel to pixel, which is known as the pixel pitch and is directly related to the visual acuity of the human eye.
In determining the pixel pitch for an LED display, the main considerations are viewing distance and budget. With a shorter viewing distance, a higher density of pixels will be required, at a higher cost, for the same size of display.
“With pixel pitch, you want to make sure that the closest viewer does not perceive individual pixels,” Simpson explains. “So the closer the viewer to the video wall, the tighter the distance between pixels needs to be.”
As a general rule of thumb, an acceptable viewing experience will use a pixel pitch of 1 millimeter for each meter of viewing distance, while an optimum viewing experience will require a pixel pitch equal to the viewing distance in meters divided by 2.5. As an example, a 3-meter viewing distance (10 feet) will typically use a 3-millimeter pixel pitch for an acceptable view, but it will require a 1.25-millimeter pixel pitch, or smaller, for optimal viewing.
In addition to viewing distance, we also need to consider the content that will be displayed. The smallest character font is 9 points, which is 9 pixels tall. At a 4-millimeter pixel pitch, the smallest text font will be 36 millimeters or 11⁄2 inches tall. Consequently, it is important to make sure the display is sized properly to best display the content and not appear pixelated.
Also factoring into the equation is location. This will be determined based upon audience location and traffic patterns. For example, as the audience is traveling past the sign, what is their viewpoint, and what form of content is the display seeking to convey?
For instance, investing in high pixel pitch may be for naught if the site is not trafficked by viewers at a close distance. Consequently, a better quality screen with a wider pitch may be a better way to go under such conditions, as the display cost can be drastically reduced without affecting the visible image quality from the distance of the closest viewer.
In fact, controlling viewing distances by placing a barrier between the screen and viewer is a good way to keep costs lower. There is no need to invest in twice as many pixels per square meter when they are not needed. For example, a 5-millimeter pitch screen will not deliver an appreciably better image at a viewing distance of 20 meters or more. Instead, a 10-millimeter pitch screen may offer the same results at less cost.
Because differences in pixel pitch can significantly impact cost, in addition to power consumption, it is critical that project teams bring in an AV consultant.
“Getting an AV consultant in early ensures that the power and cooling requirements are met and budgeted for, the cabling pathways are identified, the structural requirements are met, and the rooms are designed for the best viewing and listening experience for everyone,” Simpson adds.
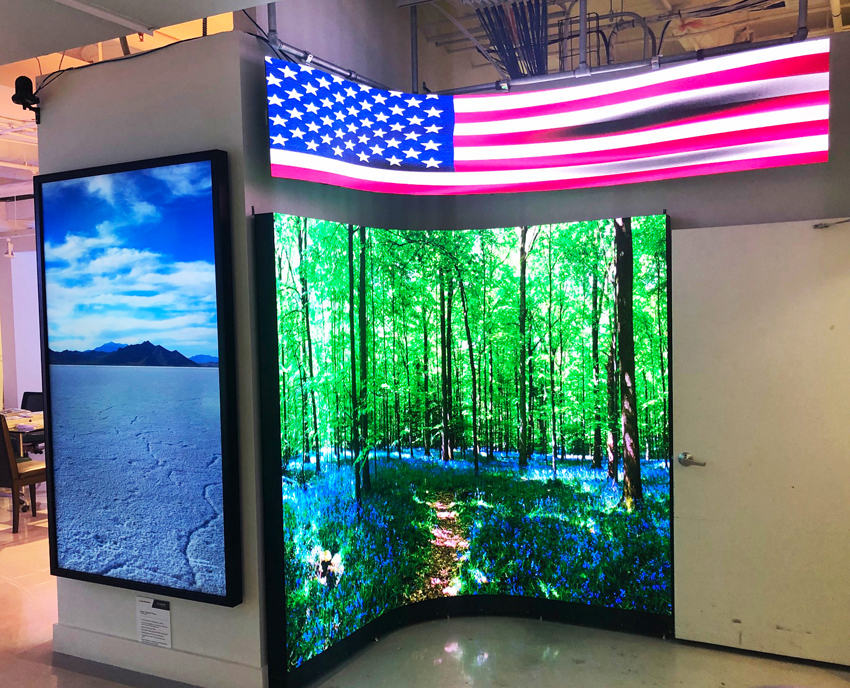
Photo courtesy of Draper Inc.
As shown here in this retail setting, separate LED structures incorporating a mix of still images and video can create a unique look, or a single structure can be designed to match the building flow.
Choosing the Right System
In addition to the pixel pitch, a number of factors go into specifying the optimal LED display for a given project.
While cost is always a noted consideration, the level of available product support and the extent of the warranty are perhaps equally important to architects and building owners.
Another important factor is the speed at which the product can be assembled. “Time is money, especially on a building site or for installations where disruption to ongoing business operation needs to be kept to a minimum,” states the audiovisual integrator Corporate Initiatives Australia in an LED display white paper for architects and designers. “The best LED products for permanent installation are therefore designed to be easy to put together in a precise manner.”
Maintenance is another issue that must be evaluated. The majority of LED display systems are serviced from the front, which enables easy accessibility. For those that are serviced from the rear, the design will require that additional space be incorporated between the display and the wall for maintenance access, or a complex mount structure is required that allows the display to extend out from the wall for service.
“The ease at which the servicing can be carried out is also a cost factor,” states Corporate Initiatives Australia. “Display systems that are well designed for access make such servicing simpler to accomplish.”
Facility maintenance teams should consider the LED manufacturer's replacement parts and training for the control system. In cases where maintenance to the face of the display is required with a module replacement, it is essential to replace the module with a spare specifically made for that display. The team must then know how to adjust the calibration software, in order to correctly adjust the settings for the new module to disappear into the matrix of the display.
The AV integrator also points out that a typical product procurement process involves developing a series of specifications and drawings, documenting what is required, and putting the whole thing out to bid. However, due to the nature of LED displays as an emerging technology, it is preferable to treat the display as a separate package and make the call on specification much closer to the realization date.
“Nothing is sadder than an LED screen being installed that is effectively already out of date on the day of installation, especially when it happens on a very large scale,” states the white paper.
To better ferret out the LED needs of the project, the following questions should be addressed:
- What is the desired display dimension?
- Where will the display be located, i.e., indoors versus outdoors?
- What is the distance between the display and the viewing audience?
- How bright is the surrounding environment?
- How high off the ground is the bottom of the display?
- What type of content will be displayed, i.e., still images, presentations, video?
- What is the resolution of the native content being sent to the display? Is a scaler required to convert video signals from one display resolution to another?
In determining the size, an indoor LED display is made of interlocking cabinets. These cabinets have traditionally been square shaped measuring 500 millimeters. In the past several years, cabinets measuring roughly 600 millimeters wide by 340 millimeters tall have been introduced, representing a 16:9 aspect ratio. So each increase in size is done by adding modules of these dimensions.
Incidentally, the 600-millimeter by 340-millimeter dimension produces a 271⁄2-inch diagonal cabinet. By doubling both dimensions, this yields a 55-inch cabinet, which is the same size as an LCD video wall cabinet. Consequently, an LCD video wall comprised of 55-inch LCD cabinets can easily be retrofitted with an LED display using these 271⁄2-inch LED cabinets.
On the issue of placement, it is important to consider the fact that the LEDs on the face of the modules are very fragile. While the LEDs can be encapsulated with an optically clear coating to improve their ruggedness, this compromises the display’s ability to vent off heat. Further, if an electrical connection comes loose within the encapsulation, the entire module will require replacement, whereas with non-encapsulated LEDs, like DIP and SMD LEDs, it is possible to solder and reconnect individual connections within a module.
In any case, it is best practice to locate the display out of reach from the general public.
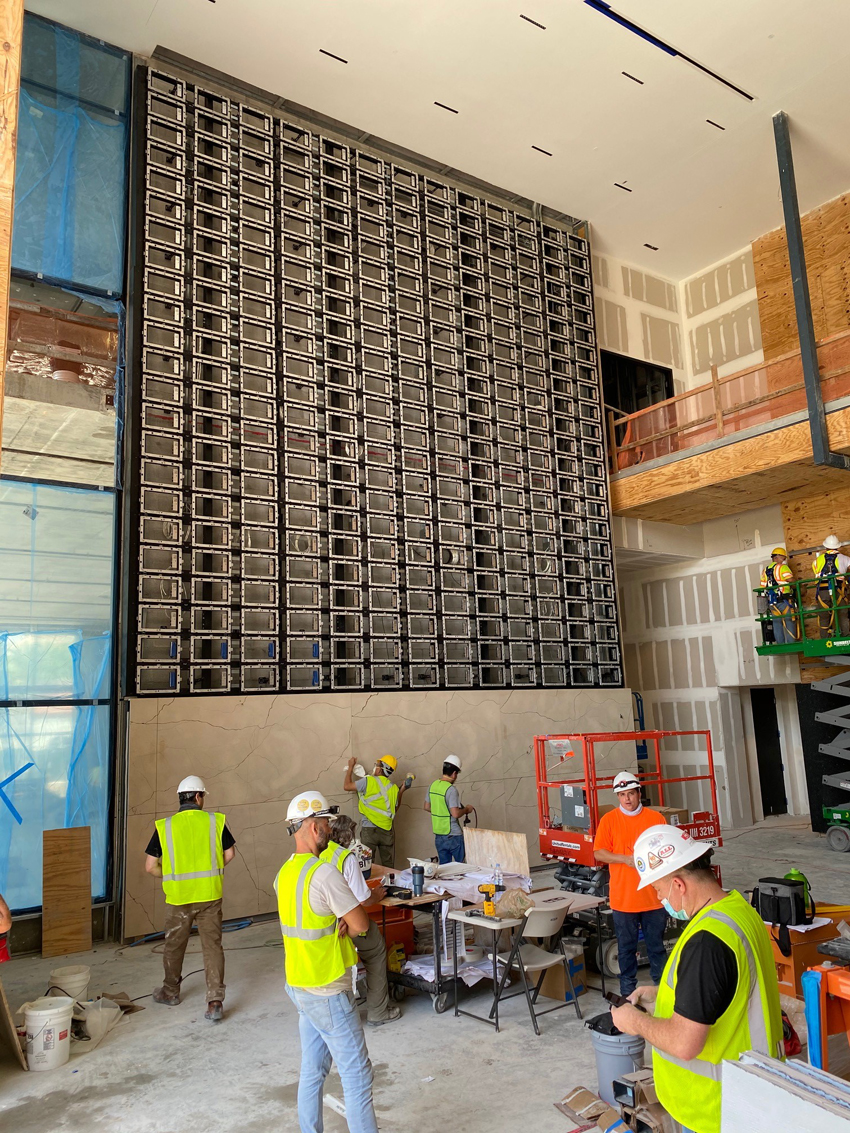
Photo courtesy of Draper Inc.
The modular nature of LED cabinets means a video wall can be in any configuration; it does not have to conform to traditional formats, such as 16:9. It can be 2 high and 10 across, or taller than it is wide.
Selecting a Mounting System
In addition to the LED display itself, it is essential to select a high-quality mounting system, as this factors significantly into the appearance of the display. Ideally, the mount must be able to make up for inconsistencies in the flatness of the wall surface.
“The wall you are attaching to is never that precise, so you have to have a system that is able to mount to that non-flat surface and create a perfectly flat mounting surface for the LED cabinets themselves,” explains Grant Wylie, director of AV product management, Draper Inc., Spiceland, Indiana.
Consequently, the highest-quality mounts offer precision via Z adjustment for the structure, plus X, Y, and Z adjustments for every LED cabinet in the display. This then enables the face of an LED video wall to be perfectly flat all the way across, as minute adjustments can be made at the cabinet level. If the wall is not flat, seams in the LED will show, and the video wall will not appear seamless.
Oftentimes, engineers will mention adjust-ability of the X, Y and Z axis. This is in reference to the placement of the LED cabinet on the mounting structure. Horizontal (left right) adjustment would be the X axis of adjustment, vertical or height adjustment would be the Y axis of adjustment and in and out would be the z-axis of adjustment.
A tolerance of 1⁄10 the pixel pitch should be maintained while assembling an LED display in order for the image to remain seamless. So if the pixel pitch is 1.2 millimeters from the center of one LED to the next, then the attachment needs to be able to maintain within 0.12 millimeter of tolerance in all axes from one cabinet to the next. This means that there needs to be some means to adjust every LED cabinet independently, in and out, on the mount so that the front face has that precision.
In order to fully develop, manufacture, and install an LED display system, a high level of planning is required. Toward this end, several questions need to be addressed, such as the following:
- Are lifts required for installation?
- Where is the access to the displays?
- How will the display be mounted and installed? On a wall or a floor stand?
- If the wall is built, are architectural drawings available?
- Is a bezel or shroud for the sides of the display required?
- Will the display be recessed into a wall?
- Where will the controllers be located in relation to the display?
- Is it close enough to run CAT, or does the contractor/vendor need to run fiber?
- Is a rack needed for the LED hardware?
- Is a light sensor/brightness sensor required?
- Is remote power control or a power conditioner needed?
- Is there three-phase power within 50 feet of the display location?
- Is power redundancy required?
- If indoors, has the HVAC been sized to accommodate the added BTUs the display will introduce into the environment?
Photo: Matt Oberer
Precise design and alignment are key components of a successful LED installation. Precision is required to preserve the LED’s seamless capabilities, resulting in a finished product that best represents the original design intent.
Curved video walls can be created using flat LED cabinets installed at an angle or faceted to create a display face in the shape of an arc. The main difference between a faceted curve display and a flat display is that each column of LED cabinets is separate from the next and all alignment between them is set and held by the mounting structure.
In contrast, flat LED cabinets have alignment features that help to provide perfect alignment from cabinet to cabinet; however, these alignment features cannot be used when the LED cabinets are placed at an angle next to each other.
Mounting the Display
When attaching an LED mounting structure to a building, the engineered connection should be specific to the material that the mounting structure is attaching to, including wood studs, plywood, cinder block, concrete, and iron.
One application that does require additional work is a metal studded wall. Typically not designed to support an external load, these walls are often used in office retrofits where the existing walls are ripped out and a metal stud floating wall, not secured to the ceiling structure, is built. Consequently, any kind of counterweight would topple the wall over. To prevent this, the wall needs to be reinforced with bracing and plywood on the exterior surface.
If for some reason there are issues with attaching to a wall, mounting to the floor can be more cost-effective than reinforcing the wall. One type of floor mount is a structure that stands on its own, for example, in a hotel lobby. With a floor-mounted structure, the four key elements that must be determined are the floor type, the floor structure that will support the weight, how high the display will be off the floor, and the acceptable depth of the structure.
In attaching an LED display to the ceiling, if it is an existing build, the ceiling structure should be reviewed to make sure it can adequately support the weight. The display will then typically utilize a truss system to attach to the ceiling. Alternatively, it can be suspended with a rigging system. In either case, it is important that the support has backup safety measures in place.
For both wall and standing structures, there are additional considerations if the video wall is curved. A curved wall that is concave provides more depth and immersion, whereas a convex curved wall can wrap around a column. Essentially, a curved wall lets the design fit the space.
Curved walls can be faceted or smooth. A faceted wall uses flat LED cabinets to create a curve with brackets. The faceted curves require extremely precise structure and installation. That said, faceted walls are less expensive, easier to install, and allow for finer pixel pitches compared to custom-manufactured smooth-curved LED displays. However, they are not good for tight radii.
Smooth-curved walls are more aesthetically pleasing and present less drastic color shift from cabinet to cabinet. At the same time, a smooth-curved display does not support the finest pixel pitches, and installation can be more challenging. Smooth-curved LED displays can be either concave or convex.
It is important to point out that all LED cabinets have different mounting hole locations and sizes. Unlike LCD, there are no VESA mounting interface standards for LED mounting hole layout. Consequently, each LED manufacturer and each LED cabinet series has unique cabinet dimensions and mounting bolt-hole placement.
This essentially means that every display is custom manufactured, which means that the mounts must be custom designed for every LED cabinet and its attachment points. Some manufacturers have created mounting systems for specific LED cabinets, and some offer a mount that can scale up and down in size, and support any configurable size and aspect ratio.
As noted, an LED wall mount serves as the interface between a usually inconsistent wall surface and a very flat surface to which the LED cabinets can be attached. With precise X, Y, and Z positioning, the LED display presents a consistent, seamless look.
While a high level of precision is required of any LED video wall structure, this is especially true of NPP displays. The very tight pixel spacings—2.5 millimeters and below—create a detailed and crisp visual, so tight tolerances on the structure are imperative. LED video walls, by nature, are attention-grabbing displays and are frequently used to present some stunning content. Consequently, it is important that the structure not detract from the overall impression. To hide the visible edges of the structure, an attractive trim is required. Some manufacturers offer a black or matte black trim surrounding the LED cabinets to help the mount blend in and appear as minimalized as possible. If the design aesthetic is to achieve an industrial or mechanical look by showing the structure, then it should have an attractive finish.
Another issue is corrosion prevention/protection, even if for aesthetic reasons. Rust spots are very undesirable and could create a false impression that the structure is weak. To prevent this aluminum, galvanized coatings and properly applied paint or powder coat finishes can be used.
Yet another issue is determining if the LED display is front or rear serviceable. With the former, access is much easier, as technicians can go in, remove the LED modules on the front face of the display, access all of the components inside, and service them. In addition, the display can be installed flat to the wall.
While the vast majority of products are front serviceable, several manufacturers still produce rear serviceable systems. Because the LED display needs to project out from the wall to allow for access, this counterbalances the weight. Consequently, architects need to verify that the wall could support the structural load with the display extended out at its farthest distance from the wall.
When installing LED displays, the size of the structural components can potentially pose a challenge to transporting the components to the installation location. For example, displays are frequently 20 to 30 feet wide by 20 to 30 feet tall, however components used to build the display oftentimes need to be able to fit through smaller access points like a service elevator. Consequently, to enable transport of smaller sections, architects should verify that the components can quickly and easily attach together in the final installation location..
As part of the project delivery process, a detailed and outlined process of how the LED cabinets and mounting system will be transported and assembled together is an encouraged best practice. This includes the order of operation for building the system, installing the LED cabinets and the mount, and completing the finish work around the outside of the display. The installation location should be clearly vetted and marked, and during the installation, technicians should make sure that everything is square, level, plumb, and aligned properly. This entire process should be chronologically outlined and precise.
Photo courtesy of Draper Inc.
LED technology can create unique spaces and experiences. It is important that the supporting structure have the same flexibility and modularity to take advantage of LED’s capabilities.
ADA Compliance
To protect against sight-impaired individuals bumping into objects that are protruding out into hallways, corridors, or passageways, the Americans with Disabilities Act (ADA) requires that the protrusion be no more than 4 inches or 100 millimeters from the wall and into the space. Displays with leading edges that are within cane sweep, 27 inches high maximum, or a minimum of 80 inches above the finished floor are permitted to protrude any amount.
While some LED cabinets are thin enough to enable the structure to stay within 4 inches (100 millimeters), in many cases, the LED cabinets are 70 millimeters to 90 millimeters thick, so by the time the mount is attached, the display protrudes more than 4 inches (100 millimeters) from the wall.
One way to design around the protrusion is to build the display all the way down to the floor by filling in the space below the display. Then it is no longer a projection from the wall, but rather it is the wall, and ADA compliance has been achieved.
Another strategy is installing a guardrail at the floor around the display. With a guardrail, a cane will effectively keep a visually impaired individual from bumping into the display.
Architects can also consider embedding the structure into the wall to take up some of the depth. In other words, create a cavity or recess inside the wall.
While ADA compliance in these types of locations is feasible, it is important that the project team first evaluate whether installing an LED display in these corridor locations is really necessary in the first place. Further, it is questionable that the technology is actually suitable for the environment, as LEDs are very fragile and easily damaged by individuals touching the display, unless the LEDs are encapsulated. Additionally, the viewing characteristics are not optimal for up-close viewing. Consequently, there must be a strong need to justify installing a display in these hallway locations.
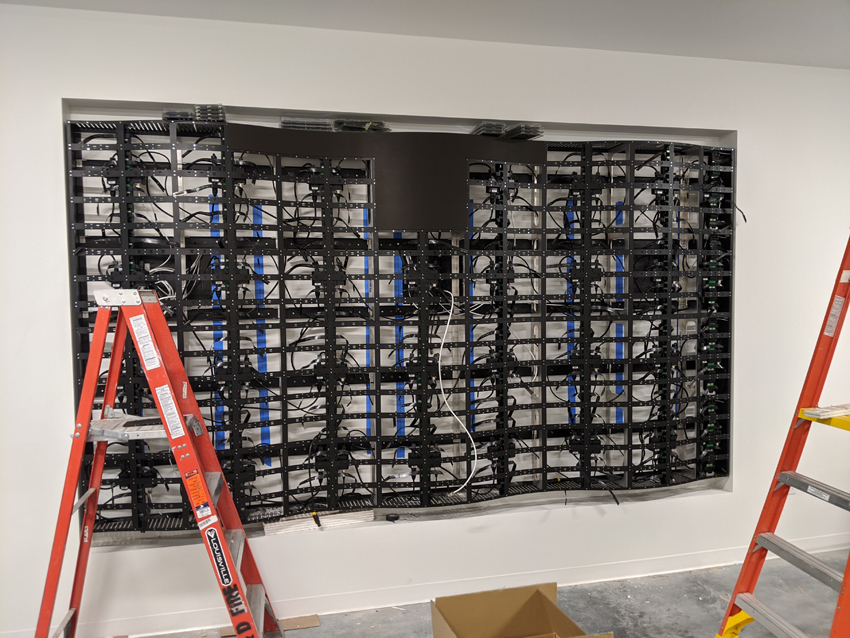
Photo courtesy of Draper Inc.
Curved LED video walls can be concave or convex—or, as in this example, they can be both for enhanced visual flow.
Cooling and Cable Management
Temperature control is an important aspect of LED video wall design, as maintaining a relatively constant, steady temperature will increase the useful life and reliability of the LED modules.
To keep the temperature from exceeding manufacturer recommendations, many LED displays are passively cooled, relying upon most of the heat to emanate through the front of the display, while the power supply units typically dissipate heat from the backside. A well-designed structure and surrounding trim package, along with vent holes at the top and bottom, will optimize convective cooling.
In some cases, HVAC or air-to-air heat exchangers will need to be used to dissipate the heat, though in some instances, flow-through fan cooling or the above-mentioned ventilation slots in the trim are sufficient.
In most projects, the architect works with the HVAC team to ensure that the BTU offset from the display is calculated into the HVAC load.
Another design issue is cable management. Traditionally, LED displays utilized a daisy chain of power and data cables from one cabinet to the next, and having adequate room for those cables was an important design consideration. Nowadays, more and more displays utilize internal power and data connections, which are typically inserted into the back side or at the top cabinet on each column. Some manufacturers then provide trim that matches the plug that goes on top of the LED cabinet.
The number of power cables that go to the display depends upon the size of the display and the number of LED cabinets multiplied by the power draw of each cabinet. The number of data cables is determined by the resolution of the display and the bitrate of the content being sent to the display. For example, a very high resolution display will require more cables, as there is more data going from the controller to the display. For higher bitrate content, it will require even more cables because there is more data being sent for every single pixel.
In project planning, some things to consider are how many cables will be needed and how the cables will be routed. If cable-less connectivity is an option, then this becomes less of an issue.
Architects also need to consider how the display will be controlled and where the controller will be located. The maximum distance between the controller and the display is based on cable length. Another consideration is the number of video walls that will be controlled (i.e., a single video wall or several video walls that will be networked).
Conclusion
Now that LED display technology sales have eclipsed LCDs, it is critical that architects to proactively address the integration of LED systems into their designs if LED is their display technology of choice for the project. This will ultimately protect the integrity of their building designs and enable the design and installation process to proceed in a seamless manner.
Further, by selecting high-quality mounting systems with a high level of adjustability and precision, this will produce the highest-quality, seamless LED display.
Barbara Horwitz-Bennett is a veteran architectural journalist who has written hundreds of CEUs and articles for various AEC publications. www.bhbennett.com