This CE Center article is no longer eligible for receiving credits.
Specifying Polished Concrete Floors
When specifying concrete floor work and polished overlayments, there are of course numerous choices and specification details to pay attention to. Coordination with manufacturers during the design phases of a project will help gain insight into details, cost drivers, installation requirements, and finish options. In a standard CSI or MasterSpec format, the usual location to include this spec is in Section 03 35 43 Polished Concrete Finishes. Some of the relevant items to address in a standard 3-part specification format are highlighted as follows.
Part 1 - General
The scope of specification work can include all preparation work, underlayments, primers, overlayment, and finishing. In carrying out the work, the following standards can be referenced including the ASTM F710 standard discussed earlier:
• ASTM C109 – Standard Test Method for Determining the Compressive Strength of Hydraulic Cement Mortars using 2 inch or 50 mm Cube Specimens.
• ASTM C1028 – Standard Test Method for Determining the Static Coefficient of Friction of Ceramic Tile and Other Like Surfaces by the Horizontal Dynamometer Pull-Meter Method.
• ASTM F1869 – Standard Test Method for Measuring Moisture Vapor Emission Rate of Concrete Subfloor Using Anhydrous Calcium Chloride.
• ASTM F710 – Standard Practice for Preparing Concrete Floors to Receive Resilient Flooring.
• ASTM F2170 – Standard Test Method for Determining Relative Humidity in Concrete Floor Slabs Using In-situ Probes.
• ASTM E430 – Standard Test Methods for Measurement of Gloss of High-Gloss Surface by Abridged Goniophotometry.
• ACI 302. R-04 – Guide for Concrete Floor and Slab Construction.
Submittals for polished concrete floors should include the usual manufacturer’s data and information for all products used plus recommended maintenance and cleaning information to be passed on to the building owner/operators.
Quality assurance is clearly an important part of any field-installed system and the same is true here. It begins with the use of trained installers and applicators with a minimum number of years of experience, up to 10 years recommended by some manufacturers. Evidence of such qualifications can be requested as a submittal, but it is important that the people actually in the field are the ones with the qualifications and experience needed. In some cases, manufacturers offer regular training and it is appropriate to request certificates showing completion of training. As the overall quality basis of the project and before work on the full area begins, the installation team should prepare a mock-up for review and approval.

Photo courtesy of CTS Cement Manufacturing Corporation
Preparing a mock-up of the finished floor for a project is a common way to identify and set a standard for quality assurance.
Protecting products and materials at the site are important. Fortunately, since this work is often done at the very end of a project, the environmental conditions should be controllable. Generally, materials should be installed in an environment between 50 and 80 degrees Fahrenheit. The ideal temperature at the time of installation is 70 degrees Fahrenheit for both the surface and air temperatures. Warmer material will set faster than expected and cooler material will have slower strength gain.
Part 2 - Products
All of the relevant products used in the total system should be called out and specified for a project. Utilize manufacturer’s recommended specifications, proportions, mix ratios, additives and proprietary components as required for specific applications. The specified products can include:
• Concrete repair materials and toppings, including self-leveling concrete underlayment if called for
• Surface defect and crack filler materials
• Primers specified as either epoxy, acrylic or both as appropriate to the project
• Water designated as clean and potable
• Concrete chemical treatments such as densifiers or stain guards
• Appropriate joint or terrazzo strip materials
• Aggregate materials and terrazzo strips should all be agreed to by the designer and the installer, and shall be within recommended guidelines of the manufacturer
• Surface stains, dyes or colorants should be approved by the concrete overlayment manufacturer


Photos courtesy of CTS Cement Manufacturing Corporation
A variety of final finishes are possible with polished concrete overlayments and need to be specified accordingly using aggregates, divider strips, or dyes and colorings.
In addition to the products used, it is common to call for the type of polishing equipment that should be employed to achieve the desired results. Note that three-phase 480-volt power may be needed in some cases and should be coordinated with the general contractor or the electrician. Three (3) head or four (4) head counter rotating variable speed floor grinders with at least 650 pounds down pressure are recommended. Further, a dust extraction system, pre-separator, and squeegee attachments with minimum flow rating 580 cubic feet per minute can be specified along with hand grinders with dust extraction attachment and pads for final finish work.
Part 3 - Execution
As we have seen, the installation requires multiple steps which need to be clearly articulated in the specification in order to receive best results.
• Examination and Preparation: The importance of this work should be stressed. In addition to the architect, the installer should be given the authority to examine and approve the concrete substrate for conditions affecting the performance of the finish. Further, the installer shall be the one to correct conditions that are found to be out of compliance with the requirements of the system, including the installation of a pre-leveling layer if required. All surface defects shall be repaired and all joints and cracks shall be repaired using materials specified. Ultimately, the goal is to provide a concrete substrate surface that has been mechanically prepared to an acceptable level, is clean of all contaminants, and free of any debris. If the application includes divider/terrazzo strips, then call for setting and levelling them to the appropriate heights prior to the pour of the overlayment. Similarly, the installer shall pin or otherwise mark all existing joint locations to ensure they can be located and re-saw cut after placement of topping.
• Primer: Prime the prepared concrete substrate using the specified primer in accordance with manufacturer’s recommendations and time restrictions. For epoxy primers, washed and kiln dried angular cut silica sand is broadcast to the point of refusal into the wet epoxy. After the epoxy primer cures, all loose silica sand should be vacuumed up.
• Overlayment Mixing: A rapid setting self-leveling overlayment needs to be mixed and installed in accordance with manufacturer’s instructions including careful monitoring of the amount of mix water being used with allowance for the following design items:
- Additional aggregates used shall be approved by the topping manufacturer
- Integral color shall be approved by manufacturer
- Mixing equipment and procedures shall be specified or approved by the manufacturer
• Overlayment Placement: The mixed topping should be placed by pouring, trowelling, or pumping to the levels required and to conform to details on the drawings. The material should be placed to achieve as true and smooth a top surface as possible with mounds or dips deemed not acceptable. The installation contractor shall control overall flatness and levelness.
• Joint Sawing: Allow the topping to cure for a minimum of four (4) hours prior to saw cutting joints. Locate original joint locations and saw cut through topping into the original joint. The saw blade shall penetrate to depth of the original joint or 2" deep, whichever is less. Ensure saw-cut joint is completely free of dust/debris/laitance and apply stain prevention film or other masking agent along surface on both sides of the joint if residual staining may be a concern.
• Install joint filler: Fill from bottom of joint, being careful to avoid entrapping air and slightly overfill joint to a crowned profile. After sufficient cure, razor cut excess filler, leaving a filler profile which is flush with the floor surface. If filler profile is low/concave, remove top of filler and re-apply.
• Polishing: Allow overlayment and fillers to cure for a minimum of 24 hours before beginning the polishing process. Use an overlay polishing system that is approved by the manufacturer.
• Surface Texture: The desired gloss, distinctness-of-image (DOI) or roughness of average (RA) should be identified and selected. These are identified by surface texture ratings that fall into standard categories of A, B, or C finish as noted in the accompanying charts.
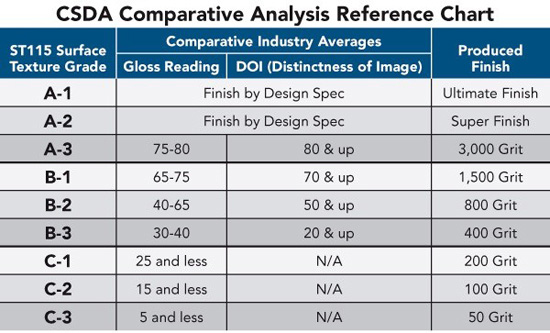

Charts courtesy of CTS Cement Manufacturing Corporation.
Polished concrete floors can be specified with a variety of characteristics identified by Surface Texture Grade with corresponding values for Gloss, DOI, and Finish.
• Protection: Once applied, the finish surface needs to be protected during any remaining construction work including final mechanical or electrical trimming, painting, or any punch list work. Since the polished surface is in fact the finish flooring, it needs to be covered and protected just like any other finish flooring. Therefore, protect the surface by means of curing blankets or other protective measures until substantial completion can be achieved.
When specified and installed correctly, the finished floor will meet the demands of both the building owners and the designers.
Few building surfaces are subject to more wear and tear yet are as prominently visible as floors. In the quest to create durable, long-lasting and appealing floor surfaces, concrete has often been used as the base material whether on grade or an elevated slab. Final finishes have commonly ranged from any number of flooring materials placed on top of it to simply sealing or painting the concrete. However, recent advances in the technology of cement-based concrete overlays have given rise to a new option that is growing in popularity. Essentially, a properly formulated cement and aggregate mix can be used as a thin (approximately 3/8-inch-thick) layer placed on top of a new or existing concrete floor slab (repaired as needed). In fact, the technology is available such that it is now possible to design and specify a concrete overlayment of this type in a full range of colors, patterns, and with various aggregates to simulate other materials such as terrazzo. In all, concrete flooring overlayments offer an option to create finished flooring that enhances any interior design, provides a durable, long-lasting surface, and requires minimal maintenance.
Advances in Cement and Concrete Products
In order to understand the nature of concrete flooring overlayments and the repair of an existing underlayment, it is worth delving first into the nature of different advanced cement and concrete products. Most architects are familiar with portland cement as a common basis for concrete products and mortars of all types. The Portland Cement Association, the trade organization for America’s cement manufacturers, points out that concrete is formed when portland cement is mixed with water to create a paste that binds with sand or rock (also called aggregate) and hardens all of the materials together. Portland cement as a product is manufactured through a closely controlled chemical combination of calcium, silicon, aluminum, iron and other ingredients. Common materials used to manufacture cement include limestone, shells, and chalk or marl combined with shale, clay, slate, blast furnace slag, silica sand, and iron ore. These ingredients, when heated at high temperatures form a rock-like substance that is ground into the fine powder that we commonly think of as cement.

Photo courtesy of CTS Cement Manufacturing Corporation
Advances in cement and concrete products allow for very attractive floor finishes to be created with polished concrete overlays that are suitable for a wide range of building types.
Concrete and cement products often use different additives to achieve different properties related to the strength, cure time, workability, or other characteristics of the end product. When considering a floor overlayment, portland cement is often modified with Calcium Aluminate Cement and other additives in order to achieve the desired characteristics for a thin, hard, workable layer.
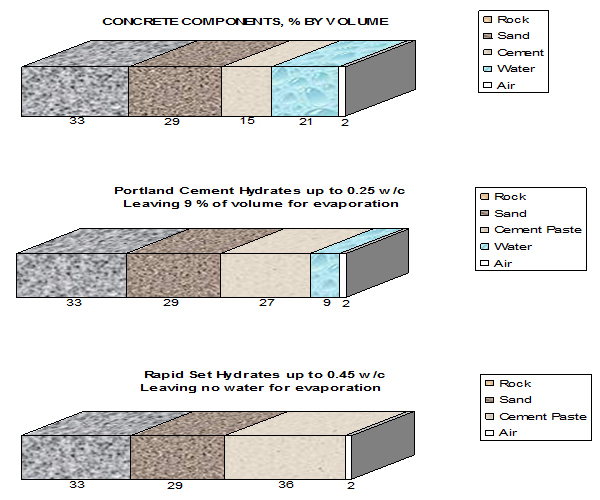
Image courtesy of CTS Cement Manufacturing Corporation
A comparison of the normal components of concrete and the difference between water content (w/c) in portland cement and C4A3S cement.
Investigation into alternatives to portland cement, particularly for concrete overlayments, has yielded other formulations that do not require additives to achieve the desired characteristics. Calcium Sulfoaluminate (C4A3S) Cement in particular is often used as a replacement for portland cement in overlayments. Part of the reason is that portland cement has excess water after hydration. Evaporation of the excess water can lead to high shrinkage of the overlayment, causing cracking, gaps or other issues with the finish which can be reduced but not eliminated by using other additives. By contrast, C4A3S cement hydrates more fully leaving very little excess water for evaporation thus considerably reducing shrinkage. There are other characteristics that make it better suited to floor overlayments and finishing too. In terms of construction timing and scheduling, C4A3S cement can gain structural strength in one hour—much more quickly than portland cement which can take 3 – 7 days. Additives can be used in portland cement to help it gain strength faster but may lead to drawbacks in the finished floor appearance. From a sustainability perspective, it is worth pointing out that C4A3S cement has an environmental impact that is 60% less than that of the environmental impact of portland cement.
Because of our focus on concrete floor overlayments and the preferred use of C4A3S cement for this type of system, the basis for concrete discussed throughout this article will assume C4A3S cement is being used.
Design Considerations
When should you consider using a polished concrete floor overlayment system? Basically anywhere that concrete floors are used. Polished overlayments can be readily applied over the top of new concrete floors and they are also a preferred way to create “like-new” floors when renovating existing buildings too.
Just as concrete floors in general are appropriate for consideration in commercial and industrial buildings, so too are polished overlayments quite appropriate in these settings. They have become a popular choice for high foot-traffic areas that need to be kept clean since the finish is durable, slip resistant, easy to clean and maintain. These attributes plus the range of design appearance options has led to many installations in retail stores, hospitality facilities and restaurants where durability and great appearances are important. These interior design qualities also make polished overlayments a great choice for other locations such as commercial buildings, lobbies, and offices. Additionally, they have been used very successfully in institutional settings such as museums, schools, civic centers, sports arenas, and exhibit halls. Even industrial settings have benefited where foot traffic is combined with service vehicles and a clean, durable floor surface is needed such as in warehouses, manufacturing facilities, or airports.

Photo courtesy of CTS Cement Manufacturing Corporation
Polished concrete floors work well in residential settings too, particularly when passive solar heating is desirable, allowing the concrete floors to act as beneficial thermal mass.
Not to be overlooked is the use of polished overlayments for residential buildings that use concrete floors. This is particularly appropriate for residences that seek to incorporate passive solar heating in the design. Concrete floors acting as a thermal mass component of the space can be located to collect and store heat from the sun in the concrete during the day and allow it to radiate directly back to the space at night. The common challenge to this approach is the finished appearance of the floor. With a full range of choices in color, texture, and patterns, that problem is solved, meaning passive solar residences can perform well and look great too. Further, since the overlayments are typically installed at the very end of the project in any application, they are not subject to much other, if any, construction activity meaning they are less likely to get damaged by other trades.
Creating a Polished Concrete Floor System
Once the decision is made to use a polished concrete overlayment as a finished floor surface, then there are a number of steps that need to be accounted for. Before starting, it is important to recognize and plan out all aspects of the job including surface preparation, type of primer(s) used, mixing procedures, placement plan, and finishing method. In order to avoid any surprises, a mock-up of at least a small area is recommended prior to starting any project.
Surface Preparation
The first step involves preparing the concrete surface, whether new or existing, and is critically important since a high percentage of all flooring failures are due to some aspect of subfloor preparation. The most common flooring type where this has been an issue is when resilient flooring (vinyl tile, vinyl sheet flooring, linoleum, rubber flooring, etc.) is placed on top of concrete. Hence, ASTM F710 “Standard Practice for Preparing Concrete Floors to Receive Resilient Flooring” has become the recognized standard for concrete substrate preparation. Although specifically written for resilient flooring, the substrate preparation methods are applicable for polished concrete overlayments too.
ASTM F710 covers the procedure for determining the acceptability of concrete floors for the installation of resilient flooring and includes suggestions for ensuring that the constructed concrete floor is acceptable for such installations. As a flooring standard, it does not cover tests for adequacy of the concrete floor to perform structural requirements. Of primary significance is the requirement for a permanent, effective moisture vapor retarder under all on- or below-grade concrete floors. Moisture can readily make its way up through concrete and cause the separation of any finish flooring and the concrete substrate. Therefore, all concrete slabs should be tested for moisture regardless of age or grade level. The standard goes on to indicate that concrete floors need to be permanently dry (i.e. fully cured with no excess water remaining), clean, smooth, structurally sound, and free of substances that may prevent adhesive bonding. Any surface cracks, grooves, depression, control joints or other non-moving joints, and other irregularities should be filled with the appropriate patching material. The surface of the concrete floor should be cleaned of any pre-existing or added coatings, materials or compounds by scraping, brushing, vacuuming, or any other effective method.

Photo courtesy of CTS Cement Manufacturing Corporation
Surface preparation of the substrate, including proper crack filling, is critically important to a successful installation of a polished concrete floor overlayment.
All of this preparation work is relevant to overlayments since they are designed to bond to profiled, sound substrates. For uneven floors or existing floors that have been damaged, a self-leveling underlayment or appropriate patching material can be placed to create a uniform substrate ready to receive the final overlayment. Note that a variety of patching and crack repair materials are available on the market and should be confirmed with manufacturers for compatibility with other components of the system. Generally speaking, the substrate is prefilled to 3/8 inch from the finish floor level. This leaves room for the overlayment to be placed, creating the final floor surface.
Priming
The use of a primer is often advised to assure that there is full adhesion to the substrate. An example would be a project where a self-levelling underlayment product is used to prepare the concrete slab. In that case, the primer needs to be applied over the prepared concrete slab and allowed to cure before the underlayment is applied. Similarly, before the overlayment layer is placed, a primer will be needed regardless of whether the substrate is a prepared concrete slab or a new layer of underlayment. The overlayment primer will serve the dual purpose of increasing adhesion while covering and reducing pinholes in the substrate that may otherwise cause issues.

Photo courtesy of CTS Cement Manufacturing Corporation
Spreading an epoxy primer over the substrate is the preferred choice before a final overlayment is poured.
There are essentially two common primer choices used—either acrylic based or epoxy based. The choice of which type of primer to use will depend on meeting specific project conditions. Acrylic primers can allow any substrate patches or repairs to telegraph through to the finished flooring. It will usually require multiple thin coats and has no crack bridging capabilities. Nonetheless, acrylic primers are considered faster to install and less expensive than epoxy. On the other hand, epoxy primers may reduce telegraphing, can be applied in a single coat, and has crack bridging capabilities for non-moving cracks in the substrate. It may, however, be slower to install and more expensive than acrylic. When comparing the two, keep in mind that for polished concrete overlayments, epoxy primers are preferred for their superior characteristics.
Mixing and Placing the Overlayment
After the substrate is prepared and primed, then a self-leveling overlayment with C4A3S cement is now ready to be mixed. On-site batch mixing is preferred for polished overlays because the mixing time and water dosages can be more accurately controlled by the installers. Continuous mixers are not recommended since they don’t provide adequate time for the material to be fully mixed properly. Since this is a finish concrete product, it is temperature sensitive. This means it is best to maintain the material temperature between 60 and 80 degrees Fahrenheit. In hotter or colder situations, cold or warm mix water may be used to help regulate the material temperature.
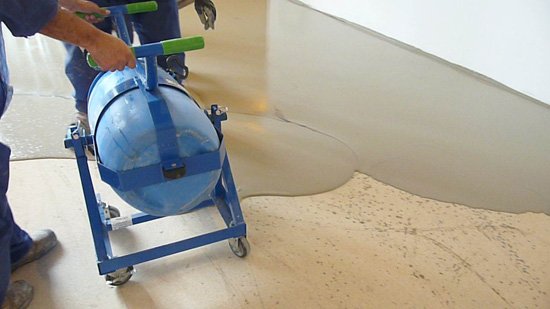
Photo courtesy of CTS Cement Manufacturing Corporation
Mixing the overlayment in a batch mixer and placing it evenly over the prepared substrate is done quickly and efficiently at proper temperatures.
Mixing is the point where the final characteristics of the overlayment are defined. If specified aggregates are desired, they should be present and added to the mix. Similarly, if coloring is called for, the appropriate colorants should be measured and added to the mix. The mixing time may vary depending on the additives and aggregates used, so manufacturer’s data should be reviewed in that regard. The size of any given batch should be equal to the area that needs to be covered in a given section of the floor. Sections may be defined by room sizes or by divider strips, commonly used for terrazzo type of applications, or by pre-determined joint locations.
Once mixed, concrete overlayments should be placed right away over the floor slab. Control joints should be pre-established if required to control cracking. Also, expansion and isolation joints that separate the floor slab from other parts of the existing structure should be honored and incorporated in the overlayment. If the application includes divider or terrazzo strips, those should be in place and levelled to the proper height prior to overlayment placement. When terrazzo strips are not being used, saw cut joints within 24 hours of placement and fill with the appropriate joint fill material.
When placing the mixed material, manufacturers recommend that the edge of the placed material is kept wet to assist in the proper meeting of separate placements. It is also important to use proper tools for placement and finishing such as a gauge rake to place the material to the desired thickness, followed by a spike roller used as the finishing tool. The spike roller removes the tool marks from the gauge rake and assists in leveling the finish surface. It also helps in removing any trapped air sometimes caused in the mixing process. Once all of the material is placed, the overlayment needs to cure in a protected state. It is important to minimize air movement over the surface until the product has reached sufficient strength.
Grinding and Polishing
This is the final step that creates the final finished appearance of the floor. It should not start until the overlayment has been allowed to fully cure per manufacturer’s recommendations and instructions. From there, the degree of polish and shine can be determined along with the amount of aggregate to expose. The first grinding step will be a coarse grit level to create a uniform appearance and expose the aggregate. Additional grinding steps will then be carried out at increasingly finer levels to refine the floor to the desired clarity and gloss. The nature of the material allows for a very high gloss to be achieved if desired while still maintaining appropriate slip resistance for safety. The final step is to apply a clear surface stain protector if desired or required.

Photo courtesy of CTS Cement Manufacturing Corporation
Grinding and polishing the overlayment topping provides the final finished appearance in a sheen and gloss that can be specified to suit a particular project.
The end result of the entire process is a finished floor that is uniform, level, smooth, and easy to maintain. It is a combination of both design and installation efforts that allows this final outcome to be achieved.
Green Building Contributions of Polished Concrete Floors
The U.S. Green Building Council has produced the best known green building rating system with the Leadership in Energy and Environmental Design (LEED) program. Under that program and others that use similar criteria for rating sustainability in buildings, there are categories where the use of polished concrete floors can contribute to the overall design of a sustainable building.
• Optimize Energy Performance: As the largest single category of the LEED rating system, energy usage appropriately receives a lot of attention in design. Finding ways to replace fossil fuel energy with renewable sources of energy is the focus of many energy design strategies. Passive solar heating has been and continues to be a viable approach but without the proper amount of thermal mass in a structure, solar gains will simply heat up the air in an interior space quickly, sometimes uncomfortably so, and then cool it back down quickly as well. The use of polished concrete floors in residential or commercial buildings where the design allows the sunlight to strike the floor means that the floor is warmed, not just the air in the space. The significance is that the mass of the concrete can store more heat than air so the interior temperature rises slowly and comfortably if designed properly. After the sun has set, the warmed concrete continues to be warm and radiates its heat back into the living space. This approach will often allow conventional heating systems to be turned off later in the fall and earlier in the spring effectively shortening the heating season. In the coldest months of winter, it can be a very effective supplement to a conventional heating system, meaning that less purchased fuel or energy is used to warm the building.
• Materials and Resources: The latest version of LEED takes a rather holistic approach to the use of materials and products in buildings. Essentially, it relies on an overall life-cycle assessment of products that may result in a manufacturer or a trade association issuing an Environmental Product Declaration (EPD) to identify the energy and environmental impacts associated with a particular material from its initiation (mining, extraction, etc.), through manufacturing, delivery, use in a building, and its end of service life options. Concrete that uses portland cement has been viewed as an energy-intensive product that contributes to greenhouse gas emissions. Happily, C4A3S cement has been found to be 60 percent more environmentally friendly than portland cement, producing 32 percent less carbon dioxide per pound during manufacture and 66 percent less over the life of the concrete. This is enhanced by the use of recycled content in the concrete such as aggregates, fly ash, etc. which may range from 10 to 30 percent by weight of the concrete, with 15 percent being typical. In the case of site mixed overlayments in particular, it is easy to see that the amount mixed is totally in the control of the installers, meaning that waste is minimized or eliminated since only the amount needed is mixed and used.

Photo courtesy of CTS Cement Manufacturing Corporation
Polished concrete floors can be used in a variety of building types to help contribute to green, sustainable, and healthier buildings.
• Indoor Environmental Quality: This green building category addresses several areas. First, it looks at the human health impact of building products, particularly from volatile organic compounds (VOCs) found in many different types of products and materials. The nature of polished overlayments is that a hard, permanent surface is created that does not require any additional paint, coatings, or adhesives that commonly are a cause of VOC release in buildings. Therefore the overlayment process can reduce or eliminate this concern altogether in regards to the floor. Second, this category looks at the quality of the space in terms of daylighting and the quality of light in the space in general. Using lighter-colored materials, including on the floors, helps with light reflectivity and the distribution of light, particularly in a commercial building space.
In the end, of course, it is the building that is certified or designated as green or not, and it is all of the individual decisions along the way related to the items above and others, that collectively produces a sustainable design.
Specifying Polished Concrete Floors
When specifying concrete floor work and polished overlayments, there are of course numerous choices and specification details to pay attention to. Coordination with manufacturers during the design phases of a project will help gain insight into details, cost drivers, installation requirements, and finish options. In a standard CSI or MasterSpec format, the usual location to include this spec is in Section 03 35 43 Polished Concrete Finishes. Some of the relevant items to address in a standard 3-part specification format are highlighted as follows.
Part 1 - General
The scope of specification work can include all preparation work, underlayments, primers, overlayment, and finishing. In carrying out the work, the following standards can be referenced including the ASTM F710 standard discussed earlier:
• ASTM C109 – Standard Test Method for Determining the Compressive Strength of Hydraulic Cement Mortars using 2 inch or 50 mm Cube Specimens.
• ASTM C1028 – Standard Test Method for Determining the Static Coefficient of Friction of Ceramic Tile and Other Like Surfaces by the Horizontal Dynamometer Pull-Meter Method.
• ASTM F1869 – Standard Test Method for Measuring Moisture Vapor Emission Rate of Concrete Subfloor Using Anhydrous Calcium Chloride.
• ASTM F710 – Standard Practice for Preparing Concrete Floors to Receive Resilient Flooring.
• ASTM F2170 – Standard Test Method for Determining Relative Humidity in Concrete Floor Slabs Using In-situ Probes.
• ASTM E430 – Standard Test Methods for Measurement of Gloss of High-Gloss Surface by Abridged Goniophotometry.
• ACI 302. R-04 – Guide for Concrete Floor and Slab Construction.
Submittals for polished concrete floors should include the usual manufacturer’s data and information for all products used plus recommended maintenance and cleaning information to be passed on to the building owner/operators.
Quality assurance is clearly an important part of any field-installed system and the same is true here. It begins with the use of trained installers and applicators with a minimum number of years of experience, up to 10 years recommended by some manufacturers. Evidence of such qualifications can be requested as a submittal, but it is important that the people actually in the field are the ones with the qualifications and experience needed. In some cases, manufacturers offer regular training and it is appropriate to request certificates showing completion of training. As the overall quality basis of the project and before work on the full area begins, the installation team should prepare a mock-up for review and approval.
Photo courtesy of CTS Cement Manufacturing Corporation
Preparing a mock-up of the finished floor for a project is a common way to identify and set a standard for quality assurance.
Protecting products and materials at the site are important. Fortunately, since this work is often done at the very end of a project, the environmental conditions should be controllable. Generally, materials should be installed in an environment between 50 and 80 degrees Fahrenheit. The ideal temperature at the time of installation is 70 degrees Fahrenheit for both the surface and air temperatures. Warmer material will set faster than expected and cooler material will have slower strength gain.
Part 2 - Products
All of the relevant products used in the total system should be called out and specified for a project. Utilize manufacturer’s recommended specifications, proportions, mix ratios, additives and proprietary components as required for specific applications. The specified products can include:
• Concrete repair materials and toppings, including self-leveling concrete underlayment if called for
• Surface defect and crack filler materials
• Primers specified as either epoxy, acrylic or both as appropriate to the project
• Water designated as clean and potable
• Concrete chemical treatments such as densifiers or stain guards
• Appropriate joint or terrazzo strip materials
• Aggregate materials and terrazzo strips should all be agreed to by the designer and the installer, and shall be within recommended guidelines of the manufacturer
• Surface stains, dyes or colorants should be approved by the concrete overlayment manufacturer
Photos courtesy of CTS Cement Manufacturing Corporation
A variety of final finishes are possible with polished concrete overlayments and need to be specified accordingly using aggregates, divider strips, or dyes and colorings.
In addition to the products used, it is common to call for the type of polishing equipment that should be employed to achieve the desired results. Note that three-phase 480-volt power may be needed in some cases and should be coordinated with the general contractor or the electrician. Three (3) head or four (4) head counter rotating variable speed floor grinders with at least 650 pounds down pressure are recommended. Further, a dust extraction system, pre-separator, and squeegee attachments with minimum flow rating 580 cubic feet per minute can be specified along with hand grinders with dust extraction attachment and pads for final finish work.
Part 3 - Execution
As we have seen, the installation requires multiple steps which need to be clearly articulated in the specification in order to receive best results.
• Examination and Preparation: The importance of this work should be stressed. In addition to the architect, the installer should be given the authority to examine and approve the concrete substrate for conditions affecting the performance of the finish. Further, the installer shall be the one to correct conditions that are found to be out of compliance with the requirements of the system, including the installation of a pre-leveling layer if required. All surface defects shall be repaired and all joints and cracks shall be repaired using materials specified. Ultimately, the goal is to provide a concrete substrate surface that has been mechanically prepared to an acceptable level, is clean of all contaminants, and free of any debris. If the application includes divider/terrazzo strips, then call for setting and levelling them to the appropriate heights prior to the pour of the overlayment. Similarly, the installer shall pin or otherwise mark all existing joint locations to ensure they can be located and re-saw cut after placement of topping.
• Primer: Prime the prepared concrete substrate using the specified primer in accordance with manufacturer’s recommendations and time restrictions. For epoxy primers, washed and kiln dried angular cut silica sand is broadcast to the point of refusal into the wet epoxy. After the epoxy primer cures, all loose silica sand should be vacuumed up.
• Overlayment Mixing: A rapid setting self-leveling overlayment needs to be mixed and installed in accordance with manufacturer’s instructions including careful monitoring of the amount of mix water being used with allowance for the following design items:
- Additional aggregates used shall be approved by the topping manufacturer
- Integral color shall be approved by manufacturer
- Mixing equipment and procedures shall be specified or approved by the manufacturer
• Overlayment Placement: The mixed topping should be placed by pouring, trowelling, or pumping to the levels required and to conform to details on the drawings. The material should be placed to achieve as true and smooth a top surface as possible with mounds or dips deemed not acceptable. The installation contractor shall control overall flatness and levelness.
• Joint Sawing: Allow the topping to cure for a minimum of four (4) hours prior to saw cutting joints. Locate original joint locations and saw cut through topping into the original joint. The saw blade shall penetrate to depth of the original joint or 2" deep, whichever is less. Ensure saw-cut joint is completely free of dust/debris/laitance and apply stain prevention film or other masking agent along surface on both sides of the joint if residual staining may be a concern.
• Install joint filler: Fill from bottom of joint, being careful to avoid entrapping air and slightly overfill joint to a crowned profile. After sufficient cure, razor cut excess filler, leaving a filler profile which is flush with the floor surface. If filler profile is low/concave, remove top of filler and re-apply.
• Polishing: Allow overlayment and fillers to cure for a minimum of 24 hours before beginning the polishing process. Use an overlay polishing system that is approved by the manufacturer.
• Surface Texture: The desired gloss, distinctness-of-image (DOI) or roughness of average (RA) should be identified and selected. These are identified by surface texture ratings that fall into standard categories of A, B, or C finish as noted in the accompanying charts.
Charts courtesy of CTS Cement Manufacturing Corporation.
Polished concrete floors can be specified with a variety of characteristics identified by Surface Texture Grade with corresponding values for Gloss, DOI, and Finish.
• Protection: Once applied, the finish surface needs to be protected during any remaining construction work including final mechanical or electrical trimming, painting, or any punch list work. Since the polished surface is in fact the finish flooring, it needs to be covered and protected just like any other finish flooring. Therefore, protect the surface by means of curing blankets or other protective measures until substantial completion can be achieved.
When specified and installed correctly, the finished floor will meet the demands of both the building owners and the designers.
Conclusion
When designing a building with concrete floors, whether new construction or renovation, the right products, materials, and systems really do matter. The differences between portland cement and C4A3S cement for rapid curing, setting, and sustainability are notable and should be considered for all concrete flooring. The use of a polished overlayment provides a durable finished surface that can be worked into almost any interior design plan. Overall, the system provides a long life cycle with attractive characteristics for use, cleaning, and maintenance. These floors are clearly a worthy option as evidenced by their increasing use worldwide.
Peter J. Arsenault, FAIA, NCARB, LEED AP, is an architect and green building consultant who has authored over 100 continuing education and technical publications as part of a nationwide practice. www.linkedin.com/in/pjaarch
 |
CTS Cement Manufacturing Corporation manufactures Rapid Set® TRU® Self-Leveling Polished Concrete Overlayment System that helps you easily specify and install fast-track, sustainable polished concrete overlayments with high reflective and distinctness-of-image (DOI). www.ctscement.com
|