This CE Center article is no longer eligible for receiving credits.
When it comes to building assets, some of the most valuable are covered during the construction process. Such is the case with subflooring, a structural layer of support—and often the only layer—between the joists and the finished floor. Anyone with floors that squeak, creak, move, sag, or separate knows the effects of a faulty subfloor. In addition to user dissatisfaction, subpar subflooring can contribute to multiple performance failures resulting in costly callbacks, reworks, and even legal suits. Consequently, it behooves architects to understand the fine points of what constitutes a good subfloor. This article will discuss both appropriate subfloor materials and why they matter and the right installation and subfloor preparation to assure long-term floor performance. Lastly, we will discuss different finished floor installations that help to ensure optimal long-term performance.
Why Performance Matters
Everything in a structure rests on the subfloor. Once installed, it cannot be changed easily. According to a 2007 J.D. Power New Homebuilder Customer Satisfaction survey, half of all new homeowners complain about squeaky hardwood floors.
Today, the demands placed on a subfloor are growing ever more stringent. Modern floor plans and designs are putting greater demands on subfloor strength and stiffness than in years past because of details such as open floor plans and stone or granite counters. Designers are increasingly specifying high-end finishes, and they absolutely require a high-quality subfloor. Large-format ceramic tiles and thin engineered planks, for example, need a subfloor that is stiff and consistent, while wide-plank solid boards demand high moisture resistance and superior nail holding ability. Designers who are ignorant of or fail to meet these needs are setting themselves up for failures ranging from loose or cracked tiles to swollen and cupped hardwoods—problems that in turn lead to expensive and time-consuming warranty claims.

Subflooring is the key to long-term floor performance.
Photo courtesy of Huber Engineered Woods © 2014
Subfloors—Parameters of Performance
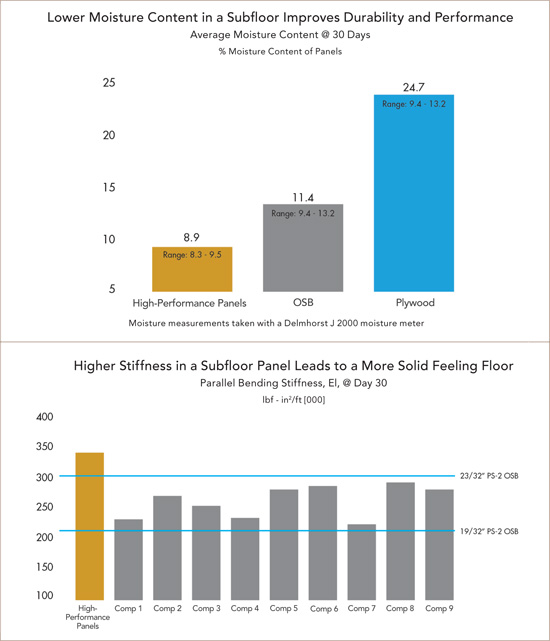
While every flooring installation is unique and has its own specific requirements for subfloor preparation, performance is primarily a function of three main criteria: moisture resistance, stiffness, and fastener holding strength. Choosing the right material for a subfloor could mean the difference between a successful job or one that is plagued by problems. The most common subfloor materials are plywood, conventional oriented strand board (OSB), and high-performance subfloor panels. High-performance panels are engineered and certified to exceed OSB and plywood PS-2 standards for strength, stiffness, and fastener holding power. In addition, high-performance panels generally have the lowest moisture absorption rate in the industry, leading to better on-site performance especially when weather is an issue. This goal is reflected in building code standards and borne out in tests.
Approved testing and inspection agencies for wood structural panels, specifically OSB, all test and inspect to the same Department of Commerce PS-2 standard; this standard has become a minimum in today's construction practices. High-performance panels are designed to exceed the PS 2 minimums. Such panels will be stamped with an Evaluation Service Report (ESR) number or some other identifying mark. ESRs are reports issued by evaluation services, like the International Code Council (ICC) Evaluation Service. For example, one high-performance panel adheres to ESR 1785, which indicates a commitment to higher standards than those qualified under PS-2 for bending strength, bending stiffness, planar shear strength, axial compression strength, and stiffness. This high-performance panel provides designers with as much as 62 percent better design bending strength than PS-2-level plywood and OSB, 28 percent better design bending stiffness than PS-2-level OSB, and 16 percent better than PS-2-level plywood.
Charts courtesy of Huber Engineered Woods © 2014
One subfloor manufacturer constructed a panel exposure deck that compared thirteen ¾-inch subfloor products, exposing them to the elements for 30 days to gauge their performance under harsh conditions comparable to an actual jobsite. Product samples were analyzed for three key indicators of performance and after 30 days and 6 inches of rain, the high-performance panels ranked highest on average in all three categories. As can be seen in the accompanying charts, high-performance panels achieved the best average results, maintaining a much lower average moisture content which is critical for the integrity of the panel and the ability to deliver strength and fastener holding for hardwood floors. The much higher moisture content shown in the OSB and plywood panels can and does often lead to panel degradation. In fact, after 30 days some of the OSB panels showed stiffness levels below PS-2 code minimums, and others approached code minimums for a 19/32-inch panel.
The difference between high-performance panels, plywood, and OSB is due to several factors. More wood is packed into high-performance panels, which produces a more dense, much stronger panel that securely grips fasteners. Resins also play a very vital role in the engineering of OSB and plywood. Typical manufacturers use powder or liquid based phenol formaldehyde resins that glue strands or veneers together with a secondary, weaker bond. These bonds are more susceptible to moisture due to the sodium content in the resins. Some high-performance panels utilize a premium, advanced resin as their primary binder that reacts chemically with the natural moisture in the wood, creating a much stronger covalent bond with the strands. This bond provides deep and long-lasting moisture protection throughout the panel. In high-performance products, wood strand orientation and size are carefully monitored to achieve maximum strength, stiffness, and fastener holding power. And, unlike other panels that may be sanded on only one side, high-performance panels are sanded on both sides to ensure consistent thickness so every panel lays flat and installs easily.
The result is a stronger, higher-density panel that performs well in the field. High-performance subfloor panels are a little heavier than standard OSB, but they cut and accept fasteners the same as other panel products. Doug Steimle, a project manager for Steven Schaefer Associates, a structural engineering firm based in Cincinnati, says “I don't go into a project without specifying subfloor panels that exceed the minimum PS-2 requirements. If the client chooses to remove them from our specs, he's well aware of the risks that causes to the building's performance.”
A closer look at the performance parameters will give a more complete understanding of the problems that may arise.

Moisture-resistant resins play a part in the effectiveness of high-performance subfloors.
Photo courtesy of Huber Engineered Woods © 2014
Moisture Resistance
A common cause of flooring problems is excessive moisture content in the subfloor at the time the finish floor is being installed. Possible consequences include swollen panel edges and degradation of the panels' fastener holding ability. A typical hardwood floor that absorbs too much of this moisture can expand and buckle.
There is a difference in plywood and OSB moisture content regarding applying finished flooring. For instance, plywood tends to buckle, warp, and delaminate when exposed to excess moisture, while OSB swells more around the perimeter. Manufacturers have tried to address perimeter swelling with edge seals, but site-cut edges limit that protection. Joe Pusateri of Elite Homes in Louisville, Kentucky, feels that moisture-related issues can be sufficiently troublesome to scheduling. “In the past, we had to add a day into our building scheduling to repair the damaged plywood spots caused by the moisture-related issues,” he says. Once they began using high-performance products they were able to remove that step in their building process, which saved them time in the long-run.
Moisture problems can be complicated by a high relative humidity or exposure to rain during construction. On a jobsite, rain and foul weather are a reality, with the average jobsite receiving rain three times during construction. In some areas of the country, snow and ice are a certainty as well and can expose projects to even more moisture. Better moisture resistance helps reduce the rate of water absorption into the panel, even under harsh weather conditions. Brice Craig, of Craig Builders in Charlottesville, Virginia, says one of the things he finds most noticeable about high-performance subflooring is what happens on the jobsite after a rain storm. “I know I'm not going to have any problems with the product because you get to the site and just see puddles of water sitting on top of subflooring,” he says.
Chance Miller, whose family has been building homes in the New Orleans area for four generations, concurs. “If I'm using regular plywood or OSB flooring and it rains before the roof is installed, those panels absorb that water, and I no longer have a truly flush flooring system,” says Miller. He compares that to high-performance flooring that has water-resistant sealing on all sides and offers a warranty just in case and it becomes a no-brainer.
Stiffness
When comparing floor systems with the same structural framing, using a stiffer subfloor panel provides a more solid-feeling floor system with a greatly reduced chance of squeaky wood planks and cracked ceramic tiles. Stiffness is a function of the panel thickness and type, as well as of the spacing between underlying joists or trusses. High-performance panels are designed to enable stiffer floors which, in turn, make for more satisfied homeowners. It is important to note that because of their higher strength and stiffness values along both axes (parallel and perpendicular), high-performance panels offer added insurance to designers regardless of the layout. This is particularly important in case a panel gets incorrectly installed parallel with the joists instead of perpendicular to the joists.

High-performance subfloor panels ensure maximum strength for complex floor support layouts, helping to guard against mistakes by installers.
Photo courtesy of Huber Engineered Woods © 2014
Fastener Holding Strength
How well a hardwood floor resists pulling away from the subfloor depends heavily on how well it's fastened. The denser the subfloor, the more friction it places on the fastener, and the more force will be required to loosen the fastener. High-performance panels offer a 10 percent better calculated fastener holding power than PS-2 standard of plywood or OSB, which translates directly to a decrease in the number one complaint of homeowners: squeaky floors. As can be seen in the chart on the previous page, after 30 days of exposure, high-performance panels performed significantly ahead of OSB and plywood.

Chart courtesy of Huber Engineered Woods © 2014
Installation—The Other Half of the Equation
In addition to selecting the right subfloor material, the other part of the equation for good performance is ensuring the right installation. Even the best subflooring will have performance issues if it is installed incorrectly.

Both glue and mechanical fasteners should be used for a solid installation.
Photo courtesy of Huber Engineered Woods © 2014
Expansion Gap
The panel manufacturer's recommendations for spacing and fastening should be followed. Typical panel spacing and fastening requirements over truss/joist systems call for approximately 1/8-inch expansion gap around the perimeter of each panel, which is consistent with National Wood Flooring Association (NWFA) recommendations. Note that this is commonly achieved along the 8-foot edge using self-spacing tongue and groove profiles, but the 4-foot cut edge must be carefully reviewed to ensure proper spacing since it is often missed in the field. If there is not sufficient expansion space, a circular saw can be used to cut in the specified space. Some manufacturers offer instructions on the surface of the panel to educate installers on the proper spacing for the panels.

Photo courtesy of Huber Engineered Woods © 2014
Over Joists, Trusses, and Dimensional Lumber
Regardless of the finish floor, glue as well as deformed shank nails or screws should be used for fastening to ensure greater floor performance. Gluing helps eliminate nail-popping and floor squeaks. Manufacturers generally recommend adhesives that conform to industry standard APA AFG-01 or ASTM D 3498, while high-performance panel manufacturers also recommend that the adhesive be solvent or polyurethane based. Using a construction adhesive on floor joists as well as at tongue and groove joints will help increase the stiffness of a floor system.
Before each panel is placed, a line of adhesive should be applied to the top of the joist. Check the panel manufacturer's instructions to ensure compatibility of the adhesive with the subfloor, but note that polyurethane or solvent-based adhesives often form stronger bonds with some types of panels. To prevent skinning of the adhesive prior to attachment of the panel, only enough adhesive should be spread for one or two panels. A 1/4-inch to a 3/8-inch bead of adhesive should be applied to all joist surfaces. For wide surfaces, use a double bead or a serpentine pattern. A double bead is required for the end of the joints as well, and a bead of glue is recommended to run through the groove of the panel to provide a more monolithic structure.
Screws or deformed shank nails will draw the floor and joist together. Naturally, all mechanical fasteners need to engage the underlying framing, an obvious recommendation that in practice does not always occur. If the installer is using a nail gun, he may not realize if the nail hit the joist squarely. Appearances can be deceiving, and installers say that even though subfloors look to be properly nailed down, they may not be. Many times rows of nails can be seen as much as 1/4 inch off the joist. Subfloor products with a fastening guide can help minimize these problems. Some manufacturers provide guides that show the exact location of the joists or trusses below, with directions in both English and Spanish.

Pre-printed fastening guides help ensure faster and more accurate installations.
Photo courtesy of Huber Engineered Woods © 2014
Mechanical fasteners should penetrate framing members at least 1 inch. Apply fasteners 3/8 inches from panel edges. Space fasteners 6 inches o.c. on supported edges (4-foot ends) and 12 inches o.c. at intermediate support locations. Ensure that all corners are securely fastened. Note: 1-1/8-inch panels spaced 48 inches o.c. should be fastened 6 inches o.c. at intermediate support locations.
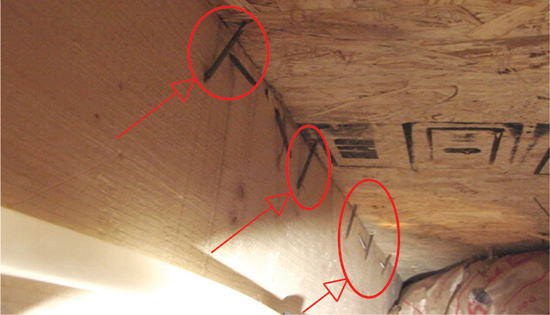
Fasteners missing joists create squeaky floors and expensive callbacks. A fastening guide helps installers.
Photo courtesy of Huber Engineered Woods © 2014
Over Concrete Slab
There are three methods used to attach subfloors to concrete slabs—direct attachment, sleeper systems, and floating floors. All methods require the preparation of the slab. For best results, the slab should be covered with a minimum 6 mil preferred polyethylene sheeting. The polyethylene sheet should be spot glued to the slab with an adhesive that will bond to both concrete and plastic. All joints in the polyethylene sheeting should be lapped a minimum of 4 inches. These laps should also be glued to ensure an adequate moisture seal. The plastic should extend up the sides of the walls a few inches, with the excess trimmed after the subflooring is installed. In this method, the panels can be placed directly on the polyethylene sheeting. Panels should be properly spaced at edges and ends according to the manufacturer's directions and fastened with masonry nails, concrete fasteners, or powder-actuated fasteners. Again, manufacturer's directions should be heeded for instructions on how far to place fasteners from panel edges.
Alternatively, the subfloor panels can be applied directly to a sleeper system. If installing the subfloor panels over a sleeper system, all edges should be fully supported. This can be achieved using blocking or a tongue and groove profile.
After the slab is correctly prepared, the sleeper system should be installed with 2x4s laid flat. Manufacturers generally recommend joist spacing of 16 inches o.c. Subfloor panels should then be laid on the joist system with the long dimension across the joists. All panels should cover at least three joists. Manufacturers' directions on spacing panels and fastener types should be followed closely.
Whether by code or by the building's designer, multifamily residential structures frequently have strict sound requirements for floors in order to cut down on noise from the units above. Many times, these requirements do not allow a subfloor to be fastened mechanically to the concrete substrate. One solution in a solid plank floor installation is a “floating floor,” an isolated floor system that sits on top of the concrete without glues or nails or screws and is held in place entirely by its own weight. The typical profile involves a concrete substrate, on top of which is a sound isolation mat, and then two layers of subflooring panels that are both glued and nailed to each other. Plywood is susceptible to delamination in this type of application because if it is not fastened directly to the substrate, it can undulate and lift, compromising the viability of the entire floor system.
High-performance panels have the resistance to water absorption and lower water induced edge swell to enable a gravity-loaded system to maintain flatness during construction and after installation. This translates to a high-quality wood floor installation.
Over Light Gauge Metal Framing
Light gauge metal framing is used in many different construction applications. It is more prevalent in light commercial buildings and accounts for only a small percentage of residential work.
Screws and pins are the two types of fasteners recommended in attaching subflooring to the metal framing. Self tapping or self drilling bugle head type screws are recommended so they can be installed flush or counter sunk. Hex screws or other fasteners that cannot be installed flush may interfere with the finish floor or wall covering installations. Typically, a minimum of three threads should be exposed through the framing beneath the subfloor. Alternatively, steel pins can be used. These fasteners contain specially designed grooves called knurls that spiral down the shaft. The knurls help to penetrate and grip the metal framing. They are installed with pneumatic air guns similar to those used for typical framing nails. As always, the local building codes or light gauge framing manufacturer's recommendations should be followed for fastening requirements.
To achieve optimum performance, a continuous bead of construction adhesive should be applied to the light gauge metal joists prior to installing the subfloor. Because metal can expand and contract more than wood, polyurethane adhesives are recommended when installing engineered wood subfloor over metal framing. Panels should be installed with the long dimension perpendicular to supports, with the light gauge manufacturer's installation instructions followed for size of fasteners.
In certain situations for accelerated installation time, powder-actuated fasteners can be used to attach engineered wood subfloors to light gauge metal framing. These specialty fasteners provide the ability to fasten into concrete, masonry and structural steel. When considering using a powder-actuated fastening system, it is advisable to request an Evaluation Service Report or an approved fastener design.
Prepping a Subfloor
A subfloor must be prepared to certain standards in order to adequately form the base for a high-performance finish floor.
Removing Standing Water, Ice, and Snow
High-performance panels remain dimensionally stable in standing water; however, removing standing water to hasten the drying process is advisable on all panels, not just high-performance panels. Sweeping and wet vacuuming are the preferred options. Drilling weep holes on a flat surface will only drain water in the immediate vicinity of the weep hole. Before the framing is erected, the use of a tented tarp system is a good preventive measure, but care must be used to provide airflow between the tarp and wood subflooring to avoid trapping water between the tarp and the wood surface, which may lead to mold and mildew.
During winter months, snow and ice may accumulate on subfloor panels. Although this may present a safety hazard, snow and ice will not normally affect the structural integrity of a high-performance panel. Typical PS-2 OSB or plywood may experience some adverse effects due to snow and ice.
Ice and snow can safely be removed with a number of different options. Dark coarse sand, available at any local hardware or big box store, will absorb heat from the sun, assist the melting process and can help minimize the possibility of slipping. Alternatively, a combination of non-sodium based materials including can be used. Most products can be applied with a simple garden sprayer and are widely available commercially in gallon containers. Once the ice and snow have melted and the building closed in, it is important to ensure the panels have completely dried prior to finish floor installation.
Dusty Bitton, owner of Pinetop Custom Homes, builds approximately five to 10 custom homes a year in McCall, Idaho and surrounding areas. Since McCall has the highest average snowfall in Idaho and the building season is only five months out of the year, Bitton must build his homes as quickly and efficiently as possible. To complete his builds under these challenging conditions, Bitton uses high-performance subflooring among other advanced products due to their quick-installation and moisture-resistant properties. “At times we are unable to complete our builds before the heavy snowfall hits and must depend on moisture-resistant products to prevent any issues until we can continue the building process the next spring,” stated Bitton. “I began building a home last November that were exposed through May. Although the homeowner was worried about mold, the strength and moisture barriers of the products prevented any issues, and we were able to resume building without any delay due to rework.”

Plywood delamination and damage is the result of wet-dry cycles on a jobsite.
Photo courtesy of Huber Engineered Woods © 2014
Flatness. One key prerequisite for a good installation is achieving flatness. Damaged panels should be repaired or replaced, and swollen seams should be sanded when necessary before underlayments are installed. Note that a cement backer board for tile and a layer of 30 lb. felt for hardwood are often recommended. While felt will raise the coefficient of friction between the hardwood and the subfloor, it will not add moisture resistance. To begin with, the moisture content of the subfloor must be correct. Consistent with the National Wood Flooring Association's (NWFA) definition, a subfloor is flat when the difference in height between two points does not exceed 3/16 inch in 10 feet or 1/8 inch in 6 feet. If the finish flooring type requires substrate flatness tolerances to be more restrictive, some sanding of the subfloor may be necessary. Peaks and valleys in a subfloor can typically be detected by taking a 6-foot or 10-foot level and laying it across the panel surface. If high or low spots in the subfloor exceed the tolerances specified by the finish floor manufacturer, then high spots should be sanded and low spots filled with a leveling compound or other NWFA-approved material. Aside from flatness, the subfloor should be checked for damaged areas and repaired as needed and free of debris such as drywall mud, dust and other debris.
It is the builder's or general contractor's responsibility to provide the wood-flooring contractor with a subfloor that is within the tolerances listed above. The subfloor itself should be inspected carefully. If there is movement or squeaks in the subfloor, it should be resolved accordingly. Refastening may be an option, as is correctly attaching the sill plate to the subfloor. Incorrect attachment of sill plate to subfloor may be a cause of squeaking if the subfloor deflects too much between joists. Protruding fasteners are easily remedied by driving those fasteners deeper into the subfloor. Any roughness or unevenness of the subfloor will result in an unsightly surface on the finish floor and wear on high spots.
With a radiant heating system. As radiant heating systems become increasingly popular it is important to understand their subflooring requirements. Wood subfloor panels are compatible structural members with radiant heating, and the system's temperature, typically ranging from 120 degrees to 135 degrees Fahrenheit, does not affect the performance of the panels. For best results, panels should be installed with the long dimension perpendicular to the supports.
The heating system can be installed either under or over the subfloor, with the tubing laid under the subfloor panels or the electric roll on top of them, according to the radiant heating manufacturer's instructions. Tubing should be attached between the insulation and to the underside of the subfloor using tubing staples between the joist cavities. For the electric roll over the subflooring, a layer of settling material should be applied, per the manufacturer's instructions.

Photo courtesy of Huber Engineered Woods © 2014
Finished Floor Installation Scenarios
Each type of finish floor has its own discrete requirements for a subfloor.
Under ceramic tile. Ceramic tile floors will crack if there is any significant movement within the subfloor. Consequently, high-performance panels are a better option than plywood or OSB, as there is less deflection. However, ceramic tiles should never be installed directly over wood subfloor panels; an approved underlayment must be installed prior to tile installation. The type of underlayment should be based on the type of construction and installed according to the tile manufacturer's recommendations. Generally speaking, a layer of thin-set mortar should be applied to underlayment in straight beads; there are several choices of thin-set mortar on the market, but the one selected should be consistent with what is specified in the Tile Council of America Handbook for Ceramic Tile Installation, which is the “bible” for acceptable methods of tile installation on structural panel substrates. According to the handbook, there are several types of underlayment available, including cementitious backer board and rubber membranes. The backer board is applied directly to the wood subfloor, and ceramic tile can be bonded to it with dry-set, laytex/polymer modified Portland cement mortar, or epoxy depending on the backer board manufacturer's instructions.
The handbook notes that the owner should communicate in writing to the project design professional or the general contractor the intended use of the tile installation in order to plan to accommodate expected live load, concentrated loads, impact load, and dead loads, including the expected weight of the tile and setting bed. Proper attention should be paid to spacing of underlayment and subsurface tolerances for thin-set tile installations.
Under hardwood flooring. Quality subflooring is particularly important under hardwood floors, with fastener holding power and panel strength providing an exceptionally solid base for keeping hardwood flooring flat and quiet. Everett Custom Homes in Charlotte, North Carolina, builds approximately three to five high end custom homes each year with each between 4,000 to 6,000 square feet, with the typical house having at least $50,000 worth of hardwood floors installed. Everett's Eric Brown says they use a lot of high end hardwood floors, such as 10 inch wide walnut, and finds that high-performance subfloor panels perform better than other subflooring materials. “You don't have to sand seams, it doesn't rot, it doesn't get soft, and it doesn't delaminate. We don't have problems with floor squeaks, and we've never had a problem with moisture content in the subfloor whenever we are ready to install the hardwood finish.” Says Brown, “Other types of subfloors lose nail-holding power.”

Photo courtesy of Huber Engineered Woods © 2014
For proper installation of a subfloor under hardwood, joists should be spaced a maximum of 19.2 inches o.c. Subfloor panels having a minimum 23/32 inch thickness and subfloor panels should be installed with long dimensions perpendicular to supports. It is important to note that truss and joists systems spaced greater than 19.2 inches o.c. will require additional subfloor thickness. Either a one-inch-thick OSB subfloor, or one that is installed in two layers, with the first layer requiring an engineered wood panel and the second a minimum ½ inch plywood panel, are the two approaches that can be successfully used according to the NWFA.
A big issue in hardwood floors is moisture. With narrow strip hardwood flooring the moisture difference between the subfloor and hardwoods should be no more than 4 percent; with wide plank hardwood flooring, the difference should be no more than 2 percent. In most U.S. states, the recommended moisture content should be no more than 12 percent, according to the NWFA.
For best results in measuring moisture, a pin model moisture gauge calibrated for the species being tested should be used. At least one reading should be taken per 100 square feet of subfloor, and more along walls and near windows and doors. Many installers keep written and often photo documentation as proof that the correct procedures were followed in the event of future problems. Ideally, the building's HVAC system will be operational prior to installation to help acclimatize the wood. When subflooring is installed over a crawl space, polyethylene sheeting should be placed over the ground, and adequate ventilation should be used to help control moisture.
If the levels are found to be excessive, moisture in the subfloor as well as in the rest of the framing can be decreased by drying the structure's interior with heat. Kerosene-fired torpedo heaters are used by many builders to dry interiors, but because one of the byproducts of combustion is moisture, the heated air needs to be vented to the outside. A better alternative is to have the HVAC unit up and running before the finish floor is installed. Forced air systems are also an acceptable method of drying the structure and venting the moisture, with the National Wood Flooring Association recommending a five-day forced air drying period before flooring installation. It goes without saying that a subfloor with a lower moisture absorption rate will obviate the need for many of these approaches.
After the subfloor has been deemed dry, level, clean and free of dirt and dust, and securely fastened to the joist system below, a layer of No. 15 felt or red rosin paper should be installed. The acclimatized hardwood can then be applied perpendicularly to the joist system. In cases where the preference is to install the hardwood parallelly to the joist system, an additional layer of wood underlayment should be installed or blocking used between joists, as recommended by the NWFA. Hardwood flooring can be affixed to subflooring with cleats, nails or staples, though the fastening recommendations of the hardwood manufacturer should always be followed.
Having a high-quality subfloor to support expensive hardwood flooring is important to Brian Hall of Classic Homes in Charlotte, North Carolina. “If that part of the job isn't done correctly, it doesn't matter how you cover it up, you're going to have problems,” says Hall, who has used high-performance subfloors for more than 10 years. “It is just a far superior product for nail retention and definitely a more substantial product. When fastened to the floor system, it certainly strengthens the overall floor.”
Subflooring: A True Asset
The finish floor will be only as good as the subfloor beneath it. While a substandard subfloor will create problems, the right subfloor material and the right installation will result in long-term floor performance and user satisfaction.
 |
Huber Engineered Woods LLC, a wholly owned subsidiary of J.M. Huber Corporation, combines advanced resin and wood product technologies with state-of-the-art manufacturing capabilities to develop top-quality products like AdvanTech® subflooring and ZIP System® sheathing. Find out more about these innovative products by visiting Huber’s online architect library www.huberarchitectlibrary.com or www.AdvanTechPerforms.com. © 2014 Huber Engineered Woods LLC. Huber is a registered trademark of J.M. Huber Corporation. |