This CE Center article is no longer eligible for receiving credits.
Pre-Finished vs. Site Finished
For optimum performance, it is recommended that Western Red Cedar is pre-primed or pre-finished prior to job site delivery.
- Factory-priming As the name implies, this is performed in an industrial setting where a machine coating process applies a primer coating to all six sides of each board. The coated boards are then dried prior to shipment to the job sites. Pre-primed siding and trim boards delivered to a job site should be kept dry and clean prior to installation. All field cuts should be re-sealed with a primer prior to the boards being installed. Top coating over the primer should be completed as quickly as possible as most primers are not intended to be exposed to natural weathering for more than 90 days.
- Factory finishing: This is similar to the above priming process; however, it allows for the additional application of one or two factory applied topcoats of acrylic latex paint or solid stains in job lot quantities and in the colors as selected. Color matching needs to be based on actual samples and a realization that color changes over time due to sunlight and moisture–regardless of which finish is used. It is important not to overdrive nails during installation of factory finished siding, as this will damage the surrounding wood and coating. Overdriven nails must be remedied immediately by filling the depression with exterior grade wood putty or caulk specifically designed for this purpose. Touch up any repairs or field cuts, taking care not to smear the topcoat.
Properly done, factory priming/finishing provides the application of a uniform coating at the recommended coverage of the primer/stain to all six surfaces of each piece (face, back, edges, and ends). It is all done in a controlled environment to permit proper curing of the finish ensuring the wood has a coating to protect it from exposure to sunlight (UV degradation) and surface contamination by mildew and dirt. It can also help with the elimination of lap marks, streaks, and shrink lines after installation. From a construction standpoint, it allows for the ability to install cedar products at any time of the year and often includes a coating warranty.
Photos: Aaron Leitz; courtesy of Western Red Cedar Lumber Association Aaron Leitz
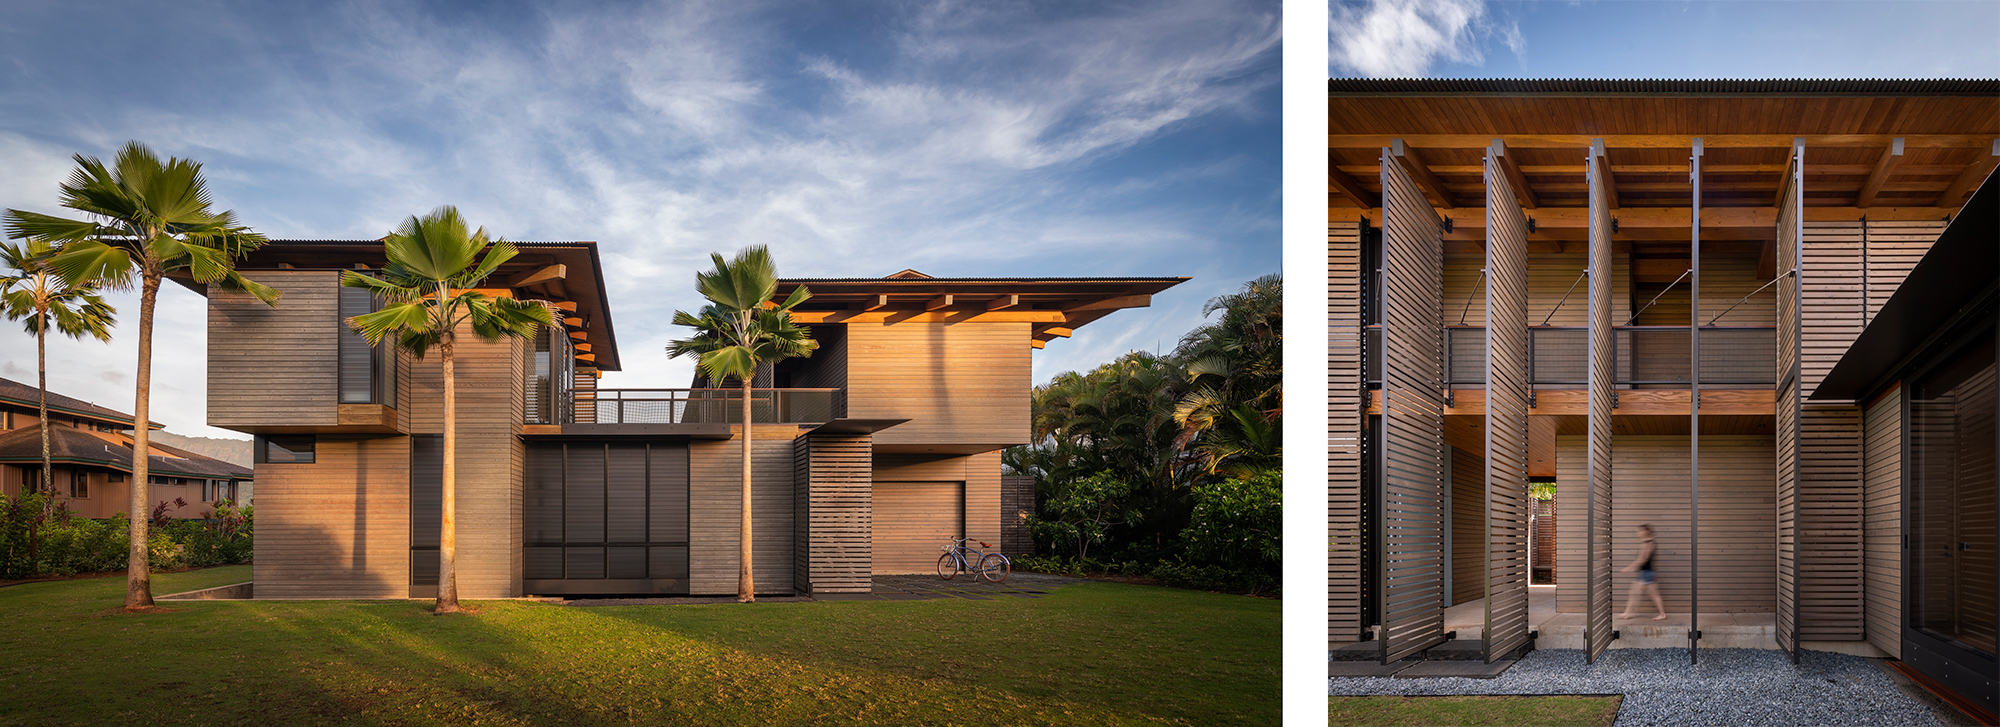
Natural, unfinished cedar is used for a variety of outdoor applications including siding, louvers, screens, and even interiors. Project: Hale Napo’o. Location: Hanalei, Hawaii. Architect: Olson Kundig.
>Finish for Engineered Cedar Products
Engineered wood products have become quite common and popular and that includes cedar products. In virtually all cases, these products are either pre-primed or pre-finished to produce the best results. Such products include clear or knotty finger-joined boards, trim, siding, and paneling. These also include clear Vertical Grain (VG) grade veneer overlay engineered tongue and groove (T&G) products that are used for soffits or other exterior locations. In these cases, the pre-finishing may be available in transparent, semi-transparent, and primer/paint options.
PREPARATION OF CEDAR FOR FINISHING
When site-finishing of cedar is being performed, the first thing to recognize is that the surface condition of the wood on which the finish is applied can substantially affect the performance and life expectancy of the finish. This is true for both newly installed WRC and existing cedar on buildings that needs to be re-finished. Of particular importance for both the first finish and subsequent re-finishing of wood is the need to be clean and dry. Any existing mold and mildew need to be killed with a mild oxygen bleach solution that stays on the wood for thirty minutes to be effective. Note that chlorine bleach destroys lignen in the wood and can be harmful to surrounding plants and gardens.
- New (Not Weathered) Western Red Cedar: New cedar siding and trim should be protected from the weather before, during, and after construction. It is seldom necessary to carry out extensive surface preparation providing the wood has not weathered for more than two weeks and is clean and dry. The moisture content should always be checked as a precaution - the moisture content cannot be above 20 percent. If the wood has been contaminated by dirt, oil or other foreign substances, the contaminants must be removed, and dirt should be washed from the surface. For smooth-planed, flat-grained cedar, the surface should be scuff-sanded with 80 grit sandpaper. This procedure will greatly increase the performance of the coatings but will not detract from a smooth appearance. Surface preparation is not necessary for clean textured cedar.
- Existing (Weathered) Western Red Cedar: Siding and trim that has been exposed to the elements for longer than two weeks may have a degraded surface that is no longer suitable for painting and requires remediation. Preparing the surface by sanding, brushing (with a non-ferrous bristle brush), and washing before applying the finish is recommended. If the wood is gray/dirty, then it needs to be cleaned and sanded to expose fresh fibers. It may be necessary to wash the wood with a restorative cleaner designed to remove graying. These products usually contain oxalic acid. Touch sanding smooth-faced wood with 80-grit sandpaper improves the adhesion of finishes.
Sometimes, a paint or stain supplier will refer to a condition called “mill glaze” on wood which is caused by the heat of the sawmill process interacting with the pitch and resin of different wood species. The suggestion may be made that this needs to be addressed so that the finish will adhere and not be compromised by the mill glaze covering the surface of the wood. However, this is not relevant to cedar because it is free of pitch and resin. Hence, any special preparation to combat mill glaze should not be necessary.
Separate from the above, some manufacturing options do have implications for the best finishing solution.
- Surface Texture: Western Red Cedar products are available with a smooth (i.e., planed) or a textured (resawn, or rough-headed) surface. As a general rule, textured surfaces provide the best mechanical adhesion of the finish to the wood. For smooth-surfaced Western Red Cedar, a two-coat paint system is preferred.
- Moisture Content: Finishing wood that is wet (above 20 percent moisture content) will increase the risk of coating failure. It is best to finish Western Red Cedar when its moisture content has stabilized at the level that will prevail during the service life of the product. In North America, this level is approximately 12 percent moisture content. The best product choice is Western Red Cedar which is kiln-dried at the time of manufacture.

Photos: Hangfei Zhang; courtesy of Western Red Cedar Lumber Association
Clear stain with a UV inhibitor produces dramatic effects while holding up to the harsh Alaskan environment. Project: Aurora Villa.
Location: Fairbanks, Alaska. Architect: Sparano + Mooney Architecture.
Design and Construction Impacts
The performance of wood finishes can be directly impacted by design and construction practices related either to the installation of the cedar or the rest of the building design. While there can be many such factors to be aware of, the following is a representative list:
- Install flashing over all openings and above skirt and band boards.
- Provide adequate overhangs at eaves and gables (designs with no overhangs provide less protection to the finish from UV and moisture exposure).
- Install drip caps over windows and door frames.
- Allow at least 6 inches of clearance between the bottoms of siding and trim boards and the ground line.
- Allow at least 2 inches of clearance between the bottoms of the siding and trim boards and roofing materials.
- Install vapor barriers on the warm side of walls to minimize condensation within walls.
- Vent high humidity areas such as kitchens, laundries and bathrooms.
- Vent attics and crawlspaces.
A general design approach of installing cedar siding over a rain screen greatly decreases the chance that the backs of the siding will get wet and remain wet. This ensures that any water that penetrates the wall assembly will drain down and away from the walls. Rain screens also minimize moisture imbalances within the siding, thus reducing the potential for cupping and extractive bleeding. As a result, coating performance is markedly improved.
FINISHING CEDAR FOR EXTERIOR APPLICATIONS
Exterior applications of finished Western Red Cedar typically include products applied to a vertical surface that is exposed to UV and weather such as siding (bevel, tongue and groove, shiplap, board and batten, etc.) and trim (corner boards, window and door trim, fascia, etc.). It may also include some protected horizontal surfaces such as soffits or porch ceilings which are subject to fewer effects of UV and weather conditions. Conversely it can include some horizontal surfaces that are exposed to more extreme conditions such as decking with heavy foot traffic, the greatest exposure to UV, and to direct rain/snow fall. Similarly, outdoor structures such as canopies, trellises, pavilions, pergolas, etc. are all subject to higher levels of exposure. Therefore, recognizing the degree of protection that is needed for different applications on the exterior is important in order to be realistic about how well or how long a particular finish may last. Of course, that can be balanced with the choice of a desired appearance but educating the building owner about the realistic life expectancy of a finish can go a long way toward setting up reasonable expectations and be a good part of a firm’s risk management practice.
Beyond identifying the degree of exposure, the quality of the finishing product needs to be considered. Western Red Cedar’s excellent finishing characteristics cannot compensate for finishing products that are unsuitable, of inferior quality, or improperlyapplied. Hence when specifying a finish for a Western Red Cedar project it is always best to use a top-of-the-line product from a proven and trusted supplier/manufacturer.
In terms of application, here are some of the things to be sure are specified or called for in all exterior situations:
- Keep cedar protected from the elements on the job site.
- Acclimatize Western Red Cedar to local humidity conditions before installing.
- Proper seasoning of the wood must be done to accept the finish if it is not already seasoned to an acceptable moisture content.
- Finishes should be applied as soon as the wood is dry.
- Use stainless steel, double hot-dipped galvanized or aluminum fasteners to avoid staining.
- Apply primer or stain to all six sides, including surfaces exposed after they are field cut, before installing. Note that the end grain may require 2 coats to fully protect it.
Based on all of the above, the following options can be considered for exterior finishing of cedar recognizing that each one has its own service life, benefits, and challenges.
Photos: Julian Parkinson; courtesy of Western Red Cedar Lumber Association
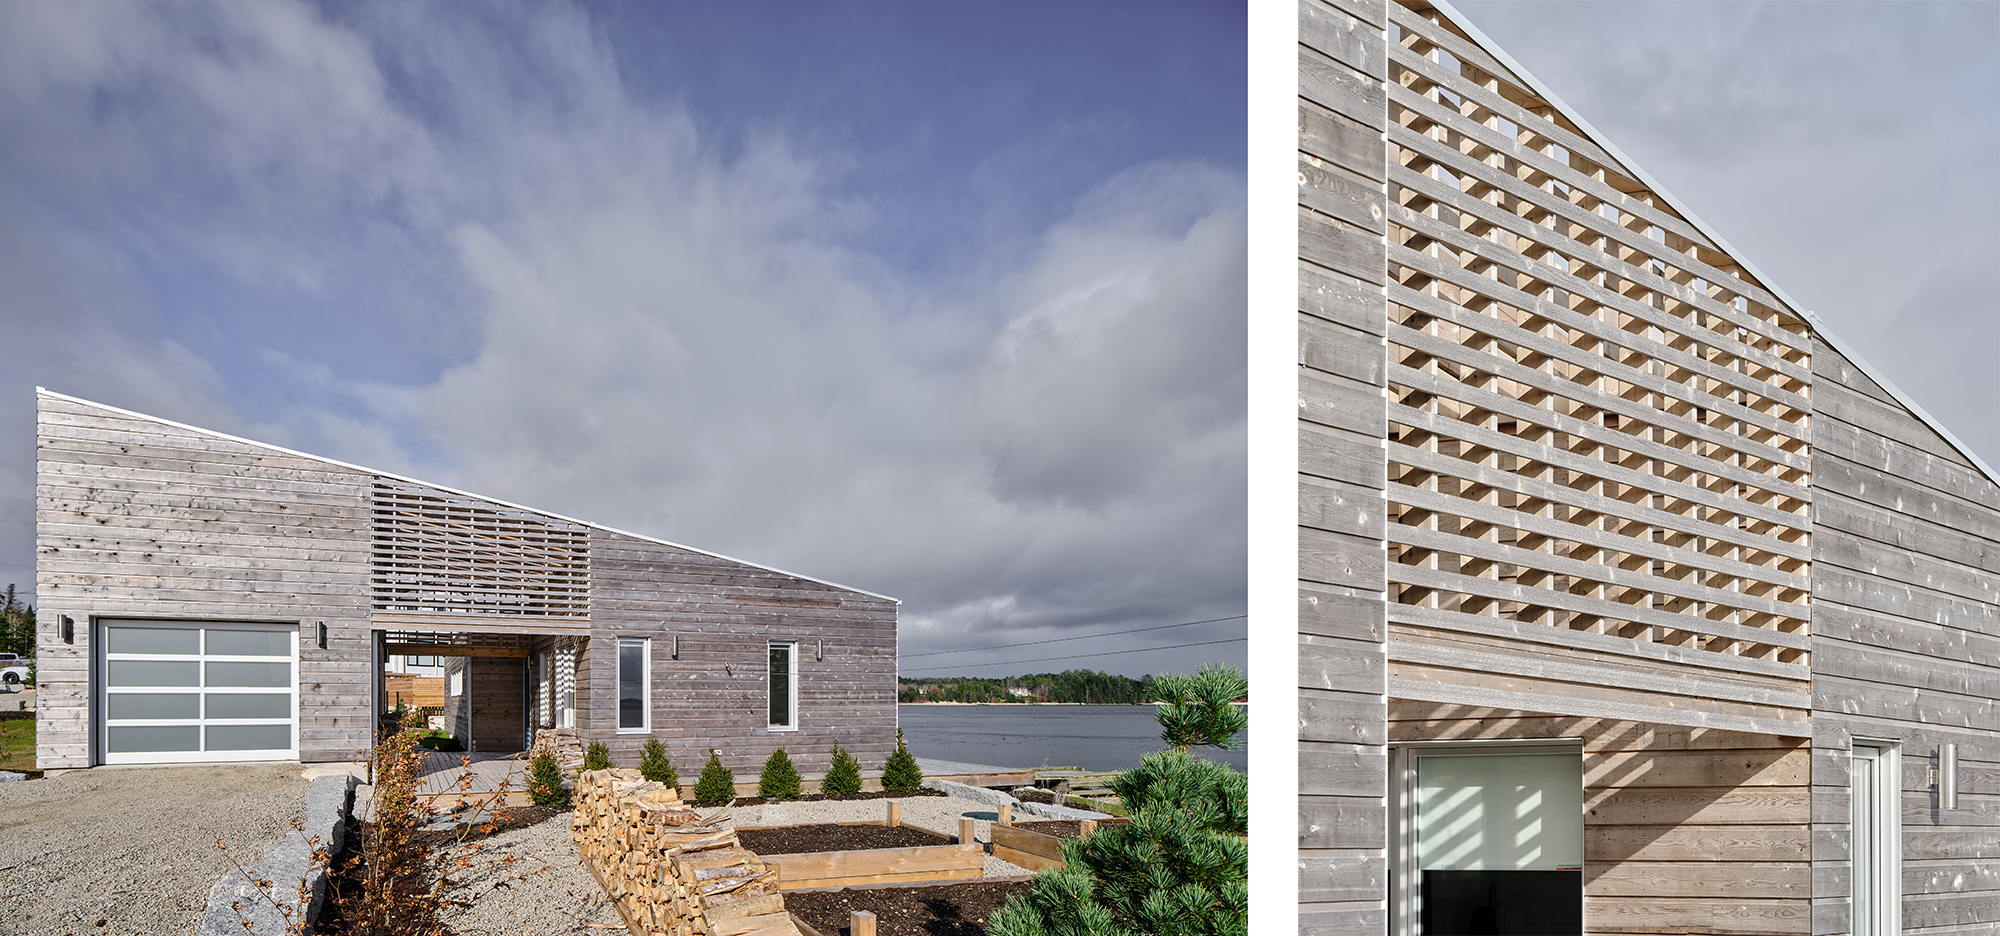
For finishing, the design team opted to let the home weather naturally, eventually turning an elegant silvery grey. It’s a design decision that highlights cedar’s versatility as well as its durability in the face of a salty coastal environment. Project: Five Cove House. Location: Marvin’s Island, Nova Scotia, Canada. Architect: RHAD Architects.
Unfinished Cedar
Western Red Cedar performs satisfactorily as a decking and siding product if it is left unfinished to weather naturally. Some design professionals or owners choose this option based on any of the following:
- A preference for the silvery grey look of naturally weathered Western Red Cedar – unfinished WRC creates a natural gray colored patina on the wood over time.
- A desire not to invest the time and effort required to maintain the finish on a cedar product.
- Project inaccessibility, causing difficulty in maintaining the finish on a Western Red Cedar project, for example, siding on very tall buildings.
- A concern about the environmental impact of applying a finish on Western Red Cedar.
These are all valid considerations, and the reality is that Western Red Cedar siding and decking can have a long service life without a finish coating in many environments — as long as good design, installation and maintenance practices are followed. Without the protection provided by a coating against moisture intrusion, (especially end grain sealing), steps must be taken during the installation process to allow Western Red Cedar to readily dry following exposure to moisture, otherwise the risk of decay increases.
It is also important to understand that the choice not to apply a finish to an exterior cedar product has long-term implications. As Western Red Cedar weathers, it will lose its natural color and become grey. In many climates, it weathers to a silvery grey color. In other climates, because of varying moisture and sun exposure conditions, Western Red Cedar may not weather uniformly. In some cases, it may develop a brownish tint. In order to restore weathered cedar to a state where it can be painted or stained, significantly more effort will be required to prepare the surface of the wood for coating. Note that unfinished cedar left to weather for just 12 weeks loses 50 percent of its ability to hold a film forming finish. That is why it is highly recommended that any finishing is done within 2 weeks of installation. Factory finishing is encouraged and recommended.
If the choice is made not to apply a finish to Western Red Cedar, contaminants such as dirt and mildew should be regularly removed to maintain its beautiful, natural appearance. Life Cycle Assessment (LCA)1 of Western Red Cedar siding and decking shows it has the most benign environmental impact of all the alternative product choices for those building applications. Coatings, especially the solvent borne finishes and the frequency of their application negatively impact the LCA of cedar siding and decking. This impact may influence a decision not to apply a finish. Fortunately, a new generation of more environmentally friendly, water borne, coatings are emerging, and these products should be considered.
Clear/Transparent Finishes
These are essentially colorless, penetrating finishes that are commonly used for cedar decks to enhance the appearance and service-life. The water-repellent preservatives are preferable to the water-repellents only because they contain a mildewcide and often other fungicides that help inhibit surface mildew growth. Many of these water-repellants contain ultraviolet light blockers or absorbers that help protect the Western Red Cedar from damaging sunlight. To date, the best of them are solvent-borne (oil based) but new products containing water soluble oils are becoming more readily available. The water repellent preservative finishes are very effective in stopping the absorption of liquid water thus reducing swelling and shrinking of the wood. Water repellents should be used only on newly manufactured bare cedar, on restored bare cedar, or on cedar previously treated with the same type of product.
When used as a natural finish, the service life of a clear water repellents is about one year, depending on the weather exposure. Therefore, frequent reapplication is necessary to maintain the original look, which may prove difficult if the finish wears unevenly allowing the color of the wood to change. Accordingly, architects should discourage the use of transparent finishes on siding and trim to prevent unrealistic expectations with regards to maintenance. The exception is for protected areas such as ceilings and walls of covered porches, soffits, etc. These areas can use transparent finish if they aren’t receiving any sun or weather exposure so the service life can be much longer. Reportedly, 6-8 or even 10 years is possible in these protected applications.
Note also that transparent, non-flexible, film-forming finishes such as lacquer, shellac, urethane, and varnish are not recommended for exterior use on Western Red Cedar. Regardless of the number of coats, the finish will eventually become brittle, develop cracks in the coating film and then fail.
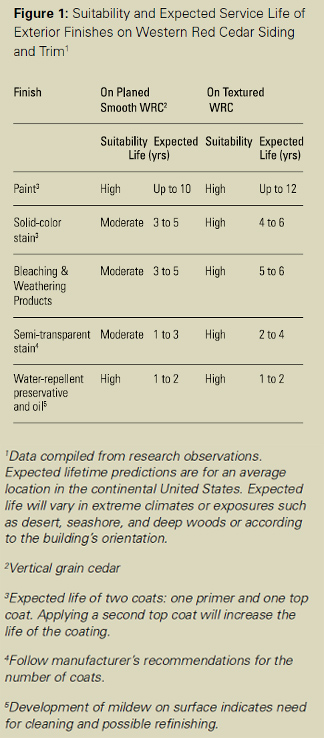
Image courtesy of realcedar.com
A comparison of the expected service life of different types of finishes on Western Red Cedar applied to building exteriors. Source: www.realcedar.com/static/2d35a974acbf517df55a40d13ed6d7a4/How-to-Finish.pdf.
Semi-Transparent Finishes
Semi-transparent stains have pigments that provide color and greatly increase the durability of the finish. The pigments help block sunlight and protect the cedar surface. The better products contain water repellents and mildewcides or fungicides. The solvent-borne, semi-transparent stains penetrate the cedar without forming a film and do not blister or peel even if excessive moisture enters the cedar. However, latex semi-transparent stains can sometimes build up a film, especially on recoating, which can lead to peeling. Latex formulas containing water-soluble oils are becoming more readily available.
It is possible to switch to a semi-transparent stain when a deck needs to be refinished. Even if the deck has been coated with a clear or transparent stain for many years, an oil-based semi-transparent stain can be applied, provided the wood surface is cleaned. Note, however, that film-forming finishes are normally not recommended for use on Western Red Cedar decks because they can fail by cracking, flaking, and peeling and can be very difficult to refinish and maintain.
Semi-transparent stains can be applied by brush, spray, pad, or roller. Brushing will usually give the best penetration and performance. Spray or roller application followed by back-brushing is also an acceptable method. Oil-based stains are generally thin and runny, so the application can be messy. Lap marks can be prevented by staining continuous lengths. This method prevents the front edge of the stained area from drying before a logical stopping place is reached. Working in the shade is desirable because the drying rate is slower. Stain that has been applied by spray, without back-brushing, is prone to show blotchy patterns as it weathers. Two coats of penetrating oil-based stain on textured Western Red Cedar will provide a longer service life than one coat, but only if the wood will accept the second coat. Stir the stain thoroughly during application to prevent settling and color change. Avoid mixing different brands or batches of stain.
Latex semi-transparent stains do not penetrate the wood surface, but they are easy to apply and less likely to form lap marks. These stains are film-forming and may not be as durable as oil-based stains. They can be applied in one coat on smooth face cedar or two coats on textured face cedar with a longer service life of approximately two to four years. Keep in mind that the building design and the exposure to weather will impact the service life of semi-transparent finishes too.

Photos: Bruce Damonte; courtesy of Western Red Cedar Lumber Association
A semi-transparent grey stain was very successfully used on the exterior of this school while a semi-transparent whitewash stain was used on the interior ceiling. Project: French International–Middle School. Location: Portland, Oregon. Architect: Hacker.
Solid Color Stain
These opaque stains fully cover, coat, and protect the wood from UV and moisture. Solid stains, like paints, sit on the surface and form a film, but they are still quite good for most exterior siding and trim applications. For decking, however, solid body finishes are not recommended because they will flake or peel.
Solid stains may be applied to Western Red Cedar by brush, roller, or pad. Brush application is usually the best. These stains perform similarly to and are applied like paint. One coat of solid-color stain is only marginally adequate on new wood. A prime coat with a topcoat will always provide better protection to the wood as well as promoting a longer service. Optimal performance can be obtained if the wood is primed, and then given two coats of stain. Topcoats of acrylic latex solid-color stains are generally superior to all others, especially when two coats are applied over a primer. Unlike paint, a solid-color stain may leave lap marks. To prevent lap marks, follow the procedures suggested for semi-transparent penetrating stains.
Properly applied in the field, one coat of solid color stain can be expected to last up to 5 or 6 years. Factory applied finishes are available that come with warranties on the finish of 15-25 years depending on the number of topcoats.
Photos: Birdseye; courtesy of Western Red Cedar Lumber Association
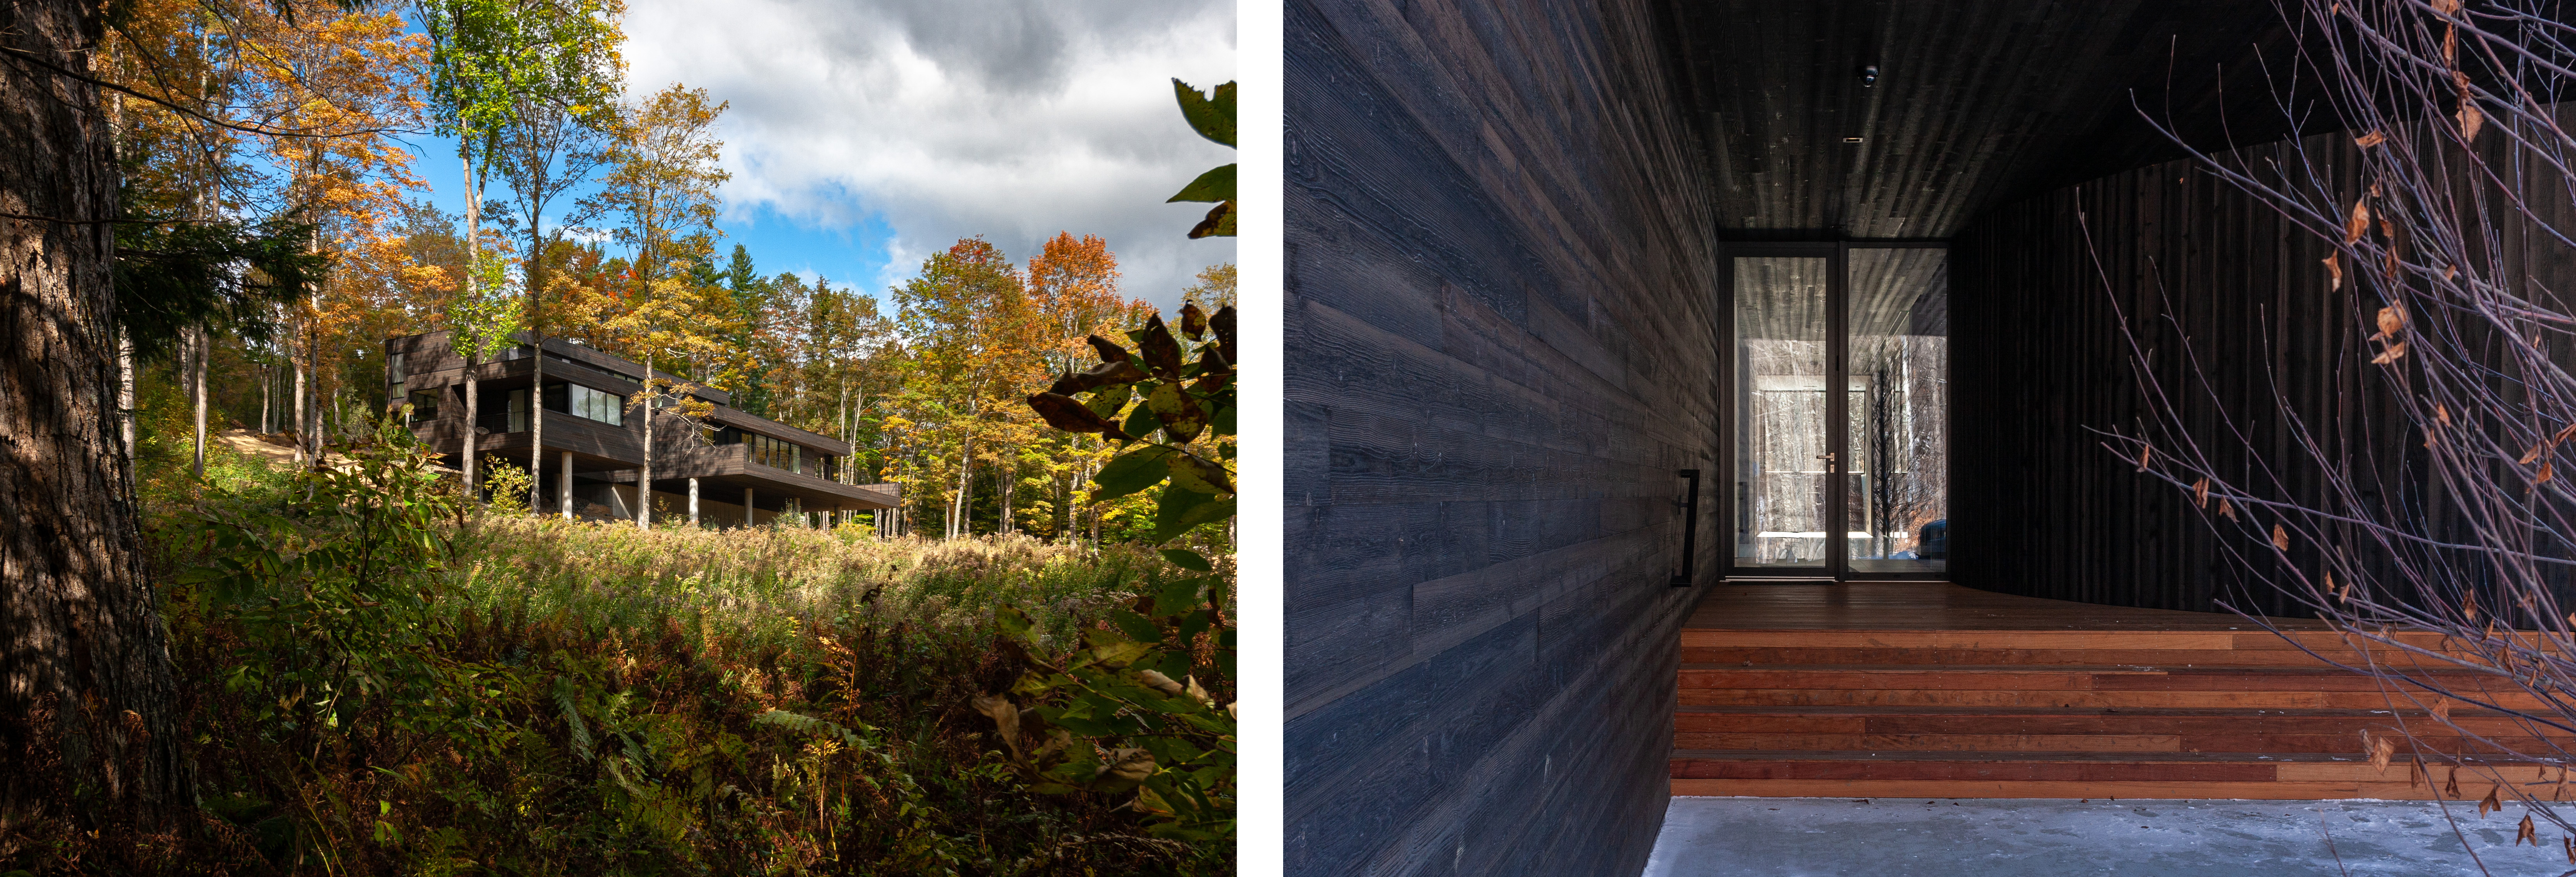
Semi-transparent graphite stain provides a dark black look contrasted with some areas of wood-colored stained cedar. Project: Terrapin. Location: Woodstock, Vermont. Architect: Brian J. Mac, FAIA, Jeff Kamuda, AIA. Project Manager: Birdseye
Paint
Painting provides the most surface protection against weathering and wetting by water, while providing color and concealment of some of the wood’s characteristics. Although paint can reduce wood’s absorption of water, paint itself is not a preservative. Paints of all types such as water-based paints, acrylic (latex), acrylic enamel, and solvent-based paints (alkyd and oil-modified) are suitable for Western Red Cedar. Test results show that good quality latex paint maintains its mechanical adhesion through dimensional changes of the wood during wet and dry moisture cycles. For this reason, finishes with high elasticity generally maintain adhesion better than brittle finishes during extended periods of exposure to outdoor weathering.
Based on all of the above, there are clearly many different options and choices for finishing exterior Western Red Cedar. Yet, there are some design trends worth noting. Currently, the two most popular finishes for siding and trim include:
- Driftwood gray bleaching stain. This may need to be reapplied every four to five years in order to provide a uniform grey look all at once and be consistent. Reapplication is primarily for water repellency.
- Noir/ black/ charcoal solid stain or semi-transparent stain. This dark coloration is often used in combination with natural-looking cedar that is protected but visible for a dramatic and appealing result.
Of course, many other appearance finishes continue to be used as well.
Photo: Brit Kwasney; courtesy of Western Red Cedar Lumber Association
The heart of this higher education building is the clear finished cedar-paneled central lobby, a celebration space which mimics a hollow cedar tree which is common to this region. Project: Wii Gyemsiga Siwilaawksat Student Housing at Coast Mountain College. Location: Terrace, British Columbia, Canada. Architect: hcma
FINISHING CEDAR FOR INTERIOR APPLICATIONS
The interior finishing of WRC should be looked at completely differently due to the lack of exposure to UV and moisture. Of course, exterior finishes (transparent, semi-transparent, and opaque) can be used where appropriate indoors such as in bathrooms, kitchens, or other high humidity areas or in areas where visual contrast is being sought. Otherwise, there are several other popular choices where a higher level of protection is not required.
Most design professionals selecting Western Red Cedar for use indoors seek to retain its natural appearance. This is best achieved using transparent finishes such as waxes, shellac and other clear film forming finishes. These “interior” finishes provide some protection to the cedar from minor abrasion and liquids (less so with wax) and make cleaning easier.
Before applying an interior finish, Western Red Cedar may require cleaning or light sanding with fine-grit sandpaper to remove any minor surface characteristics. It is good practice to experiment with the proposed finish on a small sample of wood identical to the product to be finished. This will ensure that the coating will achieve the desired look. Once the decision has been made about the type of finish, the same brand name product should be used throughout to avoid incompatible formulations and color variations
Interior Finish Choices
There are several interior finishing options that are quite appropriate and common for Western Red Cedar.
- Unfinished: If left in its natural state, some darkening of the wood can be expected as it ages, and any color variations will become less pronounced.
- Transparent Finishes: Clear finishes or water-based acrylic, polyurethane, acrylic/polyurethanes, and clear plastics (non-yellowing) are excellent options for finishing Western Red Cedar. These finishes can be brushed on to produce a coating that does not mask the natural appearance of cedar. They contain very low levels of solvents and other compounds that can reduce indoor air quality. They are available in flat (matte), satin (semigloss), and gloss finishes from a number of manufacturers. When choosing a brand, it is important to specify a nonyellowing formula unless an amber tint to the Western Red Cedar is preferred. High-gloss polyurethanes provide the most durable finish, but the highly reflective surface may be objectionable to some. These products are not suitable for exterior use.
- Bleached Finishes: These result in a sun-bleached driftwood look. It can be achieved with commercially available bleaching agents. After bleaching, the Western Red Cedar can be left in its natural state or given a coat of clear sealer.
- Clear Wax: This finish option is for smooth surfaced cedar. Few finishes bring out its inner luster so well. There are also unpigmented liquid waxes on the market that incorporate a penetrating vehicle.
- Oils: Danish oil, tung oil, and boiled linseed oil are widely available and easily applied to smooth or textured Western Red Cedar; however, they tend to darken the wood and should be tested on a sample before final application.
- Lacquer: Clear lacquer can be used for smooth surfaces. It is an unobtrusive finish that helps to retain much of Western Red Cedar’s natural beauty. It is not recommended, however, for kitchens and bathrooms or areas that require more than light dusting for regular household cleaning. Due to their fast-drying characteristics, some lacquers are best applied with an air-less sprayer rather than with a brush. For the best results, two or more coats are recommended and sanded with the grain between applications. For optimum surface durability, the first coat may be of high gloss lacquer followed by one or two coats of matte or satin lacquer.
- Varnish: Clear varnish is recommended only for smooth surfaces. It will inevitably add a richer, darker tone to cedar. Two coats applied by brush are acceptable for most areas, but additional coats should be added for kitchen and bathroom use. The surface will be slightly brittle and may show scratches, but these can be touched up with a tinted wax. Varnish-finished surfaces can be cleaned with soapy water or wiped with thinners. Varnish stains are varnishes to which color pigment has been added. Although difficult to apply, they are available in a broad choice of tones and tints.
As noted, other finishes are possible too, including those used for exteriors. They are just less common for interior use, particularly if they cover or mask the natural beauty and grain of the wood.
CONCLUSION
Western Red Cedar continues to be a popular and durable choice for buildings all around North America. Proper finishing of the cedar enhances its beauty and helps ensure that its appearance and durability of the wood are preserved, particularly in exterior applications. Understanding the different options covered in this course helps to achieve these results. It also helps architects convey to building owners realistic expectations for maintenance and refinishing requirements as the building is used and enjoyed.
Peter J. Arsenault, FAIA, NCARB, LEED AP is a nationally known architect and a prolific author advancing more sustainable buildings through the power of design. www.pjaarch.com, www.linkedin.com/in/pjaarch
Photo: Visual Works SPS; courtesy of Western Red Cedar Lumber Association
Transparent stain on protected Western Red Cedar makes a dramatic visual statement on this award-winning commercial showroom.Project: IKOI Showroom. Location: Kakogawa-city, Hyogo Prefecture, Japan. Architect: Shoji Keisuke Atelier.
Western Red Cedar (WRC) has been a preferred and appealing choice for many buildings over the past 150 years for a lot of good reasons related to design, construction, and maintenance. WRC products come from trees grown in forests in the Pacific Northwest area of North America. They are routinely used in buildings across the country and around the world because of their warm, natural, aesthetic appeal and well-known durability and stability. Like all wood products, though, they benefit from proper finishing. Selecting the best type of finish will depend on several factors such as the use, (lumber or finish carpentry) application (interior or exterior), geographic location (climate, coastal, inland), and building design (residential, multifamily, commercial). This course focuses on the range of finishing choices for WRC and the factors that contribute to making the most appropriate finish selection. In so doing, architects can help building owners and managers achieve realistic expectations about final appearance, required maintenance, and ongoing benefits.
DESIGNING WITH CEDAR
Western Red Cedar (WRC) is a proven, well-known, and versatile building material. On building exteriors, it is a durable and resilient choice for siding, trim, soffits, decking, and outdoor structures. For building interiors, it provides a desirable aesthetic for wall paneling, wainscotting, ceilings, and as a great complement to a variety of building systems including mass timber structures. Given this range of uses, architects, interior designers, building owners, and facility managers have been drawn to incorporate Western Red Cedar into their projects for some specific reasons. These include:
- Appearance: Western red cedar is real wood with the corresponding authentic appearance of wood. Its grain and natural color have helped it to become regarded as a superior aesthetic imbued with decidedly crisp, yet superbly rich, tonal properties.
- Durability: Western red cedar is well known for its longevity and durability due to the natural make-up of the wood. It has been found to be naturally resistant to rot, decay, and insect attacks.
- Sustainability: While other building materials generate greenhouse gases, western red cedar trees remove greenhouse gases from the atmosphere. Further, unlike many manufactured or composite materials, WRC is fully biodegradable at the end of its useful life. Perhaps one of the best-known sustainability attributes of WRC is that it is a renewable resource when harvested and re-planted using sustainable forest practices. In fact, WRC in North America is sourced from some of the most sustainably managed forests in the world.
- Versatility: WRC offers a wide range of sizes, surface textures, grades, and profiles –both standard and custom. Therefore, it is easy to incorporate into a wide range of design schemes and patterns.
- Profiles: A virtually unlimited variety of common and specialty profiles of cedar siding, boards, and trim are made to suit different design and construction needs. These include beveled, lapped, tongue and groove, and board and batten applications all in various thicknesses and profiles for vertical and horizontal siding, paneling, and trim board applications.
- Grades: Recognized, independent agencies use grading systems to identify different “Appearance Lumber Grades” as distinct from structural lumber grades for cedar. These grading systems use terms like “Clear Vertical Grain Heart”, “A”, “B”, “Rustic,” “Select Knotty,” and “Architect Knotty” among others. The word “Heart” in the case of grading cedar refers to the inner wood in a tree as opposed to the narrow outer sapwood between the heartwood and the bark.
- Surface Texture: The surfaces of cedar products are available with a smooth surface, a rough-sawn appearance, or a rougher-headed texture, any of which can be specified to suit different project needs.
- Fasteners: High-quality fasteners that prevent staining and discoloration (i.e. stainless steel, aluminum, double hot-dipped galvanized) help to assure that both the appearance and the performance are maintained over time.
- Finish: Unlike some other wood species, Western Red Cedar is pitch and resin-free. This means it’s ideal for accepting and holding a wide range of wood finishes.
Overall, the most appealing characteristics of Western Red Cedar include its outstanding dimensional stability, fine texture, and being free of pitch and resin. These characteristics all contribute to its exceptional ability to accept and retain many different types of finishes. With all of these attributes in mind, we will focus next on the different types of finishes used on WRC to enhance its appearance and function when installed and over its useful life.
Photos: David Papazian; courtesy of Western Red Cedar Lumber Association
Cedar-toned semitransparent stain offers great visual appearance and durability against weather and ultraviolet sunlight. Project: Hilltop House. Location: Portland, Oregon. Architect: Giulietti Schouten Weber Architects GSW/A.
TYPES OF WOOD FINISHES
The choice of how to finish Western Red Cedar in any project should be based on an understanding of the different options and their suitability not only for design aesthetics but for its realistic durability before they need to be re-finished or re-applied. While it is true that Western Red Cedar can be allowed to weather naturally and create its own gray coloring or patina, it is more common to provide a protective finish. Such coatings help ensure maximum performance so that the natural beauty of the wood can be maintained or enhanced.
First, there are some overall things to keep in mind. In general, solvent-borne alkyd/oil-based stains are best for penetrating the wood and providing good performance. They have become harder to find and are simply not available in some locations where there are restrictions on VOC emissions. With that in mind, it is good to be aware that water-soluble oils or strictly latex stains have pigments that sit on the surface of the wood, rather than penetrate into it. These pigments absorb ultraviolet light, which would otherwise change the color of the wood. The rest of the ingredients in these products provide needed water repellency which helps protect the wood and resist mold and mildew growth. Whether oil-based or not, the building design and the degree of exposure to weather will impact the service life of all finishes. While the Western Red Cedar may hold up just fine, the finishes may not.
The following is a summary of the most common types of wood finishes used on WRC.
- Clear or transparent finishes: These coatings do not add any color or alter the appearance of the cedar, they only slightly modify the color (tone) of the wood. They do provide some protection for the wood surface. It is important to recognize that they have short service lives when exposed to sun and weather so are better suited to protected areas. Transparent stains, if formulated with a fungicide/mildewcide will inhibit the future growth of mildew and fungi, which will further increase the wood’s durability. Waterborne and solvent-borne formulations are available, but these unpigmented or lightly pigmented finishes provide limited protection against the sun’s ultraviolet light and moisture-related damage. As such, they require frequent reapplication. Transparent stains are, however, easily reapplied with minimal surface preparation.
- Semi-transparent finishes: These provide some color but still allow the grain of the wood to be visible. If solvent-borne, oil-based, semi-transparent stains are available, they penetrate the wood surface, are porous, and do not form a surface film like paints, stains, and latex formulas. These oil-based finishes are usually the best choice for natural-looking Western Red Cedar when it is fully exposed to the weather. Although these stains can be used on both smooth and textured Western Red Cedar, they perform much better and last longer when applied to a textured surface. These stains contain pigments that provide color–including cedar tones–and greatly increase the durability of the finish by protecting the cedar surface from the damaging effects of the sun’s ultraviolet rays.
If latex semi-transparent stains (i.e., non-oil based) are used, they are similar in appearance to solvent-borne stains; however, their look is achieved by the formation of a thin film with little penetration. This film is often not thick enough to provide the same durability as solvent-borne stains and tends to degrade by flaking from the wood’s surface. Refinishing cedar that has been coated with a latex semi-transparent stain may require more surface preparation.
- Solid color stains: These are opaque finishes with fewer volume solids than paint. Like paints, solid-color stains protect Western Red Cedar against ultraviolet light degradation and moisture. They are available in a wide spectrum of hues which obscure the wood’s true color but allow some of the cedar’s natural characteristics and texture to remain. These finishes are non-penetrating and, like paints, form a film. A stain-blocking primer should be applied first, before applying the solid color stain. Solid color stains are available as latex or oil-based formulations. Oil-based solid color stains should not be applied over latex primers. Solid-color stains have been developed that reveal the wood’s grain and are known as semi-solid stains. Their effect on the appearance of wood lies between those of solid color and semi-transparent stains.
- Paint: Opaque, solid color paint can be used to completely cover the wood surface. Recognize, though, that Western Red Cedar contains water-soluble extractives that are responsible for its attractive color, exceptional stability and natural decay resistance. However, these extractives may discolor latex paints and solid-color stains unless a primer coat is used that is specifically formulated to help control extractive bleeding. These stain-blocking primers are available in alkyd-oil and water-based formulations. Alkyd-oil-based primers usually offer the best shield against discoloration by water-soluble extractives. The label on the container should indicate that the coating is recommended for use as a stain-blocking primer for Western Red Cedar. Virtually unlimited solid colors are available from all paint suppliers to then cover the primer.
- Bleaching/Weathering Cedar: If a truly uniform grey appearance is desired on exterior WRC, then this effect can be achieved by the use of commercially prepared bleaching or weathering products. These are essentially water-repellant finishes containing pigments and other additives that are most effective on textured cedar. To maintain this look, bleaching or weathering products may need to be re-applied periodically. Although the natural weathering effect is usually only “skin deep” (less than 1 – 2mm), with the cedar largely unchanged beneath, extra care must be given to the design of the project, the installation of the cedar, and routine maintenance. A proper application could be reasonably expected to last 3 to 5 years on smooth WRC and 5-6 years on textured.
- Other finishing products: While the five options above are used for exterior applications, there are some other finishing options that are only suitable for building interiors where weather and UV exposure are not a concern. These include bleaches, clear waxes, Danish oils, and clear plastics (non-yellowing), as well as lacquers, and varnish. These are discussed more in the interior finishing section of this course.
Photos: Meghan Montgomery/Built Work Photography courtesy of Western Red Cedar Lumber Association
Dark semi-solid stain is combined with semi-transparent stain and painted features to create a great deal of visual interest in this urban environment. Project: Cedar Speedster. Location: Seattle, Washington. Architect: Weber Thompson
Pre-Finished vs. Site Finished
For optimum performance, it is recommended that Western Red Cedar is pre-primed or pre-finished prior to job site delivery.
- Factory-priming As the name implies, this is performed in an industrial setting where a machine coating process applies a primer coating to all six sides of each board. The coated boards are then dried prior to shipment to the job sites. Pre-primed siding and trim boards delivered to a job site should be kept dry and clean prior to installation. All field cuts should be re-sealed with a primer prior to the boards being installed. Top coating over the primer should be completed as quickly as possible as most primers are not intended to be exposed to natural weathering for more than 90 days.
- Factory finishing: This is similar to the above priming process; however, it allows for the additional application of one or two factory applied topcoats of acrylic latex paint or solid stains in job lot quantities and in the colors as selected. Color matching needs to be based on actual samples and a realization that color changes over time due to sunlight and moisture–regardless of which finish is used. It is important not to overdrive nails during installation of factory finished siding, as this will damage the surrounding wood and coating. Overdriven nails must be remedied immediately by filling the depression with exterior grade wood putty or caulk specifically designed for this purpose. Touch up any repairs or field cuts, taking care not to smear the topcoat.
Properly done, factory priming/finishing provides the application of a uniform coating at the recommended coverage of the primer/stain to all six surfaces of each piece (face, back, edges, and ends). It is all done in a controlled environment to permit proper curing of the finish ensuring the wood has a coating to protect it from exposure to sunlight (UV degradation) and surface contamination by mildew and dirt. It can also help with the elimination of lap marks, streaks, and shrink lines after installation. From a construction standpoint, it allows for the ability to install cedar products at any time of the year and often includes a coating warranty.
Photos: Aaron Leitz; courtesy of Western Red Cedar Lumber Association Aaron Leitz
Natural, unfinished cedar is used for a variety of outdoor applications including siding, louvers, screens, and even interiors. Project: Hale Napo’o. Location: Hanalei, Hawaii. Architect: Olson Kundig.
>Finish for Engineered Cedar Products
Engineered wood products have become quite common and popular and that includes cedar products. In virtually all cases, these products are either pre-primed or pre-finished to produce the best results. Such products include clear or knotty finger-joined boards, trim, siding, and paneling. These also include clear Vertical Grain (VG) grade veneer overlay engineered tongue and groove (T&G) products that are used for soffits or other exterior locations. In these cases, the pre-finishing may be available in transparent, semi-transparent, and primer/paint options.
PREPARATION OF CEDAR FOR FINISHING
When site-finishing of cedar is being performed, the first thing to recognize is that the surface condition of the wood on which the finish is applied can substantially affect the performance and life expectancy of the finish. This is true for both newly installed WRC and existing cedar on buildings that needs to be re-finished. Of particular importance for both the first finish and subsequent re-finishing of wood is the need to be clean and dry. Any existing mold and mildew need to be killed with a mild oxygen bleach solution that stays on the wood for thirty minutes to be effective. Note that chlorine bleach destroys lignen in the wood and can be harmful to surrounding plants and gardens.
- New (Not Weathered) Western Red Cedar: New cedar siding and trim should be protected from the weather before, during, and after construction. It is seldom necessary to carry out extensive surface preparation providing the wood has not weathered for more than two weeks and is clean and dry. The moisture content should always be checked as a precaution - the moisture content cannot be above 20 percent. If the wood has been contaminated by dirt, oil or other foreign substances, the contaminants must be removed, and dirt should be washed from the surface. For smooth-planed, flat-grained cedar, the surface should be scuff-sanded with 80 grit sandpaper. This procedure will greatly increase the performance of the coatings but will not detract from a smooth appearance. Surface preparation is not necessary for clean textured cedar.
- Existing (Weathered) Western Red Cedar: Siding and trim that has been exposed to the elements for longer than two weeks may have a degraded surface that is no longer suitable for painting and requires remediation. Preparing the surface by sanding, brushing (with a non-ferrous bristle brush), and washing before applying the finish is recommended. If the wood is gray/dirty, then it needs to be cleaned and sanded to expose fresh fibers. It may be necessary to wash the wood with a restorative cleaner designed to remove graying. These products usually contain oxalic acid. Touch sanding smooth-faced wood with 80-grit sandpaper improves the adhesion of finishes.
Sometimes, a paint or stain supplier will refer to a condition called “mill glaze” on wood which is caused by the heat of the sawmill process interacting with the pitch and resin of different wood species. The suggestion may be made that this needs to be addressed so that the finish will adhere and not be compromised by the mill glaze covering the surface of the wood. However, this is not relevant to cedar because it is free of pitch and resin. Hence, any special preparation to combat mill glaze should not be necessary.
Separate from the above, some manufacturing options do have implications for the best finishing solution.
- Surface Texture: Western Red Cedar products are available with a smooth (i.e., planed) or a textured (resawn, or rough-headed) surface. As a general rule, textured surfaces provide the best mechanical adhesion of the finish to the wood. For smooth-surfaced Western Red Cedar, a two-coat paint system is preferred.
- Moisture Content: Finishing wood that is wet (above 20 percent moisture content) will increase the risk of coating failure. It is best to finish Western Red Cedar when its moisture content has stabilized at the level that will prevail during the service life of the product. In North America, this level is approximately 12 percent moisture content. The best product choice is Western Red Cedar which is kiln-dried at the time of manufacture.
Photos: Hangfei Zhang; courtesy of Western Red Cedar Lumber Association
Clear stain with a UV inhibitor produces dramatic effects while holding up to the harsh Alaskan environment. Project: Aurora Villa.
Location: Fairbanks, Alaska. Architect: Sparano + Mooney Architecture.
Design and Construction Impacts
The performance of wood finishes can be directly impacted by design and construction practices related either to the installation of the cedar or the rest of the building design. While there can be many such factors to be aware of, the following is a representative list:
- Install flashing over all openings and above skirt and band boards.
- Provide adequate overhangs at eaves and gables (designs with no overhangs provide less protection to the finish from UV and moisture exposure).
- Install drip caps over windows and door frames.
- Allow at least 6 inches of clearance between the bottoms of siding and trim boards and the ground line.
- Allow at least 2 inches of clearance between the bottoms of the siding and trim boards and roofing materials.
- Install vapor barriers on the warm side of walls to minimize condensation within walls.
- Vent high humidity areas such as kitchens, laundries and bathrooms.
- Vent attics and crawlspaces.
A general design approach of installing cedar siding over a rain screen greatly decreases the chance that the backs of the siding will get wet and remain wet. This ensures that any water that penetrates the wall assembly will drain down and away from the walls. Rain screens also minimize moisture imbalances within the siding, thus reducing the potential for cupping and extractive bleeding. As a result, coating performance is markedly improved.
FINISHING CEDAR FOR EXTERIOR APPLICATIONS
Exterior applications of finished Western Red Cedar typically include products applied to a vertical surface that is exposed to UV and weather such as siding (bevel, tongue and groove, shiplap, board and batten, etc.) and trim (corner boards, window and door trim, fascia, etc.). It may also include some protected horizontal surfaces such as soffits or porch ceilings which are subject to fewer effects of UV and weather conditions. Conversely it can include some horizontal surfaces that are exposed to more extreme conditions such as decking with heavy foot traffic, the greatest exposure to UV, and to direct rain/snow fall. Similarly, outdoor structures such as canopies, trellises, pavilions, pergolas, etc. are all subject to higher levels of exposure. Therefore, recognizing the degree of protection that is needed for different applications on the exterior is important in order to be realistic about how well or how long a particular finish may last. Of course, that can be balanced with the choice of a desired appearance but educating the building owner about the realistic life expectancy of a finish can go a long way toward setting up reasonable expectations and be a good part of a firm’s risk management practice.
Beyond identifying the degree of exposure, the quality of the finishing product needs to be considered. Western Red Cedar’s excellent finishing characteristics cannot compensate for finishing products that are unsuitable, of inferior quality, or improperlyapplied. Hence when specifying a finish for a Western Red Cedar project it is always best to use a top-of-the-line product from a proven and trusted supplier/manufacturer.
In terms of application, here are some of the things to be sure are specified or called for in all exterior situations:
- Keep cedar protected from the elements on the job site.
- Acclimatize Western Red Cedar to local humidity conditions before installing.
- Proper seasoning of the wood must be done to accept the finish if it is not already seasoned to an acceptable moisture content.
- Finishes should be applied as soon as the wood is dry.
- Use stainless steel, double hot-dipped galvanized or aluminum fasteners to avoid staining.
- Apply primer or stain to all six sides, including surfaces exposed after they are field cut, before installing. Note that the end grain may require 2 coats to fully protect it.
Based on all of the above, the following options can be considered for exterior finishing of cedar recognizing that each one has its own service life, benefits, and challenges.
Photos: Julian Parkinson; courtesy of Western Red Cedar Lumber Association
For finishing, the design team opted to let the home weather naturally, eventually turning an elegant silvery grey. It’s a design decision that highlights cedar’s versatility as well as its durability in the face of a salty coastal environment. Project: Five Cove House. Location: Marvin’s Island, Nova Scotia, Canada. Architect: RHAD Architects.
Unfinished Cedar
Western Red Cedar performs satisfactorily as a decking and siding product if it is left unfinished to weather naturally. Some design professionals or owners choose this option based on any of the following:
- A preference for the silvery grey look of naturally weathered Western Red Cedar – unfinished WRC creates a natural gray colored patina on the wood over time.
- A desire not to invest the time and effort required to maintain the finish on a cedar product.
- Project inaccessibility, causing difficulty in maintaining the finish on a Western Red Cedar project, for example, siding on very tall buildings.
- A concern about the environmental impact of applying a finish on Western Red Cedar.
These are all valid considerations, and the reality is that Western Red Cedar siding and decking can have a long service life without a finish coating in many environments — as long as good design, installation and maintenance practices are followed. Without the protection provided by a coating against moisture intrusion, (especially end grain sealing), steps must be taken during the installation process to allow Western Red Cedar to readily dry following exposure to moisture, otherwise the risk of decay increases.
It is also important to understand that the choice not to apply a finish to an exterior cedar product has long-term implications. As Western Red Cedar weathers, it will lose its natural color and become grey. In many climates, it weathers to a silvery grey color. In other climates, because of varying moisture and sun exposure conditions, Western Red Cedar may not weather uniformly. In some cases, it may develop a brownish tint. In order to restore weathered cedar to a state where it can be painted or stained, significantly more effort will be required to prepare the surface of the wood for coating. Note that unfinished cedar left to weather for just 12 weeks loses 50 percent of its ability to hold a film forming finish. That is why it is highly recommended that any finishing is done within 2 weeks of installation. Factory finishing is encouraged and recommended.
If the choice is made not to apply a finish to Western Red Cedar, contaminants such as dirt and mildew should be regularly removed to maintain its beautiful, natural appearance. Life Cycle Assessment (LCA)1 of Western Red Cedar siding and decking shows it has the most benign environmental impact of all the alternative product choices for those building applications. Coatings, especially the solvent borne finishes and the frequency of their application negatively impact the LCA of cedar siding and decking. This impact may influence a decision not to apply a finish. Fortunately, a new generation of more environmentally friendly, water borne, coatings are emerging, and these products should be considered.
Clear/Transparent Finishes
These are essentially colorless, penetrating finishes that are commonly used for cedar decks to enhance the appearance and service-life. The water-repellent preservatives are preferable to the water-repellents only because they contain a mildewcide and often other fungicides that help inhibit surface mildew growth. Many of these water-repellants contain ultraviolet light blockers or absorbers that help protect the Western Red Cedar from damaging sunlight. To date, the best of them are solvent-borne (oil based) but new products containing water soluble oils are becoming more readily available. The water repellent preservative finishes are very effective in stopping the absorption of liquid water thus reducing swelling and shrinking of the wood. Water repellents should be used only on newly manufactured bare cedar, on restored bare cedar, or on cedar previously treated with the same type of product.
When used as a natural finish, the service life of a clear water repellents is about one year, depending on the weather exposure. Therefore, frequent reapplication is necessary to maintain the original look, which may prove difficult if the finish wears unevenly allowing the color of the wood to change. Accordingly, architects should discourage the use of transparent finishes on siding and trim to prevent unrealistic expectations with regards to maintenance. The exception is for protected areas such as ceilings and walls of covered porches, soffits, etc. These areas can use transparent finish if they aren’t receiving any sun or weather exposure so the service life can be much longer. Reportedly, 6-8 or even 10 years is possible in these protected applications.
Note also that transparent, non-flexible, film-forming finishes such as lacquer, shellac, urethane, and varnish are not recommended for exterior use on Western Red Cedar. Regardless of the number of coats, the finish will eventually become brittle, develop cracks in the coating film and then fail.
Image courtesy of realcedar.com
A comparison of the expected service life of different types of finishes on Western Red Cedar applied to building exteriors. Source: www.realcedar.com/static/2d35a974acbf517df55a40d13ed6d7a4/How-to-Finish.pdf.
Semi-Transparent Finishes
Semi-transparent stains have pigments that provide color and greatly increase the durability of the finish. The pigments help block sunlight and protect the cedar surface. The better products contain water repellents and mildewcides or fungicides. The solvent-borne, semi-transparent stains penetrate the cedar without forming a film and do not blister or peel even if excessive moisture enters the cedar. However, latex semi-transparent stains can sometimes build up a film, especially on recoating, which can lead to peeling. Latex formulas containing water-soluble oils are becoming more readily available.
It is possible to switch to a semi-transparent stain when a deck needs to be refinished. Even if the deck has been coated with a clear or transparent stain for many years, an oil-based semi-transparent stain can be applied, provided the wood surface is cleaned. Note, however, that film-forming finishes are normally not recommended for use on Western Red Cedar decks because they can fail by cracking, flaking, and peeling and can be very difficult to refinish and maintain.
Semi-transparent stains can be applied by brush, spray, pad, or roller. Brushing will usually give the best penetration and performance. Spray or roller application followed by back-brushing is also an acceptable method. Oil-based stains are generally thin and runny, so the application can be messy. Lap marks can be prevented by staining continuous lengths. This method prevents the front edge of the stained area from drying before a logical stopping place is reached. Working in the shade is desirable because the drying rate is slower. Stain that has been applied by spray, without back-brushing, is prone to show blotchy patterns as it weathers. Two coats of penetrating oil-based stain on textured Western Red Cedar will provide a longer service life than one coat, but only if the wood will accept the second coat. Stir the stain thoroughly during application to prevent settling and color change. Avoid mixing different brands or batches of stain.
Latex semi-transparent stains do not penetrate the wood surface, but they are easy to apply and less likely to form lap marks. These stains are film-forming and may not be as durable as oil-based stains. They can be applied in one coat on smooth face cedar or two coats on textured face cedar with a longer service life of approximately two to four years. Keep in mind that the building design and the exposure to weather will impact the service life of semi-transparent finishes too.
Photos: Bruce Damonte; courtesy of Western Red Cedar Lumber Association
A semi-transparent grey stain was very successfully used on the exterior of this school while a semi-transparent whitewash stain was used on the interior ceiling. Project: French International–Middle School. Location: Portland, Oregon. Architect: Hacker.
Solid Color Stain
These opaque stains fully cover, coat, and protect the wood from UV and moisture. Solid stains, like paints, sit on the surface and form a film, but they are still quite good for most exterior siding and trim applications. For decking, however, solid body finishes are not recommended because they will flake or peel.
Solid stains may be applied to Western Red Cedar by brush, roller, or pad. Brush application is usually the best. These stains perform similarly to and are applied like paint. One coat of solid-color stain is only marginally adequate on new wood. A prime coat with a topcoat will always provide better protection to the wood as well as promoting a longer service. Optimal performance can be obtained if the wood is primed, and then given two coats of stain. Topcoats of acrylic latex solid-color stains are generally superior to all others, especially when two coats are applied over a primer. Unlike paint, a solid-color stain may leave lap marks. To prevent lap marks, follow the procedures suggested for semi-transparent penetrating stains.
Properly applied in the field, one coat of solid color stain can be expected to last up to 5 or 6 years. Factory applied finishes are available that come with warranties on the finish of 15-25 years depending on the number of topcoats.
Photos: Birdseye; courtesy of Western Red Cedar Lumber Association
Semi-transparent graphite stain provides a dark black look contrasted with some areas of wood-colored stained cedar. Project: Terrapin. Location: Woodstock, Vermont. Architect: Brian J. Mac, FAIA, Jeff Kamuda, AIA. Project Manager: Birdseye
Paint
Painting provides the most surface protection against weathering and wetting by water, while providing color and concealment of some of the wood’s characteristics. Although paint can reduce wood’s absorption of water, paint itself is not a preservative. Paints of all types such as water-based paints, acrylic (latex), acrylic enamel, and solvent-based paints (alkyd and oil-modified) are suitable for Western Red Cedar. Test results show that good quality latex paint maintains its mechanical adhesion through dimensional changes of the wood during wet and dry moisture cycles. For this reason, finishes with high elasticity generally maintain adhesion better than brittle finishes during extended periods of exposure to outdoor weathering.
Based on all of the above, there are clearly many different options and choices for finishing exterior Western Red Cedar. Yet, there are some design trends worth noting. Currently, the two most popular finishes for siding and trim include:
- Driftwood gray bleaching stain. This may need to be reapplied every four to five years in order to provide a uniform grey look all at once and be consistent. Reapplication is primarily for water repellency.
- Noir/ black/ charcoal solid stain or semi-transparent stain. This dark coloration is often used in combination with natural-looking cedar that is protected but visible for a dramatic and appealing result.
Of course, many other appearance finishes continue to be used as well.
Photo: Brit Kwasney; courtesy of Western Red Cedar Lumber Association
The heart of this higher education building is the clear finished cedar-paneled central lobby, a celebration space which mimics a hollow cedar tree which is common to this region. Project: Wii Gyemsiga Siwilaawksat Student Housing at Coast Mountain College. Location: Terrace, British Columbia, Canada. Architect: hcma
FINISHING CEDAR FOR INTERIOR APPLICATIONS
The interior finishing of WRC should be looked at completely differently due to the lack of exposure to UV and moisture. Of course, exterior finishes (transparent, semi-transparent, and opaque) can be used where appropriate indoors such as in bathrooms, kitchens, or other high humidity areas or in areas where visual contrast is being sought. Otherwise, there are several other popular choices where a higher level of protection is not required.
Most design professionals selecting Western Red Cedar for use indoors seek to retain its natural appearance. This is best achieved using transparent finishes such as waxes, shellac and other clear film forming finishes. These “interior” finishes provide some protection to the cedar from minor abrasion and liquids (less so with wax) and make cleaning easier.
Before applying an interior finish, Western Red Cedar may require cleaning or light sanding with fine-grit sandpaper to remove any minor surface characteristics. It is good practice to experiment with the proposed finish on a small sample of wood identical to the product to be finished. This will ensure that the coating will achieve the desired look. Once the decision has been made about the type of finish, the same brand name product should be used throughout to avoid incompatible formulations and color variations
Interior Finish Choices
There are several interior finishing options that are quite appropriate and common for Western Red Cedar.
- Unfinished: If left in its natural state, some darkening of the wood can be expected as it ages, and any color variations will become less pronounced.
- Transparent Finishes: Clear finishes or water-based acrylic, polyurethane, acrylic/polyurethanes, and clear plastics (non-yellowing) are excellent options for finishing Western Red Cedar. These finishes can be brushed on to produce a coating that does not mask the natural appearance of cedar. They contain very low levels of solvents and other compounds that can reduce indoor air quality. They are available in flat (matte), satin (semigloss), and gloss finishes from a number of manufacturers. When choosing a brand, it is important to specify a nonyellowing formula unless an amber tint to the Western Red Cedar is preferred. High-gloss polyurethanes provide the most durable finish, but the highly reflective surface may be objectionable to some. These products are not suitable for exterior use.
- Bleached Finishes: These result in a sun-bleached driftwood look. It can be achieved with commercially available bleaching agents. After bleaching, the Western Red Cedar can be left in its natural state or given a coat of clear sealer.
- Clear Wax: This finish option is for smooth surfaced cedar. Few finishes bring out its inner luster so well. There are also unpigmented liquid waxes on the market that incorporate a penetrating vehicle.
- Oils: Danish oil, tung oil, and boiled linseed oil are widely available and easily applied to smooth or textured Western Red Cedar; however, they tend to darken the wood and should be tested on a sample before final application.
- Lacquer: Clear lacquer can be used for smooth surfaces. It is an unobtrusive finish that helps to retain much of Western Red Cedar’s natural beauty. It is not recommended, however, for kitchens and bathrooms or areas that require more than light dusting for regular household cleaning. Due to their fast-drying characteristics, some lacquers are best applied with an air-less sprayer rather than with a brush. For the best results, two or more coats are recommended and sanded with the grain between applications. For optimum surface durability, the first coat may be of high gloss lacquer followed by one or two coats of matte or satin lacquer.
- Varnish: Clear varnish is recommended only for smooth surfaces. It will inevitably add a richer, darker tone to cedar. Two coats applied by brush are acceptable for most areas, but additional coats should be added for kitchen and bathroom use. The surface will be slightly brittle and may show scratches, but these can be touched up with a tinted wax. Varnish-finished surfaces can be cleaned with soapy water or wiped with thinners. Varnish stains are varnishes to which color pigment has been added. Although difficult to apply, they are available in a broad choice of tones and tints.
As noted, other finishes are possible too, including those used for exteriors. They are just less common for interior use, particularly if they cover or mask the natural beauty and grain of the wood.
CONCLUSION
Western Red Cedar continues to be a popular and durable choice for buildings all around North America. Proper finishing of the cedar enhances its beauty and helps ensure that its appearance and durability of the wood are preserved, particularly in exterior applications. Understanding the different options covered in this course helps to achieve these results. It also helps architects convey to building owners realistic expectations for maintenance and refinishing requirements as the building is used and enjoyed.
Peter J. Arsenault, FAIA, NCARB, LEED AP is a nationally known architect and a prolific author advancing more sustainable buildings through the power of design. www.pjaarch.com, www.linkedin.com/in/pjaarch