Electric System Design
The design of an electrical system follows the same general principles as a hydronic system, but some of the particulars are obviously different.
Things to keep in mind with electrical systems include the following:
- Energy: The electrical equivalent of 130–170 BTUs per square foot is between 38 and 50 Watts per square foot. The electrical power, circuiting, and distribution needs should be designed accordingly.
- Temperature: Electrical systems use a fixed wire temperature of about 140 degrees Fahrenheit. This temperature is not changeable during operation.
- Wire size: No special wiring is required for electrical distribution wiring from the control panel to the snow-melting system, based on code requirements. The electrical snow-melting system itself will use the manufacturer’s standard wiring products.
- Insulation: No insulation is needed.
- Wiring layout: The length or run of the snow-melting system wiring/cables needs to be considered. Generally, these cables come from the manufacturer in a fixed length and cannot be extended.
- Wiring spacing: Wiring spacing needs to be closer than hydronic piping spacing and should be 3–4 inches on center. Wider spacing will cause striping and be less effective.
- Wiring depth: Wiring should also be closer to the surface than hydronic piping. The minimum depth below the surface is 2 inches, with an ideal depth for performance and protection at 3 inches.
Keep in mind that all the design parameters indicated here for hydronic and electrical systems are for typical buildings and sites. It is always best to consult with manufacturers for recommendations related to specific project conditions and requirements.
Photos courtesy of Watts
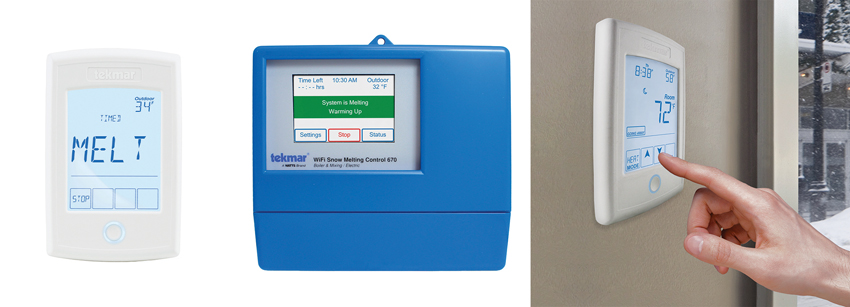
Main control boards are compact, based on electronic technology, and straightforward to use by maintenance staff and homeowners alike.
Snow-Melting Controls
The key to the successful operation of any mechanical or electrical system is the means to control it. Recognizing this, manufacturers offer particular control devices and systems specifically designed for snow-melting systems. The controls are essentially the same for both electrical and hydronic system types, meaning that they use the same components and just control different things. A hydronic system uses the controls to turn on and off or regulate the pumps, mixing valves, boiler, etc. Electrical systems use the controls as basically an on/off control regulating the time when a system, or zones within it, comes on and goes off.
All snow-melting control systems include several aspects with products, software, and manufacturing support available. These include the following:
- Main control boards: A central or convenient location can be selected to install the control board. This could be in the mechanical room where the boiler, manifold, electrical panel, or other equipment are located, or it could be somewhere else. Typically, the control board is a small device, no bigger than a shoe box, and mounted on the wall. The control operates on 120 V electricity and then engages the corresponding-sized contactor for the application. This may be anywhere from 120 V to 277 V depending on the application or product used.
One of the appealing features of the control board component is that it is the programmable “brain” of the system. This means that it can be used to help optimize the way the system runs. For example, the design professional or operator can get a bit creative and use the controls to cycle different zones of the system. If this is addressed in the design phase with the intent that not all zones need heat at once, then perhaps the boiler in a hydronic system can be smaller.
Since control boards are essentially all electronic devices, they can take advantage of interfacing with other electronic systems. Some controls can communicate with building automation systems (BAS) using BACnet or Modbus. This allows for things like alert notifications, remote monitoring, and full adjustment capability to be carried out through the BAS. Some controls can even be connected to a mobile phone app, allowing facility managers or maintenance staff the ultimate flexibility in when, where, or how they receive information or initiate commands to operate the system.
- Control sensors: The means for providing input to the control panel is to use automatic sensors that detect moisture and temperature. There are two common types of sensors: those installed in the ground and those installed on an aerial mount above ground. In-ground sensors automatically detect snow or ice on a driveway or walkway, which means that they need to have snowfall to discern conditions. In-ground sensors are also used to monitor the slab or pavement temperature. In-ground sensors are used for a wide range of systems on a variety of building types. Aerial sensors are used when the use of in-ground sensors simply is not practical. This means that they can be a good option for remodeling projects or sites that have other restrictions interfering with the in-ground sensor installation.
The installation of automatic snow-melting sensors is simplified through the use of some common but sophisticated technology and features. For example, some controls are Wi-Fi enabled, giving them access to weather data and allowing for remote access. Other control options can “daisy chain” together to identify up to 12 zones with different priorities in each zone, allowing the control board to respond accordingly.
- Sequencing: The control sequence is an important part of snow-melting systems, just like any other mechanical/electrical system. The basic elements here are automatic and manual operations, with the ability for a manual override if needed. Typically, the start function is automatic based on information from the in-ground or aerial sensors. An on-demand start is typical, meaning that the system turns on when one or more sensors are activated. Otherwise, the system remains in the “off” mode. There is the option for an anticipator function, which is a Wi-Fi enabled feature connected to weather information or an operator. This allows for a preemptive start of the snow-melting system prior to actual snowfall so the surface is warm and begins melting as soon as the snow starts to hit it. Some operators find that a manual override to start up a system is also helpful for conditions that are not directly related to a snowfall, such as drifting snow or black ice formation.
The system should turn back to “off” based on an automatic function, such as a timer or separate interlink. This keeps the system from running longer than needed and helps reduce energy use and operating cost. It is also a requirement of the International Energy Conservation Code (IECC) in Section C403.13.2 (2021 edition), which states: “Snow- and ice-melting systems shall include automatic controls configured to shut off the system when the pavement temperature is above 50 degrees Fahrenheit (10 degrees Celsius) and precipitation is not falling, and an automatic or manual control that is configured to shut off when the outdoor temperature is above 40 degrees Fahrenheit (4 degrees Celsius).”
In addition to a straight “on” or “off” situation, some critical areas (helipads, emergency room entrances, etc.) may engage in a control sequence known as idling. This is a condition that maintains a constant slab condition whether it is snowing or not but turns off when the outdoor temperatures are reached as cited in the IECC above. Idling options can be permanent or temporary but are typically intermittent based on weather conditions. Idling was used where deemed necessary in the past, but this practice has been mostly replaced by the availability of anticipator systems.
For insight into the significance of controls, Dave Raabe, a tekmar Control Systems sales representative with ROI Marketing, says, “Controls operate hydronic and electric snow-melting systems, with options for fully automatic operation, remote access, and equipment protection. The latest controls improve efficiency through coordination and allow for remote access using a Gateway, WiFi access, and mobile app access options.”
Photos courtesy of Watts
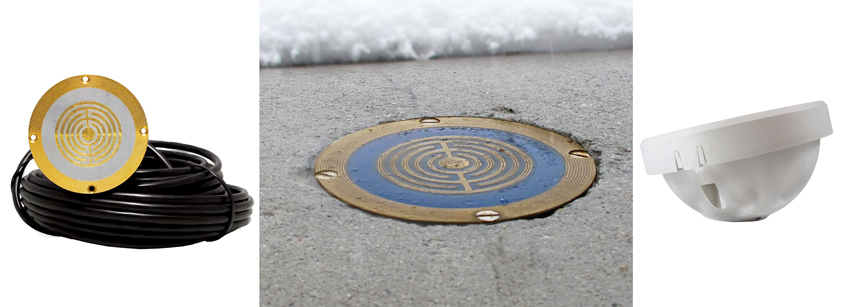
In-ground/in-slab sensors (left and middle) recognize temperature and moisture and are wired back to a main control board. Aerial sensors (right) are used where in-ground sensors are not practical.
Providing safe pedestrian or vehicular access in cold weather to a building entrance, walkway, or critical operation area means minimizing or eliminating the presence of snow and ice in those areas. In some facilities, this is done manually by maintenance staff who clear snow, spread ice-melt chemicals, and work to maintain clear and safe passage. The expense, impact of chemicals, and difficulty in creating a consistently safe condition pushes many building owners and operators to look for other solutions. As such, mechanical or electrical snow-melting systems are often designed and constructed to be placed below concrete, asphalt, or other paved areas to help ensure that pedestrians, and vehicles are protected from the hazards of snow and ice accumulation. This course looks at the ways that design professionals can investigate, design, and optimize a snow-melting system suited to the specific requirements of a particular project. This approach helps ensure control of the initial and ongoing costs as well the proper, long-term performance of these systems that create safe, clear passage in what could otherwise be a hazardous condition.
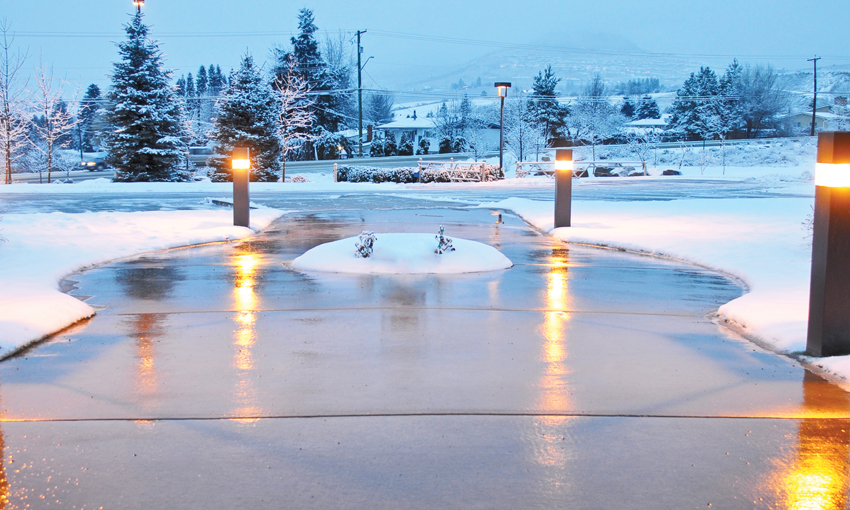
Photo courtesy of Watts
Snow-melting systems provide a low-maintenance solution to create safe walkways and entrances that help with risk management for all types of buildings and facilities.
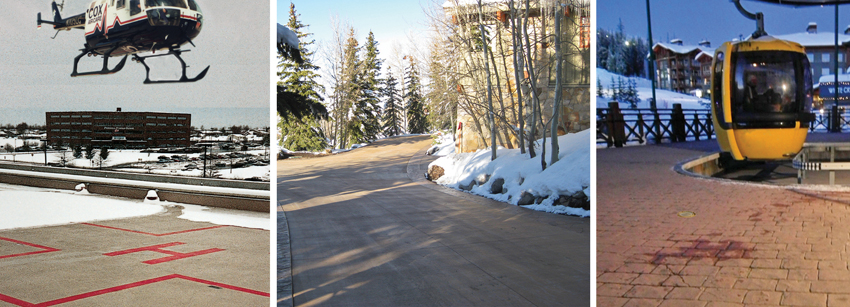
Snow-Melting Systems Overview
The basic function of a snow-melting system is to warm an outdoor surface to a temperature above freezing, allowing snow and ice to melt and drain away safely. That surface might be a walkway into or out of a building that sees many people walking there daily, such as a retail, hospitality, health-care, educational, governmental, or other type of building. Keeping such walkways clear of snow and ice reduces the likelihood that someone walking there will slip, fall, and become injured. The surface might also serve vehicles, not just pedestrians. These vehicles could be large, such as cars, trucks, or buses, or small, such as forklifts, dollies, or robotic carts. They could also be specialty areas, such as a heliport on a building, an emergency room entrance, or a critical operations facility. Regardless of the type of traffic, the goal is usually the same: keep the area clear and safe for usage when snow and ice would be otherwise present.
System Need
Snow-melting systems are sometimes viewed as a luxury item or as an extravagance. This would only be true if safety is not a concern or if there is no cost to maintain and clear areas of snow and ice. The reality is that all buildings need to protect the safety and welfare of the people using them, and there is always a cost of labor and/or materials to keep a building safely maintained. The risks and costs are higher, of course, in geographic locations where snow is more common or frequent, or where the number of people or vehicles is high. Hence, snow-melting systems should be appropriately looked at and evaluated for each project as an option that meets the needs of building owners and regulatory agencies for safety and maintenance in climates that receive snow or ice storms.
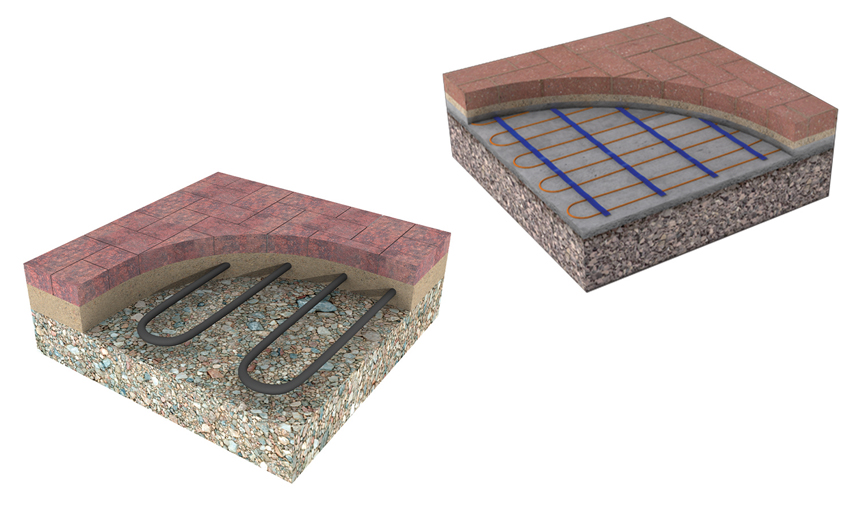
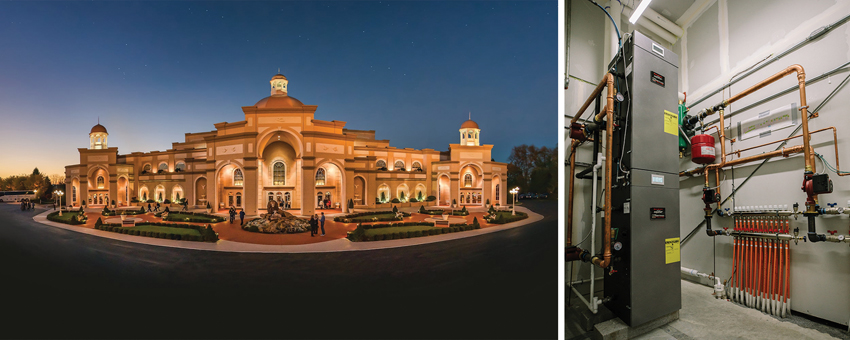
Images courtesy of Watts
Hydronic snow-melting systems (left) and electrical systems (right) work on the same principles, just with different components and design implications.
Environmental Impacts
Many people are concerned about the environmental impacts associated with any building system. These concerns are fully justified, although snow-melting systems have been shown to be part of the solution, not part of the problem. The truth is that they are one of the eco-friendlier options available since they can reduce or eliminate use of salt or chemicals being introduced into the environment. Snow-melting chemicals are commonly used by maintenance staff, but they too melt and run into drains and sewers, where they can do damage to vegetation and aquatic life. Snow-melting chemicals are also well-known for the damage they can cause to concrete and other paved surfaces, causing shorter service lives and the need for replacement. This replacement then adds more environmental burden compared to a longer-lasting solution for concrete and other paved surfaces.
By using heat in selected locations in a snow-melting system, the need for chemicals is eliminated, thus eliminating their impact on the environment and the buildings. Also eliminated are the labor and time needed to spread these chemicals. The heat aspect of a snow-melting system is also very manageable based on proper efficiencies and controls, just like any other mechanical system. Designed, installed, and operated properly, snow-melting systems can be very energy efficient, so the energy use and cost impacts can be properly accounted for and controlled. If the energy comes from a renewable, non-polluting source (i.e., solar electric, hydroelectric, wind, etc.), the environmental impact of the energy used is drastically diminished.
System Costs
The discussion of any building system cost should always include a review of not only first costs but also ongoing operating costs and the residual costs of an alternative. Often, building owners, especially residential ones, only take into consideration the initial cost of the system. In doing so, they fail to see the intrinsic benefits of a system that can prove to be much less costly over the life of the building. The cost of installation can be allowed for in the project budget and may in fact be a very small percentage of the total project cost. Similarly, the operating cost of a snow-melting system can be managed and accounted for so that it becomes an anticipated and controlled expense. All of these costs, although they may seem expensive at first blush, can be significantly outweighed by the benefits of less labor, less maintenance, less chemicals, less risk of liability, and less potential damage to building surfaces. By doing this type of review, some building owners ultimately conclude that they cannot afford the alternatives after all—it makes better economic sense to include a snow-melting system.
System Types
There are two basic types of snow-melting systems available: electrical systems and hydronic systems. Electrical systems use electric current run through specially designed heat-generating resistance wires to create the needed heat for the snow-melting function. Hydronic systems use a water-glycol fluid circulated through tubing (piping) and boilers to generate heat. Many aspects of these two systems are similar in terms of the principles behind their design, installation, and operation—it is just some of the components and system parts that are different.
The type of system selected for a particular project will often be predicated on the size of the area to be heated. An installation less than 1,500 square feet usually means that electrical is more economical since a boiler is not required. For example, most residential systems are smaller and tend to use an electric rather than hydronic system. Nonetheless, any size system where a boiler or hydronic system is not desired or practical will tend to be electric.
Larger installations often benefit from hydronic systems. This is particularly true if they can be linked to an existing boiler and can gain some overall boiler efficiencies. However, there are many cases where it makes more sense to use an appropriately sized dedicated boiler. Since each building is unique, a review of the applicability of both system types (hydronic versus electric) may be warranted to discern which is the best choice for a particular project. This review should include the practical aspects of installation, costs, benefits, and differences between the two systems.
Regardless of the type selected, all snow-melting systems operate using automatic and manual controls. These controls are essentially the same from the standpoint of the user whether electric or hydronic systems are used. There will be some difference in what is being controlled of course (electric current or hydronic fluids), but the overall concepts and principles are straightforward and well known.
Basic Considerations for Design and Performance
Before designing a snow-melting system, there are several site- and building-specific conditions that need to be addressed. There is also the need to establish proper expectations and quality assurance standards for a system ahead of time. These considerations are reviewed further in the following paragraphs.
Photos courtesy of Watts
Every project must be assessed to determine the owner's needs, particular site conditions, and performance expectations of a system.
Site Conditions
The building site and the specific outdoor areas targeted for a snow-melting system need to be fully assessed to design and install an effective solution. Such an assessment should consider the following:
- Surfaces to be treated: The use of the surface(s) intended for snow-melting should be understood first. Is it a critical use area in constant use or an occasional use area only at certain times of day or the week? Similarly, is there anything about the material used or the surface treatment that needs to be taken into account? For example, is the surface going to be smooth concrete, brick pavers, asphalt, or some other material? A basic understanding of the design intent and material of the surfaces will help inform the different aspects of a site assessment.
- Surrounding area: The surfaces do not exist independently from their surroundings. Rather, buildings and other features around the snow-melting area can have impacts on the snow-melting surface in different ways. Direct solar visibility onto the snow-melting surface could cause melting independently from the system during daylight hours. Conversely, a shaded area may never receive any solar benefit and need to rely entirely on the snow-melting system. By the same token, areas that are prone to wind are different from areas that are protected. Wind can cause drifting and accumulation of snow onto a surface, requiring more attention than those that are protected.
It is important to recognize that a single building can have several different conditions in different specific areas. One walkway may be shielded by adjacent buildings and another may be exposed, for example. A driveway may get 24-hour use but a walkway may not. In cases like these, different conditions need to be accounted for—one snow-melting system approach will not likely be appropriate for all of them. The usual implication is to anticipate the need for different operations and create different snow-melting zones. This way, each different area can be controlled separately to respond to the different conditions and snow-melting needs.
- Drainage: When a snow-melting system is working properly, it will turn snow or ice into water, which then needs to drain harmlessly away. Where that water drains to needs to be designed into the project and will be different for each one. In some cases, this drainage could be along the sides of the snow-melting area in troughs, swales, or gutters. In others, it could be picked up by trench drains and channeled into an underground drainage system. Other drainage options are also certainly possible.
It is important to keep in mind that areas along the side of melted areas are usually covered by snow and ice, which may interfere with drainage there, causing all the melted water to move in one direction along the pitch of the melt area. Note that draining melt water commonly moves faster than a typical rainfall. This means drainage rate and flow needs to be addressed so that one safety concern (snow and ice) is not replaced with another one (excessive drain water). It is also important to recognize the need for water to drain away after the system is turned off so ice does not form from the meltwater. This may imply a zone that keeps the drainage area warmed during and after the operation of the snow-melting system. Finally, never drain a system to a street or public thoroughfare since it will then freeze and build up there, causing other problems. All these drainage conditions need to be assessed and accounted for to create a successful snow-melting condition.
Available Heat Sources
Different buildings and sites may have different options in terms of the heat source for a system. In some cases, electric may be the only practical option if natural gas, propane, or other fuels are not available. In these cases, the system will likely connect to the building’s electrical system. The source of electricity could be the local electrical utility, a local renewable energy system, or a cogeneration system if that is used. The available source should be considered for capacity and economy.
Hydronic heat sources can similarly vary based on the building conditions. An existing water or steam-based boiler may have the capacity to handle the snow-melting needs. If not, one or more stand-alone boilers may be appropriate. It will be important to know the type of fuel that is available to power these boilers either way and plan accordingly. Alternatively, energy-recovery or energy-capture systems can be used as a heat source. This is common in locations where there is a large refrigeration load (e.g., supermarkets, food storage, etc.). In these cases, the extracted heat is captured and channeled into useful energy for the building systems.
Regardless of the heat source, in all cases, the critical factors for the success of a snow-melting system are the British thermal units (BTUs) of heat provided, the temperature of the snow-melting surface and the system, and the flow of heated fluids (GPM). Therefore, identifying the available options to assure these factors are achieved is clearly important.
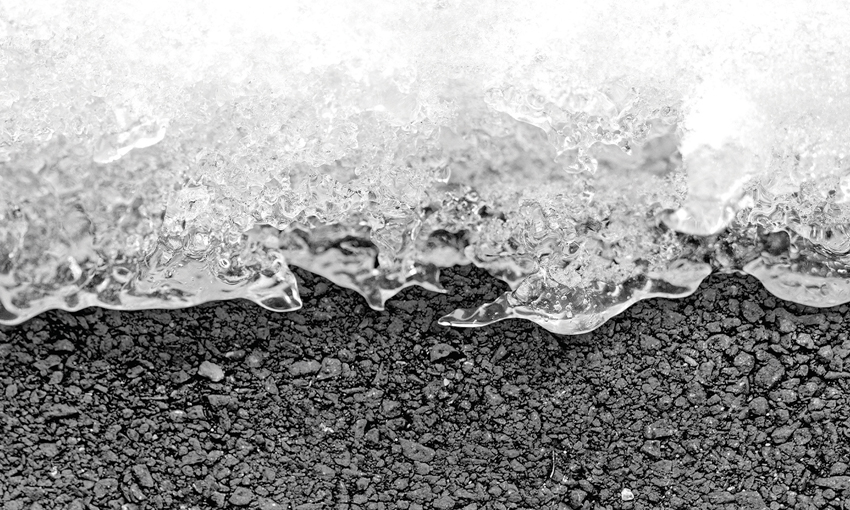
Photo courtesy of Watts
The edges of a snow-melting system need to be taken into account, particularly in terms of how the melt water will drain safely away from a treated area.
Performance Expectations
When planning a snow-melting system, it is always helpful to have everyone on the same page in terms of expectations about how the system will perform. Ideally, this means a conversation with not only the building owner but also the facilities manager or maintenance staff who will be using that system is warranted. The objective is to overcome some misperceptions about how a system works and dispel any notion that it is an “instant” solution. Some of the key performance expectations that need to be understood include the following:
- Response time: Most systems need between 30 minutes and 1 hour before results are visible on the surface. Immediate melting should not be expected.
- Slab and paving warming: The time required before melting occurs depends on the outdoor air temperature and the corresponding temperature of the slab or pavement. Before the snow can melt, the system needs to overcome the slab temperature first. As would be expected, the colder the slab is, the longer it will take to get it up above freezing temperatures.
- Full melting: It will likely take 4–6 hours to melt snow completely in most situations. This will vary, of course, based on the amount of snow present, the temperature, and the weather conditions. Most controllers are set to run for 4 hours and can be adjusted as needed.
- Troubleshooting: It is very rare that a system does not work at all. It is more common that design assumptions vary from reality. The system could be designed for a different amount of snowfall than occurs, the density of the snow can vary, etc. There may also be unintended variances between design and installation, such as tubing depth variations or material thickness changes, which result in different supply temperatures being delivered than planned. These variances can be avoided through careful adherence to the design and specifications of a system and implementation of quality-control measures during installation.
Quality-Control Standards
There are a number of industry standards that apply to snow-melting systems that address both quality control and regulatory compliance. Some of these include:
- FCC: Federal Communications Commission for control systems that use wireless message delivery.
- CSA: Canadian Standard Association for installations in Canada.
- UL: Underwriters Laboratories for electrical connections, pumps, and other components.
- BTL: BACnet Testing Laboratories Certification Program provides companies with a Certificate of Conformance, a BTL Listing, and the right to use the BTL Mark. The BTL Mark is a mark of distinction and has come to represent a high level of quality and conformance based on rigorous independent testing.
In addition to the above, it is always recommended to confer with the manufacturers during design to review their own quality-control standards. Manufacturers should be consulted as well regarding the limitations and capabilities of snow-melting systems and designing to address specific project conditions.
Typical Design Criteria for Snow-Melting Systems
With all of the site conditions, design parameters, and expectations sorted out, it is then appropriate to design and engineer a specific snow-melting system. Note that the typical system design is driven by the amount of energy needed to overcome the anticipated amount of snow and air temperatures. For planning purposes, this is usually calculated based on the number of BTUs needed on a square-foot basis. For most systems, the typical requirement is 120–170 BTUs per square foot depending on outdoor temperature and system configuration.
Some further design criteria for different system types follows.

Photos courtesy of Watts
Hydronic snow-melting systems rely on the same basic components as other hydronic systems: a boiler, distribution piping and manifolds, zone controls, pumps, and tubing for the radiant snow melting.
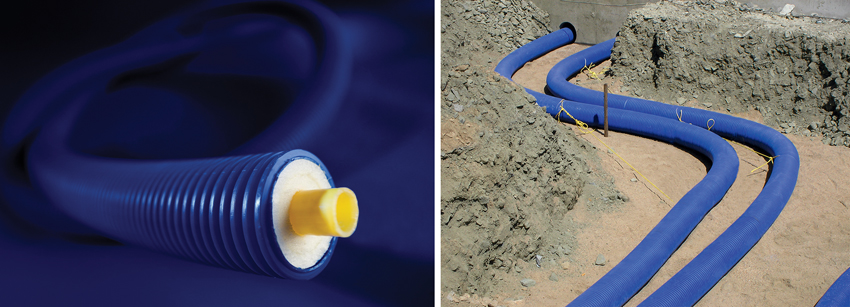
Supply and return piping needs to be insulated, and pre-insulated products are available for this specific purpose.
Hydronic System Design
The design of a hydronic snow-melting system is similar to other hydronic systems used for other purposes. Keep in mind that hydronic snow-melting systems not using a dedicated heat source will use a heat exchanger at the piping interface. This added component needs to be factored into the mechanical room requirements. The heat transfer medium in the hydronic systems is based on using water and a glycol mix with calculations made accordingly. Other design considerations include the following:
- Temperature: The water temperature should be designed for 100–150 degrees Fahrenheit. This temperature can be fluctuated in a hydronic system as needed for a particular design depending on the mass of the surface, differing conditions, and the snow-melting time cycle desired (i.e., 4, 5, or 6 hours).
- Pipe size: It is common to use ½-inch-diameter pipe or larger depending on the length and area of the snow-melting location.
- Supply/return pipe insulation: The distance between the boiler/heat exchanger and the surface where the snow-melting system is installed will require supply and return transmission piping. All of this piping will need to be insulated to ensure that the heat is applied as intended and not lost along the way.
- Snow-melting insulation: Placing insulation under a snow-melting system is generally viewed as optional and is not normally used. However, there may be cases where it is necessary based on the application, performance factors, or regulatory requirements.
- Piping layout: The length of the hydronic piping (or tubing) should be considered in a layout. Typically, longer runs mean more pressure drop, which affects the performance and size of the pumps used to move the water/glycol mix.
- Piping spacing: The spacing distance between parallel piping tubes is important. The general guideline is to space tubing between 6–12 inches on center, with a 9-inch spacing being most typical. The use of a 6-inch tube spacing is typical for critical use areas, such as a hospital entrance, handicapped ramps, parking garage ramps, etc. Spacing that is wider than 12 inches will tend to cause striping of the snow/ice and not melt the surface area completely, so spacing of more than 12 inches should be avoided.
- Depth of pipe: The piping/tubing needs to be close enough to the surface to be effective but must remain covered. Therefore, it should be no closer than 2–3 inches from the surface for proper protection. It should also be no deeper than needed since the further down it is, the slower the response rate and the more energy that will be needed to operate the system.

Photos courtesy of Watts
Electrical snow-melting systems can use preassembled mats of wire (left) or hand-installed coils of electrical wire (right). The preassembled mats have the advantage of ensuring a uniform spacing and streamlined installation.
Electric System Design
The design of an electrical system follows the same general principles as a hydronic system, but some of the particulars are obviously different.
Things to keep in mind with electrical systems include the following:
- Energy: The electrical equivalent of 130–170 BTUs per square foot is between 38 and 50 Watts per square foot. The electrical power, circuiting, and distribution needs should be designed accordingly.
- Temperature: Electrical systems use a fixed wire temperature of about 140 degrees Fahrenheit. This temperature is not changeable during operation.
- Wire size: No special wiring is required for electrical distribution wiring from the control panel to the snow-melting system, based on code requirements. The electrical snow-melting system itself will use the manufacturer’s standard wiring products.
- Insulation: No insulation is needed.
- Wiring layout: The length or run of the snow-melting system wiring/cables needs to be considered. Generally, these cables come from the manufacturer in a fixed length and cannot be extended.
- Wiring spacing: Wiring spacing needs to be closer than hydronic piping spacing and should be 3–4 inches on center. Wider spacing will cause striping and be less effective.
- Wiring depth: Wiring should also be closer to the surface than hydronic piping. The minimum depth below the surface is 2 inches, with an ideal depth for performance and protection at 3 inches.
Keep in mind that all the design parameters indicated here for hydronic and electrical systems are for typical buildings and sites. It is always best to consult with manufacturers for recommendations related to specific project conditions and requirements.
Photos courtesy of Watts
Main control boards are compact, based on electronic technology, and straightforward to use by maintenance staff and homeowners alike.
Snow-Melting Controls
The key to the successful operation of any mechanical or electrical system is the means to control it. Recognizing this, manufacturers offer particular control devices and systems specifically designed for snow-melting systems. The controls are essentially the same for both electrical and hydronic system types, meaning that they use the same components and just control different things. A hydronic system uses the controls to turn on and off or regulate the pumps, mixing valves, boiler, etc. Electrical systems use the controls as basically an on/off control regulating the time when a system, or zones within it, comes on and goes off.
All snow-melting control systems include several aspects with products, software, and manufacturing support available. These include the following:
- Main control boards: A central or convenient location can be selected to install the control board. This could be in the mechanical room where the boiler, manifold, electrical panel, or other equipment are located, or it could be somewhere else. Typically, the control board is a small device, no bigger than a shoe box, and mounted on the wall. The control operates on 120 V electricity and then engages the corresponding-sized contactor for the application. This may be anywhere from 120 V to 277 V depending on the application or product used.
One of the appealing features of the control board component is that it is the programmable “brain” of the system. This means that it can be used to help optimize the way the system runs. For example, the design professional or operator can get a bit creative and use the controls to cycle different zones of the system. If this is addressed in the design phase with the intent that not all zones need heat at once, then perhaps the boiler in a hydronic system can be smaller.
Since control boards are essentially all electronic devices, they can take advantage of interfacing with other electronic systems. Some controls can communicate with building automation systems (BAS) using BACnet or Modbus. This allows for things like alert notifications, remote monitoring, and full adjustment capability to be carried out through the BAS. Some controls can even be connected to a mobile phone app, allowing facility managers or maintenance staff the ultimate flexibility in when, where, or how they receive information or initiate commands to operate the system.
- Control sensors: The means for providing input to the control panel is to use automatic sensors that detect moisture and temperature. There are two common types of sensors: those installed in the ground and those installed on an aerial mount above ground. In-ground sensors automatically detect snow or ice on a driveway or walkway, which means that they need to have snowfall to discern conditions. In-ground sensors are also used to monitor the slab or pavement temperature. In-ground sensors are used for a wide range of systems on a variety of building types. Aerial sensors are used when the use of in-ground sensors simply is not practical. This means that they can be a good option for remodeling projects or sites that have other restrictions interfering with the in-ground sensor installation.
The installation of automatic snow-melting sensors is simplified through the use of some common but sophisticated technology and features. For example, some controls are Wi-Fi enabled, giving them access to weather data and allowing for remote access. Other control options can “daisy chain” together to identify up to 12 zones with different priorities in each zone, allowing the control board to respond accordingly.
- Sequencing: The control sequence is an important part of snow-melting systems, just like any other mechanical/electrical system. The basic elements here are automatic and manual operations, with the ability for a manual override if needed. Typically, the start function is automatic based on information from the in-ground or aerial sensors. An on-demand start is typical, meaning that the system turns on when one or more sensors are activated. Otherwise, the system remains in the “off” mode. There is the option for an anticipator function, which is a Wi-Fi enabled feature connected to weather information or an operator. This allows for a preemptive start of the snow-melting system prior to actual snowfall so the surface is warm and begins melting as soon as the snow starts to hit it. Some operators find that a manual override to start up a system is also helpful for conditions that are not directly related to a snowfall, such as drifting snow or black ice formation.
The system should turn back to “off” based on an automatic function, such as a timer or separate interlink. This keeps the system from running longer than needed and helps reduce energy use and operating cost. It is also a requirement of the International Energy Conservation Code (IECC) in Section C403.13.2 (2021 edition), which states: “Snow- and ice-melting systems shall include automatic controls configured to shut off the system when the pavement temperature is above 50 degrees Fahrenheit (10 degrees Celsius) and precipitation is not falling, and an automatic or manual control that is configured to shut off when the outdoor temperature is above 40 degrees Fahrenheit (4 degrees Celsius).”
In addition to a straight “on” or “off” situation, some critical areas (helipads, emergency room entrances, etc.) may engage in a control sequence known as idling. This is a condition that maintains a constant slab condition whether it is snowing or not but turns off when the outdoor temperatures are reached as cited in the IECC above. Idling options can be permanent or temporary but are typically intermittent based on weather conditions. Idling was used where deemed necessary in the past, but this practice has been mostly replaced by the availability of anticipator systems.
For insight into the significance of controls, Dave Raabe, a tekmar Control Systems sales representative with ROI Marketing, says, “Controls operate hydronic and electric snow-melting systems, with options for fully automatic operation, remote access, and equipment protection. The latest controls improve efficiency through coordination and allow for remote access using a Gateway, WiFi access, and mobile app access options.”
Photos courtesy of Watts
In-ground/in-slab sensors (left and middle) recognize temperature and moisture and are wired back to a main control board. Aerial sensors (right) are used where in-ground sensors are not practical.
Conclusion
Snow-melting systems have been shown to provide a significant degree of safety and protection to people, vehicles, and buildings. The benefits of installing a snow-melting system often outweigh the cost many times over during the life of the facility. A properly designed system starts with an assessment of the site and building conditions, and discussions with building owners and operators. The design of either hydronic or electrical systems relies on following known principles applied to the particulars of a specific system. The use of electronic controls allows for the smooth operation and optimization of the system. The systems available today are up to date, practical, advanced, and cost-effective.
Peter J. Arsenault, FAIA, NCARB, LEED AP, is a nationally known architect, continuing education presenter, and prolific author advancing high-performance buildings through better design. www.pjaarch.com, www.linkedin.com/in/pjaarch