This CE Center article is no longer eligible for receiving credits.
Masonry construction, one of the oldest building systems in the world, requires a complex integration of a variety of elements to control moisture. The construction of a masonry building requires the knowledge of how this material weathers and reacts to seasonal changes such as snow, sleet, wind-driven rain, and humidity. Ancient civilizations building in equatorial zones using 3-foot-thick walls did not have to worry about a freeze-thaw cycle when they chose masonry, stucco, and brick as their most common building material. However, as civilization moved north to more temperate climates, new construction methods reduced the impact of moisture from seasonal temperature variations on buildings. The modern development of wood and steel structural frames with masonry cladding included the development of flashing systems that can expel moisture from these new building enclosures. The main line of defense that protects a wall system from moisture damage is in the construction detailing of wall flashing.
Early technical manuals such as the AIA's Ramsey and Sleeper Architectural Graphic Standard as well as 21st century editions provide numerous details for preventing moisture damage in masonry and masonry clad buildings. In the 1939 Brick Engineering Handbook of Design, the author states that at “the outset, it might be stated that no flashing at all is better than poor flashing.”1 The International Masonry Institute and the Building Enclosure Council provides information on codes, technical and non-technical bulletins on materials and techniques. Flashing materials and assemblies require code-compliant standards for durability, plasticity, and permeability. With all of this support, the evidence is clear that the variety and compatibility of moisture-proofing materials, flashing, expansion and control joints are providing many choices for successful field applications of flashing in masonry buildings.
Contractors are required to monitor the installation and compatibility of numerous materials specified by design professionals who are often not aware of the specific field conditions during construction. A lot can and does go awry when building a masonry building. There is also an increasing emphasis on the design of high-performance buildings for energy efficiency and durability as part of a sustainable design portfolio. To design a moisture-proof, high-performance building, architects need to carefully detail and specify all of the components that are part of this system. They may also want to choose from a new variety of engineered products that unitize some of the basic components of the flashing system to improve the constructability of masonry wall systems.
 |
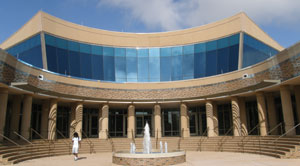
The selection of a unitized flashing system was part of the overall moisture proofing strategy for the Hampton University Student Dining Facility in Hampton, Virginia. Architect of record: Livas Group Architects, P.C. in Norfolk, Virginia.
Photo by George Faulkner Jr., AIA |
As architects explore new forms: curved walls, canted overhangs, multifaceted edges, and masonry cladding in high-rise buildings, the integration of materials for moisture proofing wall systems can be an important design component. Three-dimensional detailing as part of information modeling has helped develop a more focused look at the many corners, breaks, and openings in modern buildings. “Designers sometimes forget how beautiful details are!” says Jim Stevens, AIA, an associate professor of architecture at Lawrence Technological University. Stevens reports that the plans for the renovation of a courthouse in St. Louis displayed corner boots, end dams, and flashing pieces that could have been exhibits of modern sculptures. A review of the components in wall flashing will show how unifying the components allows for easier installation and better moisture control in buildings.
Moisture and Masonry
 |
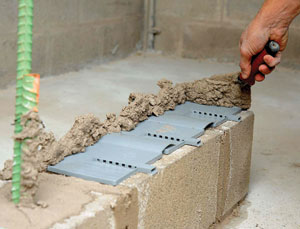
Unitized flashing systems can be specified using any of the most common flashing materials.
Photo courtesy of Mortar Net® USA, Ltd. |
Masonry is a porous material and all masonry buildings absorb moisture. From roof to foundation, what may appear to be an impenetrable building component is in fact, a system that needs to breathe to expel moisture. Masonry walls are typically constructed with an air gap between the brick veneer or exterior wythe of brick and the structural wall. Brick veneer is primarily decorative and is connected to the structural wall system by metal brick ties. Between the veneer and the structural wall is an air gap that is the “lungs” of the wall system— the place where air and moisture is channeled to be expelled at any place where the solid wall is interrupted by an opening such as a window, an interior or exterior corner and primarily at the end of the vertical wall. The Brick Industry Association (BIA) defines a cavity wall as having a continuous air space. Depending upon the skill of the mason, mortar droppings can fill a wall cavity so the BIA recommends a 2-inch minimum cavity to allow for proper drainage and airflow. However, the BIA Technical Note 21A allows rigid insulation to occupy one-half of the 2-inch cavity creating an even tighter allowance for proper mortar placement.
 |
New Jersey’s Louis I. Kahn Trenton Bath House uses a unitized flashing system on two new walls.
Photo courtesy of Mortar Net® USA, Ltd. |
The most common reasons for excess water in a brick wall cavity can come from:
- Inadequately filled or over-sanded mortar joints
- Extreme acid cleaning
- Design details – Rowlocks or Soldier courses
- Construction materials – weather exposure
A publication of best practices from the 2006 AIA Convention, describes the need for considering moisture penetration as part of an early design phase. “Effective prevention involves implementing a successful water management system, understanding the sources of moisture ingress, and identifying potential problems. Studies have shown that uncontrolled rainwater penetration and moisture ingress are two of the most common threats to the performance of a building's envelope and together they represent up to 80 percent of all construction-related liability claims in the United States.”2 Detailing of the drainage system through proper flashing is considered one of the top means of effective moisture management.
Effective Flashing
Flashing is a membrane installed within a masonry wall to either prevent moisture infiltration, or divert moisture, which does penetrate the wall, back to the exterior of the building. Flashing provides a controlled path for water through walls. Unless specified as a unified component, the pieces that comprise a flashing system are membranes, weeps, termination bars, drip edges, and adhesives. Driving rain or sleet and the build-up of condensation on the interior of a masonry wall is directed by gravity to the lowest point in a building. Without flashing, the collection of moisture increases maintenance costs and can even cause building failures. Water can be prevented from getting out of a wall by the omission or incorrect installation of wall flashing and weep holes that can be clogged by mortar. Damage to masonry buildings due to moisture penetration can include efflorescence, spalling, steel stud failures, mold penetration, and even the collapse of the entire wall system.
Advantage of Unitized Flashing Materials
When installed at the base of a masonry wall, flashing spans from the exterior to the interior of that wall. Flashing covers the gap between the masonry and the substrate backup wall or in the case of a single wythe system, covers the open cells in blocks. Flashing should primarily be durable and resist and direct moisture as part of a complete system. Flashing materials should be tough enough to resist puncture by a mason with a trowel as subsequent layers of mortar and masonry are added to the wall. The flashing material should be flexible enough to be formed and placed on the wall. Flashing is adhered to the wall with adhesives that allow for expansion and contraction without cracking during seasonal changes. The flashing material must be compatible with the masonry, back-up substrate wall, adhesives, sealants, air barriers, mortar, salts, and masonry. Flashing materials should not cause staining on the wall and should be almost invisible when placed along the wall surface.
The estimated life of the flashing should match the life of a building. Replacing flashing, particularly in high-rise buildings, is difficult and expensive. Lower-cost solutions for building flashing, for example the use of asphalt-impregnated felts or tar paper, almost always lead to higher replacement and maintenance costs for the building owner.
The advantages of selecting a unitized flashing system are that the design professional will specify a material that:
- Decreases the probability of improper installation of materials—especially at difficult locations such as overlaps, rough openings, inside and outside corners.
- Manages mortar damming so water can easily flow out of the wall cavity.
- Prevents air pressure differentials that can force moisture in the building envelope.
- Can specify a material that has recycled content to help with LEED® certification.
- Assists with timely delivery on site.
- Provides compatible materials and prefabricated components for end dams and corner boots.
- Is one product instead of five separately manufactured and sourced products.
- Predetermines overlaps and enhances uniform installation.
- Avoid excessive labor installation costs of multiple layers of materials.
| Composite, Unitized Flashing Chosen for Hampton University
|
|
Architect George Faulkner Jr., AIA, senior designer and project architect for the Hampton University Student Dining Facility worked with moisture consultant, Stephen Hentz, P.E., of Hentz Engineering, to detail this important campus building. The dining hall will serve as an institutional focal point that will be located on the shoreline of the Hampton River on the campus of Hampton University overlooking downtown Hampton, Virginia.
The 80,000-square-foot facility will be housed on two levels with the second floor set back from the main façade to create a dramatic two-story atrium along the waterfront. The main floor will house a central dining area with food service kiosks around the perimeter of the atrium. The second floor will house a full-service market-style food court and administration areas. The design will also include exterior eating areas with views of the river. To maximize the benefit of its prime waterfront location, the composition of the building will be designed to accommodate views to downtown Hampton through a three-story convex glass curtain wall that will be the length of the building. The building is also designed to complement the other masonry buildings on this historic campus. A contrast of old and new, reflective and permanent, major building materials are brick, precast concrete, and glass. The building is designed with a canted facade, curved walls, and defined edges between the masonry and glass detailing.
The exterior brick veneer wall system for the dining facility was installed over a 2-inch air cavity with a commercial air and moisture barrier applied to a 5/8-inch fiberglass sheeting backed up with 6-inch or 8-inch steel studs. The veneer is drained to the base of the wall through a unitized flashing system that incorporates a mesh cavity drainage material, membrane flashing, termination bar, and stainless steel drip into a panelized product. The flashing panels were installed and sealed together at the end laps using multiple sealant beads. At termination points in the flashing, pre-molded end dams were utilized to direct water to the exterior of the wall cavity. Due to the varying slopes and curves of the curtain wall system, several custom brick veneer cavity closures were fabricated and sealed to the moisture barrier using flashing membrane tapes and stainless steel for rigidity and long service life.
 |
Controlling water penetration on campus buildings was important when designing a building that is clad in brick, glass, and precast concrete.
Photo by George Faulkner |
During construction, site visits were performed to observe the installed components for compliance with the project documents. Working with a moisture proofing consultant, the architect commented that the “choice of unitized flashing was presented by the consultant who had previous experience with this unique product.” This selection is part of the overall requirements to design a long-lasting, permanent campus facility.
|
Unitized flashing systems can be specified using any of the most common flashing materials as a membrane. Unitized flashing has pre-designed laps, screws, weeps, termination bars, drip-edges, and a mortar collection device that meets the requirements of the ASTM E-514 water test. These durable systems are easy to install, particularly for high-rise buildings as well as buildings with numerous changes of materials and wall orientation. New products include roll flashing with a mortar collection system directly attached to the flashing membrane, clean lap spaces, and weeps. This adds to the ease of installation and reduces the cost of labor. In addition, the uniform placement of weeps and the clean edges of the flashing are almost indiscernible on the building facade.
Components of flashing systems
There are several components of a flashing system that needs to be installed and work together for moisture collection. The flashing membrane is the material that extends from the inside to the exterior of the wall system. Mortar collection is a strategy that in the past has been provided by a variety of installation techniques but now can be specified as part of a collection system. In addition, a flashing system includes weep hole vents, termination bars, and drip edges—all of which may be adhered to the wall by screws or adhesives that must be compatible with a variety of materials. The latest flashing systems provide prefabricated corner “boots” and end dams that allow for more precise fittings at different edges and corners of the building. All of these components can be specified in a variety of materials, and weep hole vents and drip edges can also be selected by color. One of the advantages of unitized flashing systems is that these components can be easily coordinated and specified.
Membranes
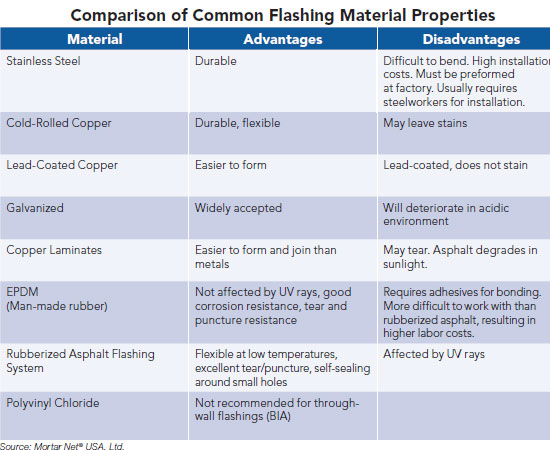
The choice of the flashing material is important when specifying any flashing system. There is a wide variety of materials to select from for a typical flashing system as well as for a unitized flashing system, including the following products that have been re-engineered to meet higher performance standards. According to Steven Fechino, engineering and construction manager at Mortar Net® USA, Ltd., some of these types of flashing include the following:3
Copper laminate. Copper flashings are one of the oldest of all flashing materials and one of the most permanent. New systems include a laminated mesh of polyethylene on both sides of the copper. This durable product is almost impossible to damage with a trowel during installation. Copper flashing can cause staining on masonry if not properly detailed. Many new copper laminates are compatible with most building products as they do not contain asphalt as a binder.
Stainless steel. This high-end product is usually specified for institutional buildings and those buildings meant to be a legacy for future generations. One of the most expensive flashing materials, installation is labor intensive and requires bending, soldering, mechanical fasteners, and adhesives.
Rubberized asphalt. One of the most common types of flashing used by masons and often is installed with a “peel and stick” placement on the back up wall. The type of primer used with this product as well as proper installation is the key to successful moisture management. It is sensitive to ultra-violet rays and can be damaged if left exposed during construction. Rubberized asphalt can also be incompatible with polyvinyl chloride (PVC) molds used for corners and end dams. The plasticizers in the PVC may leach into the asphalt and reduce the plasticity of the asphalt over time.
 |
Multicolored weep vents blend in and are less noticeable along the face of a building.
Photo courtesy of Mortar Net® USA, Ltd. |
Thermovinyl plastics with non-migratory plasticizers (PVC): The current PVC flashing materials have been developed from products well-tested and used for roof flashing. This product is durable, flexible, and strong. It is compatible with many polyurethanes, polyethers, and butyls.
Thermoplastic polyolefin (TPO). This flexible membrane has a 30-year life span when installed on a roof and almost unlimited life span when used as wall flashing. The laps on this product can be sealed with a butyl rubber or primed polyether adhesives as well as with heat welding.
Ethylene propylene diene monomer (EPDM). Another roofing material that has migrated for use in wall flashing, EPDM is durable, flexible, and easy to install but may need to be specified with matching EPDM components to avoid incompatibility with some PVC corner boots and end dams.
Mortar Collection Systems
Before the invention of modern flashing systems, a mason would place flashing and align pieces of wood to collect mortar droppings as they fell into the wall cavity during the construction. The mason removed the lathe after every 16 inches of block construction leaving the air space free of mortar droppings. Slow and tedious, this practice often resulted at best uneven air spaces in wall cavities and at worst clogged weep holes and vents. Unitized flashing systems replace this common practice with smart geometry. By adding a trapezoidal mesh fabric to the base material, any dropped mortar is captured in order to always create a pathway for water to the exterior.
Weep Vents
A weep hole is an opening left or installed to prevent water from accumulating behind a wall or within a wall. Weep holes should be large enough to allow for moisture flow and fill the open head joint. A weep hole made of the same material as the drainage mat provides a continuous flow from the wall to the exterior for any accumulated moisture. They should also provide a barrier to insect penetration into the wall cavity.
Weep hole vents must be flame resistant and UV stable as they are exposed to sunlight. In order to be less noticeable, the color of the material should match the mortar used on the project. According to the BIA, the recommended spacing of weep holes depends on the materials. In a unitized flashing system, weep holes can be as close as 6 inches apart and in traditional flashings as much as 24 inches from center to center. The use of tubes as a weep hole material is no longer recommended as they can easily clog.
Termination Bars
A termination bar is a piece of plastic or metal with holes punched in it at a predetermined space to allow it to be adhered to the substrate wall. When the only structural system was double wythe masonry, a piece of flashing was laid into the bed course of the backup CMU wall one course above the flashing level. A mason dropped down the flashing and curled it over the brick shelf. This method often required a team of masons to hold, roll, glue and place weeps. With the advent of alternative substrates as the back up wall system, the termination bar “caps” the flashing system and is placed horizontally on the vertical wall.
The choice of materials for a termination bar is often selected by the contractor or architect and is related to geographic preferences. Sixteen gauge stainless steel termination bars with mounting screws can be selected for their durability and compatibility with all substrates.
Drip Edges
 |
Uniform drip edges are possible with a unitized flashing product as shown in this wall completed for the Hampton University Dining Hall.
Photo courtesy of Mortar Net® USA, Ltd. |
Drip edges are one of the most visible components of wall flashing. A drip edge is the overhanging component of the flashing, usually metal provided to control the direction of wind driven rainwater and moisture within the wall system. The crispness of a drip edge is controlled by its placement and the material used. Quality drip edge materials are a minimum of 26-gauge stainless steel, cold rolled copper, and materials coated with polyvinylidene fluoride. Drip edges are usually curved at the end with an approximately 30-degree hem to avoid sharp edges.
Adhesives
There are numerous adhesives on the construction market. To assure compatibility with the flashing materials, the adhesive should be selected and purchased along with the flashing components. Non-curing butyl or synthetic rubber is the most common form of adhesive. This material will stick to almost any surface and never completely hardens, so it will move along with the building.
 |
Compatible corner boots and end dams can be specified with a unitized flashing system manufactured to meet many sizes and configurations of a modern wall system.
Photo by Mortar Net® USA, Ltd. |
Polyether sealants are new to the wall flashing industry but have been tested and used in the roofing industry. Polyether sealants can be applied in temperatures as low as 30 degrees F, extending the construction cycle. They are made without any volatile organic solvents, and contain no carcinogenic materials. They conform to California's proposition 65 and according to an article in Roofing Contractor, “These are the most environmentally and OSHA-compliant sealants on the market today.”4
End Dams, Penetrations, and Corner Details
Masons install end dams at the ends of lintels and masonry openings. There are left and right end dams as well as universal units that can be used in any configuration. Overlooking the inclusion of an end dam may result in field ordering of these components on-site by the mason. The material in an end dam must be compatible with the flashing membrane and adhesives. The end dams prevent water from moving laterally through the mortar that can cause spalling and joint failure in the masonry adjacent to the openings.
All penetrations through exterior walls require flashing particularly those that intersect the line of the flashing at the bottom of walls. With a system that can be easily cut and placed over the pipe, extrusion or other protruding object and then taped, a solid moisture barrier is created at a place where leaks and subsequent cracking of the masonry can occur.
Proposition 65, the Safe Drinking Water and Toxic Enforcement Act of 1986, was enacted as a ballot initiative in November 1986. The Proposition was intended by its authors to protect California citizens and the state’s drinking water sources from chemicals known to cause cancer, birth defects, or other reproductive harm, and to inform citizens about exposures to such chemicals.
Proposition 65 requires the Governor to publish, at least annually, a list of chemicals known to the state to cause cancer or reproductive toxicity.5
|
Masonry corners can provide challenges for flashing installations. Rather than piecing together flashing fabrics and wrapping them around the edges or corners in two directions new products include different sizes of corner boots. With a manufactured corner boot, the flashing is set upon the wall, adhered to the substrate and can extend above the flashing to avoid lateral moister penetrations at the corners. Masonry corner boots can be specified to have taller profiles and are available for radial corner conditions.
Concrete Masonry Units (CMU) Construction
Single wythe concrete masonry walls also need protection from water damage. In the case of a single wythe system, water will run down the inside of the block and can cause the deterioration of steel reinforcement and wall failure. By placing flashing at wall openings and above the base of the wall, water can expelled out to the face of the building preventing damage to the masonry wall. A unitized system requires no additional components except for sealant and includes the following:
- Vertical mesh components that prevent mortar droppings from blocking pathways to the exterior of the building.
- Vertical mesh components and weep tabs to provide open pathways for water to migrate to the exterior of the building.
- A rear dam on the stainless steel drainage strips channels water to the weep tabs and out of the building.
- Forms a continuous drainage system around the entire perimeter of a concrete block building.
- Installs quickly and easily with minimal training.
- May be used with 6-inch block and larger.
- May be used over wall openings, bond beams and structural steel members if ends are properly dammed.
The mesh components will not degrade, rot, promote mold or fungus growth, or react with common building materials, and will last for the life of the building and because of easy installation details it is ideal for repair and restoration projects as well as new construction.
High-Tech Solutions for the Preservation of the Louis I. Kahn Trenton Bath House
|
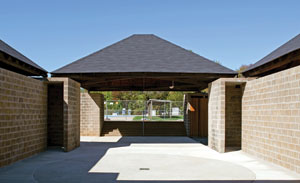 |
The unitized flashing system was used on the two new walls in the complex that had hidden gutters built into the top course of CMU.
Photo by Mills + Schnoering Architects, LLC |
One of Louis Kahn’s early masonry buildings, this small concrete block building was restored in 2010. The Bath House was seminal to the development of Kahn as an internationally famous architect. “I discovered myself after designing that little concrete block bath house in Trenton,” he recalled a few years before his death in 1974.6 Built in 1955 and exposed to the elements, the challenge for the architect was to detail the reconstruction so it would maintain its design integrity, but also solve some of the technical problems that had caused severe degradation in the block walls. The building was designed with a floating roof structure. The supporting corner pillars are hollow spaces, “servant” spaces that Kahn used to support the “served” spaces—the shower, bath, and atrium areas. These walls had been originally filled and canted to shed water but after 50 plus years, these porous block walls had absorbed enough water to degrade the steel reinforcement and damage the masonry. All areas of the roof had no gutters and were designed as pure geometric forms with sharp edges that allowed the rainwater to “wash” across the wall as a surface effect. New Jersey’s freeze-thaw climate severely damaged these walls. They were coated with algae, broken, cracked, and in many cases, needed to be entirely reconstructed.
The architect employed many strategies to moisture proof this iconic building without affecting Kahn’s dramatic design. The contractor was required to remove mortar and clean the steel reinforcement bars in the columns that supported the floating roof. These areas were capped with a plasticized filler to shed rainwater. The top course of block walls that were to be washed with rainwater were also filled and the surface was coated with a similar material. Because of severe damage to the masonry, the atrium walls had to be completely rebuilt. At the top of the walls, a built-in gutter was installed into the block so that it was not visible from below but provided a method to protect the wall surface. The block was recreated as was the unique smeared mortar technique. The completed restoration was not designed to look as though it were a new building and the architect did not remove all evidence of weathering particularly at the rain-washed walls.
To protect the new single wythe CMU walls in the atrium from additional moisture attack without changing the appearance, the architect specified a unitized block flashing system that consisted of flashing panels with a mortar catching mesh laid atop the first above-grade course of CMU and grouted into place. This system intercepts the water as it runs down the CMU cores and expels it through integrated weep hole drainage spouts that are almost invisible along the wall surface.
 |
Installation of unitized flashing at base
of wall.
Photo by Mills + Schnoering Architects, LLC |
The contractor Wu Construction and their masonry subcontractor Jamison Masonry suggested the new unitized flashing system designed for CMU walls. The contractor submitted samples and technical literature for the architect’s review and they approved it for use on the project. According to Michael J. Mills, FAIA, partner at Mills + Schnoering Architects, “The unitized flashing system was used on the two new walls in the complex that had hidden gutters built into the top course of CMU. This was a ‘belt and suspenders’ approach to make the restored Bath House less susceptible to the ongoing moisture damage which had compromised the original design.”
The National Trust for Historic Preservation awarded the Louis I. Kahn Bath House and Day Camp in Ewing Township, New Jersey, a 2011 honor award for its careful preservation and restoration by the architect.
|
Specifying Flashing
Cassandra Mellon, CSI, CCPR, the national sales representative for Mortar Net® USA, Ltd., admits that “Flashing is not the most glamorous part of the business.” However, she contends that it is “one of the most important.” The design professional has four major choices when specifying a flashing material. These are:
- The membrane choice is important because it affects the durability and directs the subsequent decisions for materials that are compatible to it during installation.
- As one of the most visible components of a flashing system, the drip edge is a significant choice.
- The termination bar and compatibility with the vapor barrier and installation on the wall substrate.
- The mortar collection system that prevents mortar droppings from clogging the air gap between the masonry and the substrate.
By specifying a unitized system, these four components are compatible with each other making installation easier on the jobsite. Different manufacturers will provide unique installation requirements for their systems and whether the designer is specifying a unitized system or the separate components of a system, the materials must work together. Flashing must be integrated into the full building envelope and the design professional should pay attention to this component particularly at the corners and wall openings. High-performance masonry buildings require the high attention to details that will provide durable, energy efficient, and moisture-proof enclosures.
Endnotes
- www.rci-online.org/interface/2008-BES-erdly-bekelja.pdf
- www.aia.org/aiaucmp/groups/ek_members/documents/pdf/aiap016373.pdf
- masonrymagazine.com/features/1288-flashing-rules-never-to-be-broken.html
- www.roofingcontractor.com/articles/from-caulk-to-sealants
- www.oehha.org/prop65.html
http://www.ncma.org/
- www.ncma.org/CMDOnline/2010Issues/NovDec/
Pages/HistoricPreservationKahnBathHouse.aspx
Architect Celeste Allen Novak, AIA, LEED AP, specializes in sustainable design and planning in Ann Arbor, Michigan.

|
Mortar Net Solutions
Innovative products, superior sales and technical support have established Mortar Net Solutions as the leader in developing and providing moisture management solutions for masonry construction. Architects confidently specify and masons proudly build with products by Mortar Net.
http://www.mortarnet.com/
|