This CE Center article is no longer eligible for receiving credits.
Proper Adhered Masonry Wall Design
Adhered masonry walls using veneers such as thin brick, thin stone, and stucco have been in use for decades. A traditional adhered masonry system includes a substrate with one or two layers of a weather resistant barrier (WRB) on the substrate’s outside face, a metal lath securely fastened to the substrate, a “scratch” or base mortar coat that completely encapsulates the metal lath, a top mortar coat, and a masonry veneer adhered by a top coat to the scratch coat. Stucco veneers may also include a “brown” mortar coat over the scratch coat and a “color” mortar coat over the brown coat, which is the final stucco finish.
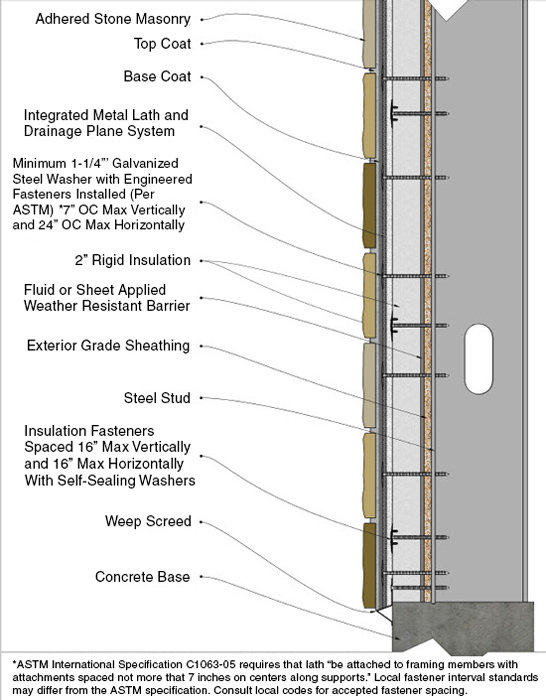
Image courtesy of Mortar Net Solutions
Adhered masonry veneer wall detail with drainage mesh
Like a masonry cavity wall, a high-quality adhered masonry wall is designed with the expectation that moisture will penetrate the veneer and consists of multiple components that act together to provide structural integrity combined with proper drainage and drying. Traditional adhered masonry veneer walls have relied on double layers of weather resistant barriers (WRBs) and self-furring metal lath to provide drainage and drying, along with batt, foam, or rigid insulation between studs for insulation. In concrete masonry unit (CMU) structural walls, insulation may be provided by filling the CMU cells with insulation or by furring out the interior and using batt, foam, or rigid insulation. However, demand for more sustainable and energy-efficient walls combined with advances in building science have led to a number of important design improvements during the past few years, including the addition of weep screeds, location of rigid insulation (RI) between the veneer and the structural wall, and a drainage plane behind the lath.
A weep screed is placed at the bottom of the wall before the lath is installed to allow drainage of moisture that makes its way down the wall between the base coat and WRB. A weep screed is highly recommended but is not always required by code. Modern building science and increasingly stringent energy codes are recommending or requiring the addition of rigid insulation (RI) and a drainage plane between the substrate and the lath. These additions make designs more challenging but pay off with longer building life, and greater energy efficiency and occupant comfort.
Every adhered masonry veneer wall must start with a dry, sound substrate—a wood or steel stud wall with sheathing or a CMU wall. Unlike masonry cavity walls in which the masonry veneer rests on a brick ledge designed to support its weight, adhered masonry veneer is suspended from the structural wall, so a wet, unsound structural wall will prevent solid anchoring of the metal lath and result in veneer failure.
The most commonly used method for keeping the structural wall dry is the installation of either a WRB or an air and vapor barrier applied to the surface of the substrate. WRBs can be sheet material or liquid applied, and the substrate must be dry and free of any contaminants that could interfere with their application. In this course, we will concentrate on sheet product WRB installation without going into liquid- or sheet-applied air and vapor barriers. In many geographical areas local codes require the use of two layers of WRB, which can be asphalt impregnated paper or “housewrap,” a generic term for manufactured WRBs with varying degrees of permeability. On stud wall buildings, the first WRB layer is typically installed by the carpenters who frame the walls as a way to keep the sheathing dry until the adhered masonry veneer installers arrive and install the second layer. On CMU walls, the WRB may be installed by the masons or by a separate WRB contractor.
The second layer of sheet product WRB has several functions: it keeps the first WRB layer dry, it adds to the protection of the exterior walls during the application of the base mortar coat, and it serves as a bond break between the base coat and the first layer of WRB. A bond break is extremely important because it allows thermally generated movement in the veneer relative to the substrate so the building can move without cracking the veneer. There are a number of variations in WRB requirements, which are dependent on several factors, including code enforcement, insulation use and placement, local climate, and cost. These variations are beyond the scope of this course, but the Masonry Veneer Manufacturers Association (MVMA) can provide further information and guidance.
Lath is installed over the WRB by the veneer installers. If continuous rigid insulation (RI) is specified, the lath is attached on top of the insulation. If a drainage plane is specified, it is installed between the lath and RI or WRB. Wire lath, metal lath, 2.5-pound lath, and 3.4-pound lath are all the same basic product—expanded galvanized metal lath. Galvanizing is the application of a zinc coating to the metal lath. It prevents corrosion and is expressed as the weight of zinc in tenths of an ounce that is applied per square foot of lath, so G-60 lath, the most common galvanizing standard, has an average of 0.60 ounces of zinc evenly applied to every square foot. Lath with less than a G-60 galvanizing rating should not be used.
Lath is installed by placing it against the WRB and fastening it every 6 inches vertically into a stud and horizontally into structural members. Fasteners should not be placed between the studs because they will work loose as the building moves and can create paths for water and air to pass through the wall. Once the lath is in place, the wall is ready for the “scratch” or base coat of mortar. A minimum ½-inch-thick base mortar coat is forced into the lath so it completely encapsulates the lath, then the masonry veneer is attached to the base coat with a mortar top coat. The combined base and top coat thickness should be about 1 inch.
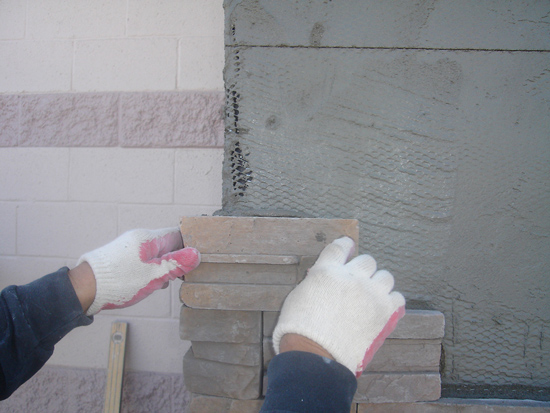
Photo courtesy of Mortar Net Solutions
Typical adhered masonry
Adhered masonry veneers typically consist of natural stone cut into thin sections, thin brick (masonry brick units sawn into thin sections), cultured stone (cast concrete units that look like natural stone), and stucco. In typical adhered masonry construction without a drainage plane, walls dry primarily due to the moisture escaping between the units, either through mortar joints or open joints, or through evaporation through stucco. Without a drainage plane, this is a slow process.
Walls dry at different rates, but a good rule of thumb is to expect a completely saturated wall with no drainage plane to dry at a rate of 1 inch of material thickness every 40 days. Actual drying rate depends on temperature, wind and sun exposure, density of the mortar coats, time of dry weather exposure, and whether or not a weep screed and drainage plane have been installed. While the base mortar coat is wet, moisture can penetrate fastener holes and create a damp substrate wall in concentrated areas around those holes, which can lead to substrate deterioration and mold growth if the substrate can not dry quickly. In worst-case scenarios, water can cause damage to the interior walls and dramatically reduce the effectiveness of batt insulation.
Properly designed cavity walls provide rapid drainage and drying by including a space between the veneer and substrate that allows moisture to move rapidly out of the cavity and air to circulate in the cavity. Modern adhered masonry veneer walls also incorporate a space that serves the same function in the form of an entangled or high loft non-woven drainage mesh made of polyester or polypropylene between the WRB and the base coat.
Both materials prevent mortar from entering the drainage space, allow air, vapor, and water to move unrestricted behind the base coat, and allow for full encapsulation of mortar around the wire lath. Substrate walls remain dryer because moisture will quickly run down the WRB and out of the weep screed or evaporate due to air movement within the mesh. The base and top coats will also cure faster with a drainage mesh because air is able to reach both sides of the mortar. The result is a system that will not exhibit mortar deterioration in wet conditions, and which will maintain a strong bond between masonry units and the base coat.
Several years of testing have convinced the MVMA to allow the reduction of two layers of WRB to only one when drainage mesh is installed because the drainage mesh acts as a bond break, and prevents the base mortar coat from coming in contact with the first WRB layer and transferring moisture to the substrate. However, local code officials have the final word in this issue so be sure to check with them before specifying a single-layer of WRB.
Drainage mesh systems are available in two forms: as metal lath and drainage mesh installed separately on site, or as a systemized product with the lath and mesh attached to each other in a factory. Both configurations are attached to the wall in the same way using the same fastener types, but the systemized product saves labor and reduces the number of wall penetrations because the lath and drainage mesh are installed at the same time with only one set of fasteners, and because frequently only a single layer of WRB is necessary.
Lath installation is usually specified to conform at minimum to ASTM C-847, which describes recommended installation procedures for expanded metal lath. ASTM International is a standards organization that develops and publishes voluntary consensus technical standards for a wide range of materials, products, systems, and services. ASTM C-847 and most local codes require that metal lath sections overlap by a minimum of 1 inch, and installing lath and mesh separately or as a system can meet this requirement. However, the lath/drainage system includes a built-in overlap determined by a holdback of the drainage mesh on two edges that makes it easier for installers to create the conforming overlap. The mesh sections can be overlapped if installed separately from the lath, or will be abutted if installed as a factory-assembled system to create a continuous drainage plane behind all the areas covered with lath.
This course explains the design of adhered masonry wall systems typical of today’s best practices. It utilizes familiar masonry cavity wall design to show why proper ventilation and drainage typical in this wall type must also be used in adhered masonry veneer wall design, and explores the design differences and similarities between masonry cavity wall systems and adhered masonry veneer systems. It shows the results of improper wall design, common errors in adhered masonry installation techniques and product selection, and the correct techniques and products necessary for constructing sustainable, energy-efficient adhered masonry veneer walls that will remain free of water damage for the life of the building.
At the end of this program, students will understand the proper construction of adhered masonry veneer walls. They will be familiar with how air and moisture move in and out of the wall, with all the components necessary for detailing a modern adhered masonry veneer wall system, and how to design a long-lasting wall that promotes proper water drainage and drying for the life of the wall. They will also have a more complete understanding of how to evaluate adhered masonry installations in the field so they can make sure their designs are properly executed and their clients are satisfied with the results.
AIA Sustainable Design Definition
The AIA defines sustainability as the concept of meeting present needs without compromising the ability of future generations to meet their own needs. AIA provides guidelines to help designers create sustainable designs, which include resource-efficient construction and processes; building with a minimal environmental impact; reducing waste, pollution, and overall environmental degradation; and providing for the protection and enhancement of occupant health and productivity.
Designers’ Challenge: Creating a Specification That Matches the Installation
Specifications are the guidebook for every project and are one of the most important documents in the construction industry. The specifier expects the specifications to be followed to the letter, resulting in a well-constructed, properly sourced, functional, and sustainable structure. What the specifications cannot do is teach a low bidder to install high-quality products with well-trained personnel if the bidder is trying to “value engineer” out key components or well-trained personnel are not available. This program will provide information about material function and installation that can be utilized to create high-performing, sustainable wall systems that conform to design expectations, no matter the contractor.
Masonry Cavity Wall Design
No masonry wall is waterproof. Water will penetrate the veneer due to differences in the path of moisture travel, varying absorbency of materials, and openings in the veneer that may develop during or after construction. Trapped moisture can create wall failures, callbacks, and damage to installer and designer reputations, so designing and building for rapid moisture removal and drying is vital for creating sustainable walls. Because the latest building science shows that adhered masonry walls can benefit by using the same proven design principles as those used in masonry cavity walls, it’s important to have an understanding of what makes cavity wall design so effective.
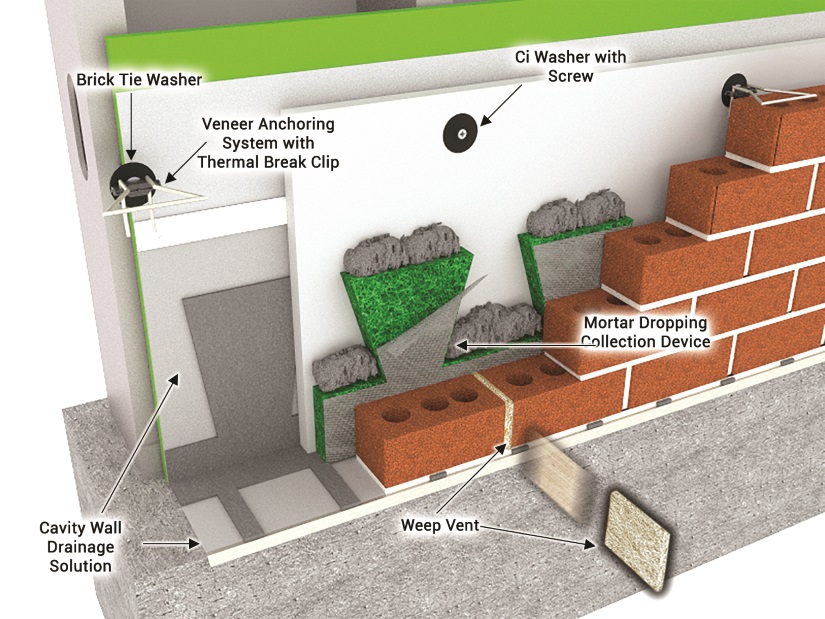
Image courtesy of Mortar Net Solutions
Masonry Cavity Wall with 1-inch rigid insulation and 1-inch cavity
Basic cavity wall design locates the inside face of the veneer one to several inches from the interior structure of the building and includes a drainage system, which consists of three key components.
The first is a flashing that extends up the substrate wall 10 to 12 inches and under the first or second course of exposed veneer above grade to the outside of the structure. A drip edge is often used to trim the appearance of the flashing, ensure that the flashing extends to the outside face of the veneer, and provide a hemmed lip to allow moisture to drip away from the veneer. The flashing must be level or sloped slightly toward the exterior to allow the water to drain to the outside.
The second is weep holes, the placement and function of which is so critical that they should be specified with as much care as the rest of the wall’s components. Most codes require that weep holes be placed a maximum of 24 inches on-center, and they should always be placed directly on clean flashing. Open weep holes are not recommended and should be filled with open cell or mesh weep vents that extend the full height of the head joint. These weep vent types are the best choice because they allow rapid drainage and air movement in and out of the cavity. Wick weeps are not recommended because they don’t allow air movement, and can deteriorate and fail to drain.
A mortar collection device is the final key component, as it prevents mortar droppings from reaching the flashing and clogging the weeps, while providing multiple pathways for moisture to flow around the droppings. With the drainage system in place and an open cavity, moisture can find its way to the base of the wall unrestricted, air can move in and out of the cavity, and the veneer, cavity, and substrate can dry rapidly and completely.
Proper Adhered Masonry Wall Design
Adhered masonry walls using veneers such as thin brick, thin stone, and stucco have been in use for decades. A traditional adhered masonry system includes a substrate with one or two layers of a weather resistant barrier (WRB) on the substrate’s outside face, a metal lath securely fastened to the substrate, a “scratch” or base mortar coat that completely encapsulates the metal lath, a top mortar coat, and a masonry veneer adhered by a top coat to the scratch coat. Stucco veneers may also include a “brown” mortar coat over the scratch coat and a “color” mortar coat over the brown coat, which is the final stucco finish.
Image courtesy of Mortar Net Solutions
Adhered masonry veneer wall detail with drainage mesh
Like a masonry cavity wall, a high-quality adhered masonry wall is designed with the expectation that moisture will penetrate the veneer and consists of multiple components that act together to provide structural integrity combined with proper drainage and drying. Traditional adhered masonry veneer walls have relied on double layers of weather resistant barriers (WRBs) and self-furring metal lath to provide drainage and drying, along with batt, foam, or rigid insulation between studs for insulation. In concrete masonry unit (CMU) structural walls, insulation may be provided by filling the CMU cells with insulation or by furring out the interior and using batt, foam, or rigid insulation. However, demand for more sustainable and energy-efficient walls combined with advances in building science have led to a number of important design improvements during the past few years, including the addition of weep screeds, location of rigid insulation (RI) between the veneer and the structural wall, and a drainage plane behind the lath.
A weep screed is placed at the bottom of the wall before the lath is installed to allow drainage of moisture that makes its way down the wall between the base coat and WRB. A weep screed is highly recommended but is not always required by code. Modern building science and increasingly stringent energy codes are recommending or requiring the addition of rigid insulation (RI) and a drainage plane between the substrate and the lath. These additions make designs more challenging but pay off with longer building life, and greater energy efficiency and occupant comfort.
Every adhered masonry veneer wall must start with a dry, sound substrate—a wood or steel stud wall with sheathing or a CMU wall. Unlike masonry cavity walls in which the masonry veneer rests on a brick ledge designed to support its weight, adhered masonry veneer is suspended from the structural wall, so a wet, unsound structural wall will prevent solid anchoring of the metal lath and result in veneer failure.
The most commonly used method for keeping the structural wall dry is the installation of either a WRB or an air and vapor barrier applied to the surface of the substrate. WRBs can be sheet material or liquid applied, and the substrate must be dry and free of any contaminants that could interfere with their application. In this course, we will concentrate on sheet product WRB installation without going into liquid- or sheet-applied air and vapor barriers. In many geographical areas local codes require the use of two layers of WRB, which can be asphalt impregnated paper or “housewrap,” a generic term for manufactured WRBs with varying degrees of permeability. On stud wall buildings, the first WRB layer is typically installed by the carpenters who frame the walls as a way to keep the sheathing dry until the adhered masonry veneer installers arrive and install the second layer. On CMU walls, the WRB may be installed by the masons or by a separate WRB contractor.
The second layer of sheet product WRB has several functions: it keeps the first WRB layer dry, it adds to the protection of the exterior walls during the application of the base mortar coat, and it serves as a bond break between the base coat and the first layer of WRB. A bond break is extremely important because it allows thermally generated movement in the veneer relative to the substrate so the building can move without cracking the veneer. There are a number of variations in WRB requirements, which are dependent on several factors, including code enforcement, insulation use and placement, local climate, and cost. These variations are beyond the scope of this course, but the Masonry Veneer Manufacturers Association (MVMA) can provide further information and guidance.
Lath is installed over the WRB by the veneer installers. If continuous rigid insulation (RI) is specified, the lath is attached on top of the insulation. If a drainage plane is specified, it is installed between the lath and RI or WRB. Wire lath, metal lath, 2.5-pound lath, and 3.4-pound lath are all the same basic product—expanded galvanized metal lath. Galvanizing is the application of a zinc coating to the metal lath. It prevents corrosion and is expressed as the weight of zinc in tenths of an ounce that is applied per square foot of lath, so G-60 lath, the most common galvanizing standard, has an average of 0.60 ounces of zinc evenly applied to every square foot. Lath with less than a G-60 galvanizing rating should not be used.
Lath is installed by placing it against the WRB and fastening it every 6 inches vertically into a stud and horizontally into structural members. Fasteners should not be placed between the studs because they will work loose as the building moves and can create paths for water and air to pass through the wall. Once the lath is in place, the wall is ready for the “scratch” or base coat of mortar. A minimum ½-inch-thick base mortar coat is forced into the lath so it completely encapsulates the lath, then the masonry veneer is attached to the base coat with a mortar top coat. The combined base and top coat thickness should be about 1 inch.
Photo courtesy of Mortar Net Solutions
Typical adhered masonry
Adhered masonry veneers typically consist of natural stone cut into thin sections, thin brick (masonry brick units sawn into thin sections), cultured stone (cast concrete units that look like natural stone), and stucco. In typical adhered masonry construction without a drainage plane, walls dry primarily due to the moisture escaping between the units, either through mortar joints or open joints, or through evaporation through stucco. Without a drainage plane, this is a slow process.
Walls dry at different rates, but a good rule of thumb is to expect a completely saturated wall with no drainage plane to dry at a rate of 1 inch of material thickness every 40 days. Actual drying rate depends on temperature, wind and sun exposure, density of the mortar coats, time of dry weather exposure, and whether or not a weep screed and drainage plane have been installed. While the base mortar coat is wet, moisture can penetrate fastener holes and create a damp substrate wall in concentrated areas around those holes, which can lead to substrate deterioration and mold growth if the substrate can not dry quickly. In worst-case scenarios, water can cause damage to the interior walls and dramatically reduce the effectiveness of batt insulation.
Properly designed cavity walls provide rapid drainage and drying by including a space between the veneer and substrate that allows moisture to move rapidly out of the cavity and air to circulate in the cavity. Modern adhered masonry veneer walls also incorporate a space that serves the same function in the form of an entangled or high loft non-woven drainage mesh made of polyester or polypropylene between the WRB and the base coat.
Both materials prevent mortar from entering the drainage space, allow air, vapor, and water to move unrestricted behind the base coat, and allow for full encapsulation of mortar around the wire lath. Substrate walls remain dryer because moisture will quickly run down the WRB and out of the weep screed or evaporate due to air movement within the mesh. The base and top coats will also cure faster with a drainage mesh because air is able to reach both sides of the mortar. The result is a system that will not exhibit mortar deterioration in wet conditions, and which will maintain a strong bond between masonry units and the base coat.
Several years of testing have convinced the MVMA to allow the reduction of two layers of WRB to only one when drainage mesh is installed because the drainage mesh acts as a bond break, and prevents the base mortar coat from coming in contact with the first WRB layer and transferring moisture to the substrate. However, local code officials have the final word in this issue so be sure to check with them before specifying a single-layer of WRB.
Drainage mesh systems are available in two forms: as metal lath and drainage mesh installed separately on site, or as a systemized product with the lath and mesh attached to each other in a factory. Both configurations are attached to the wall in the same way using the same fastener types, but the systemized product saves labor and reduces the number of wall penetrations because the lath and drainage mesh are installed at the same time with only one set of fasteners, and because frequently only a single layer of WRB is necessary.
Lath installation is usually specified to conform at minimum to ASTM C-847, which describes recommended installation procedures for expanded metal lath. ASTM International is a standards organization that develops and publishes voluntary consensus technical standards for a wide range of materials, products, systems, and services. ASTM C-847 and most local codes require that metal lath sections overlap by a minimum of 1 inch, and installing lath and mesh separately or as a system can meet this requirement. However, the lath/drainage system includes a built-in overlap determined by a holdback of the drainage mesh on two edges that makes it easier for installers to create the conforming overlap. The mesh sections can be overlapped if installed separately from the lath, or will be abutted if installed as a factory-assembled system to create a continuous drainage plane behind all the areas covered with lath.
Properly Specified Masonry Veneer Wall Components
Following are more details about the components typical of an adhered veneer wall designed to meet today’s demand for high-performance, sustainable buildings. Specifics of weep screed sizes, WRB characteristics, insulation type and thickness, and mortar, veneer and fastener types will vary with climate and local codes.
Weep Screed
Weep screed is typically galvanized metal or plastic. The galvanized weep screed must be a minimum 26 gauge or 0.018 inches thick, and the plastic weep screed must be a minimum 0.050 inches thick. Both include a nailing strip that must extend a minimum of 3.5 inches up the wall. On wood or steel stud walls, the weep screed is attached to the bottom of the wall on top of the sheathing. On CMU walls, the weep screed is attached to the CMU. When a sheet type WRB is used, the WRB must lap over the top of the weep screed nailing flange and extend to the point where the screed angles away from the wall. When a liquid WRB is used, the weep screed is installed over the top of the WRB and should be sealed along the top of the nail flange and around any penetrations. These steps prevent moisture from wicking into the base plate of the framing—a very important consideration since moisture in these areas can create rust or rot, which may be concealed from view after construction.
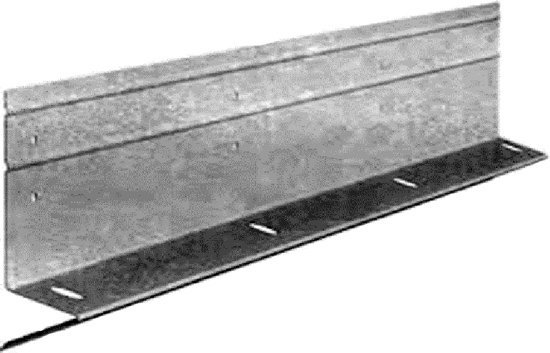
Photo courtesy of Mortar Net Solutions
Typical metal weep screed
On projects with no RI, the screed is attached directly on top of the sheathing or CMU. On projects with RI, the screed is attached on top of the insulation. Both designs require fasteners that penetrate into structural members, CMU, or concrete substrate at least ¾ inch, and steel structural members at least 3/8 inch. The weep screed also provides a clean edge to transition the base of the veneer from the rest of the structure. A weep screed is especially important when using a drainage mesh because it allows water that runs down the mesh to easily exit from behind the wall and for air to move in and out of the mesh. Many building code officials have recently become more stringent in the enforcement of weep screed standards, so be sure to check with local code officials when detailing the screed.
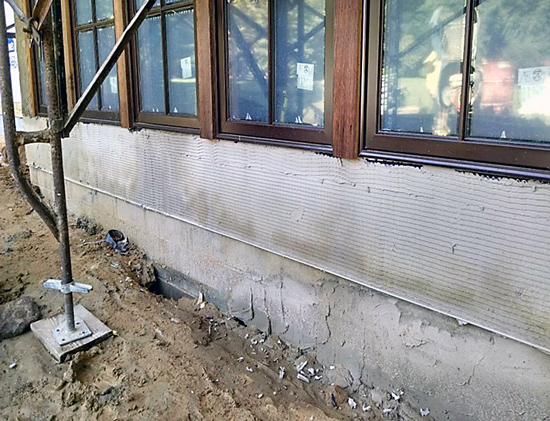
Photo courtesy of Mortar Net Solutions
Weep screed must be a minimum 4 inches above finish grade.
The weep screed must be placed a minimum of 4 inches above finish grade and 2 inches above a roof line. It is very important that water sprinklers, gutter discharge, or water splash of any sort be prevented from hitting the base of the veneer to prevent staining and freeze damage.
Weather Resistant Barrier
In traditional adhered veneer systems, two layers of WRB are the only defense against water that penetrates the veneer. It is very important for the WRB to remain undamaged during construction. If adhered masonry veneer is saturated and cannot dry quickly, the water will wick through damaged WRB into the sheathing, insulation, and framing of the house. This condition frequently results in wall failure, often before the problem causing the failure becomes apparent and after the point where it can be easily repaired. However, if a drainage mesh is installed between the wire lath and WRB, the saturated veneer is not in contact with the WRB, the wall can breathe and drain much more efficiently, and moisture is much less likely to penetrate the WRB and be absorbed into the structure.
Photo courtesy of Mortar Net Solutions
WRB at building outside corner
When the WRB terminates at inside and outside corners, it must extend a minimum of 16 inches on either side of the corners for both layers. A WRB is typically installed with only enough staples or roofing nails to hold the material in place until the metal lath is installed to minimize penetrations. WRBs will repel water for short periods of time, but are not considered waterproof, so proper construction scheduling is very important.
Continuous Rigid Insulation
Continuous rigid insulation (RI) has become increasingly popular with adhered masonry veneers because it provides far better insulating performance than batt insulation between studs. For example, steel studs can act as thermal bridges that reduce the effective insulating performance of batts by as much as 50 perecent, but RI forms a continuous thermal barrier with no thermal bridges other than the fasteners. For best performance, the insulation must be fastened to the substrate with self-sealing screws and washers, which prevent moisture and air movement through the fastener penetrations, thus reducing thermal transfer. Some types of RI may be installed with taped seams to provide even greater resistance to air and moisture movement, and some of these RI types act as WRBs as well as insulation.
Lath
Lath is offered in three different designations that describe the lath’s weight per square yard: 1.75 pounds for interior applications, and 2.5 pounds and 3.4 pounds for exterior applications. Self-furring metal lath includes ¼-inch-deep dimples spaced evenly throughout the material that hold the lath sheet away from the substrate and WRB or drainage mesh, and allow full lath encapsulation by the base mortar coat.
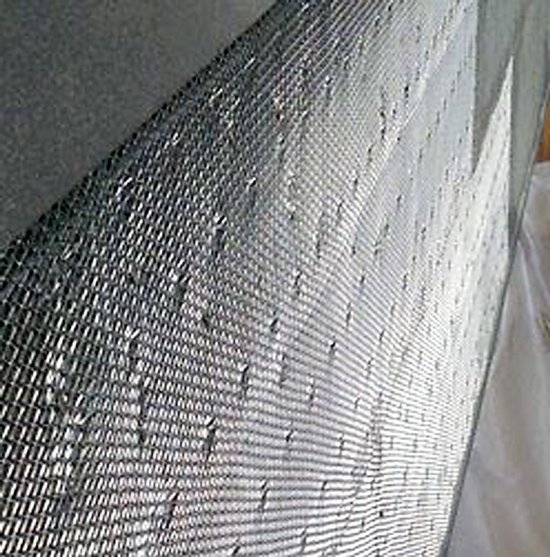
Photo courtesy of Mortar Net Solutions
Self-furring lath
Fastening
ASTM International requires that lath be fastened at intervals of not less than 7 inches on center, and the Uniform Building Code (UBC) requires a minimum spacing of 6 inches on center on all structural members. Lath can be terminated at an inside corner but must extend at least 12 inches in both directions on either side of an outside corner.
Spacing the fasteners too far apart or failing to fasten to the structural members are the most common causes of adhered masonry veneer fastener failure. Fasteners that penetrate the sheathing but not a structural member will almost certainly work loose and may allow moisture to penetrate through the WRB, so it is highly recommended to specify that all fasteners must penetrate a structural member.
Metal lath fastened over RI that is ½ inch thick or less may be attached with a non-engineered fastening system, but designs with RI thicker than ½ inch require an engineered lath anchoring system. Fastener manufacturers can provide guidance, and a guide from the Foam Sheathing Coalition™ for attaching exterior wallcoverings though foam sheathing can be found at www.hunterxci.com/images/technical_docs/FSC_Guide_attachingtoXci_SS.pdf.
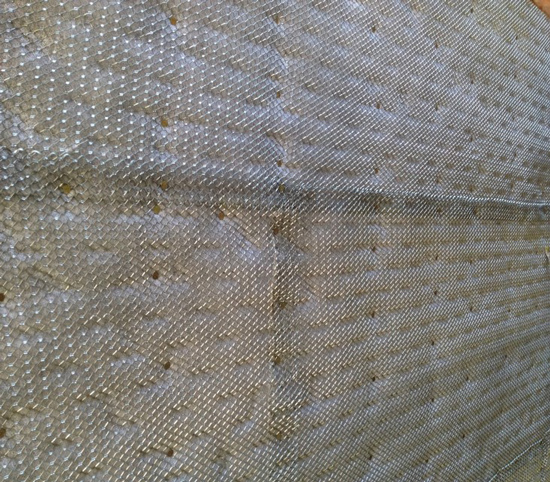
Photo courtesy of Mortar Net Solutions
Self-furring metal lath properly fastened to structural members
Allowable non-corrosive or corrosion-resistant fasteners for wood framing include staples, roofing nails, and screws. The minimum embedment into a structural member is ¾ inch, but a minimum of 1 inch is a good practice to follow because it provides extra fastening security and helps ensure that fasteners will sufficiently penetrate warped structural members. Steel studs require self-tapping screw or hex head anchors with a neoprene washer or 1¼-inch galvanized washer attached. For concrete or CMUs, powder actuated fasteners or concrete masonry screws may be used.
Integrated Lath/Drainage Systems
Factory-assembled lath/drainage systems are new, but use materials and design principals that have been a part of the industry for decades. The newest system combines 2.5-pound lath with a ¼-inch-thick drainage mesh so they can be installed together in one pass. A 3.4-pound self-furring lath and 10-millimeter mesh are available as options. It has a built-in lath overlap on two sides that conforms with ASTM Specification C-847, so the drainage mesh is always aligned properly to produce a continuous drainage plane, and the lath overlap is consistent. Because the drainage mesh acts as a mortar break, it usually requires only one layer of WRB.
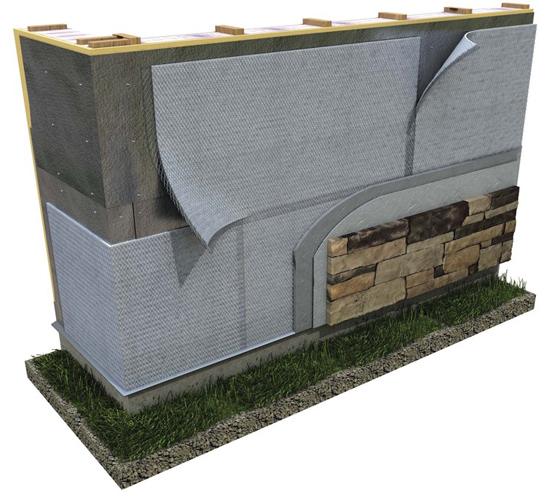
Image courtesy of Mortar Net Solutions
Factory-assembled metal lath/drainage mesh system
The other lath system is a lath and paper combination for use in temporarily protecting stud cavity and sheathing walls during and after construction. However, this product does not include the airspace that is provided with the factory-assembled lath/drainage system.
Installation
While installation is obviously not part of the designer’s job, an overview of good installation practices can help the designer know what to look for during site visits to be sure the veneer is installed properly. The WRB and weep screed must have no loose edges or penetrations other than fasteners before the RI, lath, or drainage mesh and lath are installed. The RI (if specified) and lath must be attached with the proper fasteners at the proper spacings and only into the structural members.
When flashing systems are used with adhered masonry veneer, follow standard flashing techniques. There are a variety of flashing systems, materials, and techniques available, and a detailed discussion of them is beyond the scope of this course.
Mortar must be applied in a way that allows it to cure completely to yield maximum strength. Mortar “cures” rather than “dries,” which means it forms interlocking crystals as it hardens that provide the material’s strength. Efficient building production requires that the mortar cure as quickly as possible while keeping in mind that if it cures too quickly, it will not have time to form a complete crystalline matrix and its strength will be compromised. To help mortar cure completely, lath that has been in direct sunlight and is hot to the touch should be cooled with a light water spray before mortar application, but the wall should not be wet. On windy days, the base coat should be covered with plastic to slow evaporation, and on hot days, the base coat must be misted during curing. In cold weather, the mortar must be protected from freezing.
The base coat is applied over the lath and must be applied evenly. An uneven base coat, in which the mortar has high and low spots, can create air pockets behind the veneer in which water can accumulate and cause freeze/thaw damage.
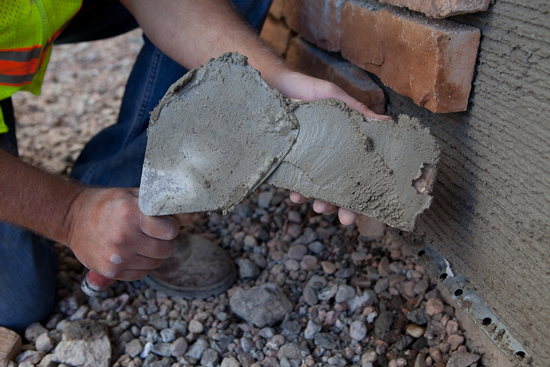
Photo courtesy of Mortar Net Solutions
Properly buttered veneer unit
The veneer can be installed when the base coat is “green” or when it’s fully set. Installers “butter” or apply a coat of mortar to the entire back of the veneer units, then push, twist, and hold each unit for a few seconds to allow full adhesion. Capillary action between the wet and dry mortar creates a very strong bond that is almost instantaneous, and the mortar also produces a chemical bond between the two coats as it cures.
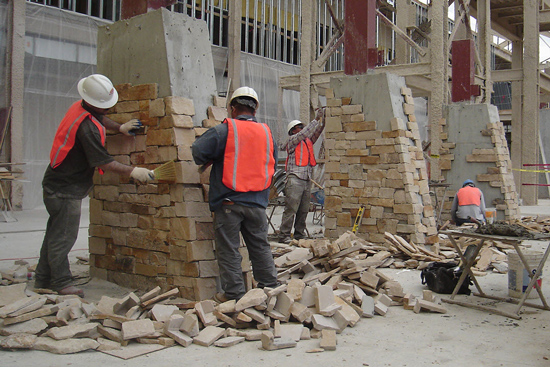
Photo courtesy of Mortar Net Solutions
Mix multiple boxes of veneer units before installation to minimize color variances.
It is highly recommended that installers mix several boxes of veneer units together before installation to minimize color variances in the veneer. If a modular product has not been specified, this step also allows the installer to become familiar with the various unit sizes in each box and to plan how to apply the units in a pleasing pattern. Cut and smaller-sized units will be less visible at the weep screed or a few courses up within the pattern of the bond.
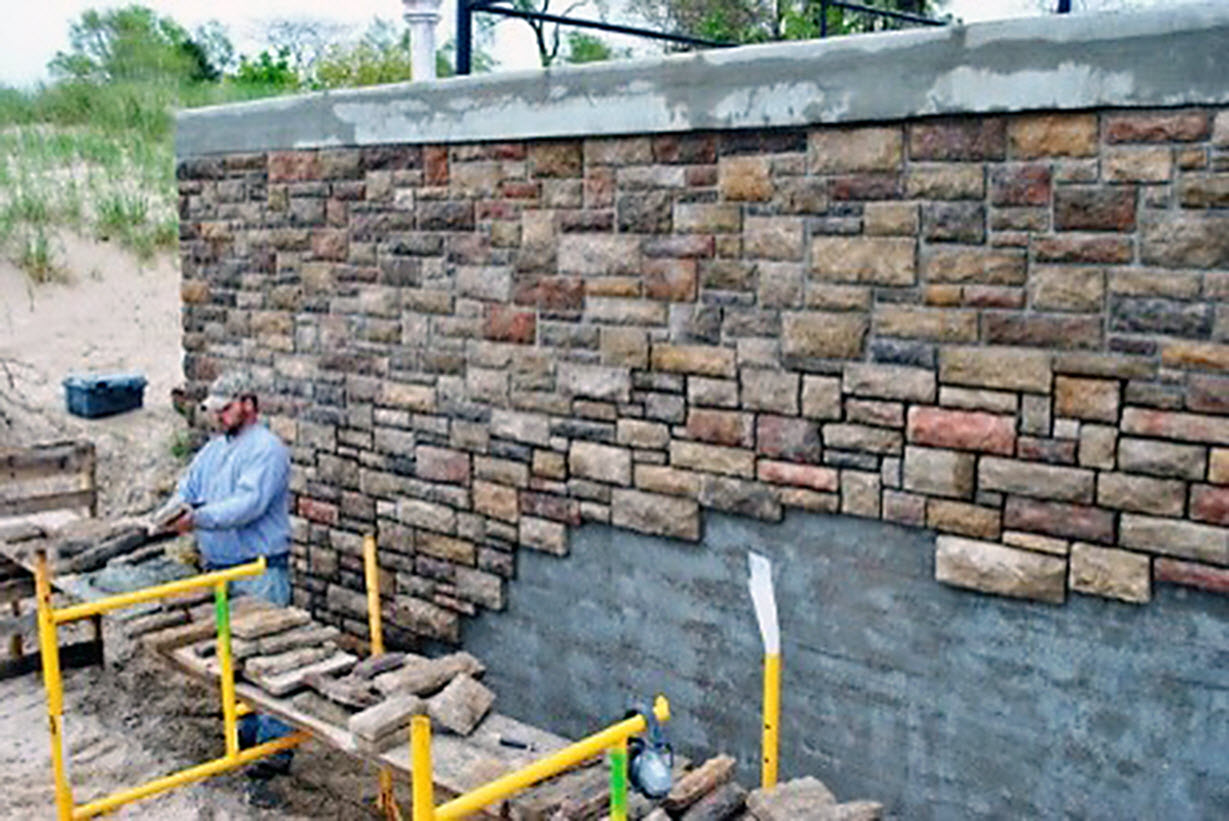
Photo courtesy of Mortar Net Solutions
Preferred veneer unit installation method is from top down.
Installing units from top to bottom is the preferred installation method because it reduces the mortar droppings on finished work. Mortar droppings on veneer units should not be removed until the mortar has dried, at which point they will easily pop off using a tuck pointer and a brush. Trying to clean mortar before it dries simply smears the mortar and makes it more difficult to remove.
With cultured stone veneers, masonry cleaners, wire brushes, or pressure washers should not be used, as they will remove the texture that gives the material its stone-like appearance. Light duty cleaners can be used for thin brick and natural thin stone veneers. It’s very important for installers to turn scaffolding walk boards on edge each night, as a rain shower can spatter wet droppings or residual dust on the boards onto the wall, creating damage that only unit replacement can fix. Once the units are attached to the wall and initial mortar set has occurred, installers grout the joints using a tuck pointer and hawk or a grout bag.
Examples of Damage to Adhered Masonry Veneers
Moisture damage to adhered masonry wall systems can be serious and expensive.
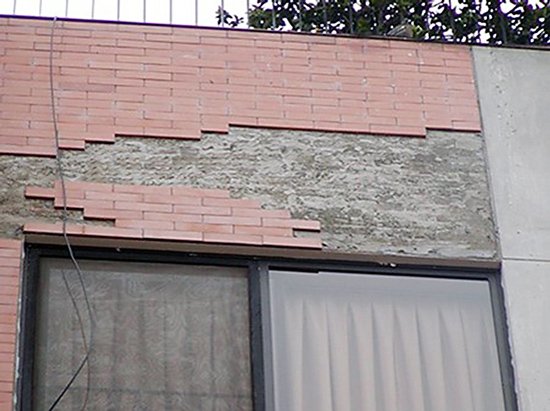
Photo source: FEMA
Delaminated veneer
The photo above shows a thin brick veneer with a portion of the wall delaminated from the structure. The delamination location above the windows compounds potential water problems because water can more easily leak in around the window frame and penetrate the interior walls. This damage is typical of walls that become saturated where freeze-thaw cycles break the bond between the veneer and base coat. Once one brick or stone falls off, it becomes much more likely additional veneer will fall off until the wall can be protected from further moisture infiltration and allowed to dry. Typically spot repairs are not possible for this type of situation, and require removal of the existing lath and scratch coat, repair of the original WRB layers, and application of a new veneer.
When water penetrates a masonry veneer and is allowed to keep a wood substrate continuously wet, sheathing may swell and mold may grow, causing serious structural and health issues. It requires that the exterior be dried and repaired before a cold weather event creates extensive veneer damage, as well as mold removal and repair to or replacement of the damaged wood.
Conclusion
Modern adhered masonry veneer wall design has drawn on the lessons learned over decades of masonry cavity wall design to produce sustainable, long-lasting walls that drain and dry quickly. Rigid insulation between the lath and structural wall is becoming more common as energy standards become more stringent. Advances in building science show that a drainage plane dramatically improves drainage and drying, which helps extend the building’s life, improves energy efficiency by reducing air, moisture and vapor movement through the veneer, and reduces the chances of mold growth.
In order to consistently produce high quality masonry veneer walls, proper installation techniques should be specified. Today’s masonry veneer walls are more complex than they’ve ever been, but proper design and construction will create walls that are better than they’ve ever been.
For additional information and design guidance, consult the MVMA, a division of the National Concrete Masonry Association (NCMA) and the most recognized source for general information, detailing, and installation standards for adhered masonry veneer walls. For more information, visit www.masonryveneer.org.
Steven Fechino is the engineering and construction manager for Mortar Net Solutions. He has more than 35 years of experience in the masonry industry.

|
Mortar Net Solutions is the industry leader in moisture management products and systems for masonry, including masonry cavity, single wythe CMU, and adhered masonry veneer walls. It provides innovative solutions that help contractors and designers create beautiful, sustainable structures they can take pride in throughout their careers. www.mortarnet.com |