This CE Center article is no longer eligible for receiving credits.
Architects have routinely created scale models of building designs to serve multiple purposes. In some cases, they have been simple conceptual models to study the relative sizing or massing of a particular design in a given context. In others, they have been detailed explorations into the relationship of spaces, shapes, and materials. In all cases they help with three-dimensional visualization of the proposed designs whether by the design team, the client, the public, or all of these. The process of creating such architectural models has varied based on need and capabilities. Historically, simple in-house model building has been based on cardboard or wooden representations cut with hand tools. More advanced models have been prepared by companies specializing in creating detailed creations based on architects' designs that use machine-cut wood, plastic, or other materials supplemented with features to represent natural features such as trees, terrain, etc. Now, there is also a new option available to any design team—the use of 3D printers to create architectural models of all types and detail. This conceptually simple but revolutionary technology allows new freedom in the design process to explore building designs in three dimensions and in a manner that can be quicker and less expensive than traditional architectural models. Further, 3D printing combines the precision of computerized design simulations with the tangibility of physical scale models.
3D Printing Technology
Over the past 25 years or so, printing technology in general has developed side by side with advances in computer technology. Anyone who has printed drawings or documents on paper during this time has experienced the transformation of ammonia-based “blueprints” and black line prints to computer-generated drawing outputs using pen plotters, inkjet plotters, and laser printers. At the same time, while architects have been immersed in using computer-aided drafting (CAD), those in the industrial design world have experienced computer-aided manufacturing (CAM). This technology has been based on creating 3D objects for prototyping or testing typically by using a subtractive approach. This means that a solid piece or block of material (wood, metal, etc.) is placed in a machine that follows the computerized design instructions to remove or subtract all of the material that is not needed, leaving the final product at the end. It is essentially 3D sculpting via a computerized machining process.

Image courtesy of Stratasys, Ltd.
Conceptual scale models can be created from 3D printers showing the surrounding context of a particular project differentiated by materials from the proposed designs.
With all of the CAD, CAM, and printing advances that have taken place, it is not surprising to see that 3D printing technology has grown up in this time too. The term 3D printer was originally a trademarked name but in 1999, it was allowed to enter the public domain and become a generic industry term. Just as a 2D inkjet printer places ink on paper using the X and Y axes based on a computer file, 3D printers place solid material on a base using computerized information for the X, Y, and Z axes. However, instead of the subtractive process used in CAM, a 3D printer creates objects using an additive manufacturing process which deposits material in a succession of layers from the bottom up. This means that there is no waste—only the material needed to create the object is used. That material is not ink as in a 2D printer, but typically some type of plastic that is heated slightly so it flows through printer heads or sprays through jets and then re-solidifies as it cools or is exposed to ultraviolet light.


Images courtesy of Stratasys, Ltd.
A completed 3D printed model can show the form and mass of a building or focus on a portion with as much detail as needed for design review.
3D Printing Equipment Options
3D printers are available to produce a variety of sizes of printed output, just like ink on paper printers, from small to large format. Small 3D printers are reasonably priced and can be readily incorporated into most design offices on a table or desktop. As a time-saving approach, they can be set up and programmed to run overnight unattended. Larger 3D printers or multiple units may be warranted if a lot of models are created. Alternatively, businesses are available that will do 3D printing (just like paper printing) from CAD files.
Two different technologies are commonly used in 3D printing of architectural models:
▶ Fused deposition material (FDM). This production process occurs as layers of plastic material are placed on top of each other. FDM printers build three-dimensional objects by melting and advancing one or more fine ribbons of plastic through a computer-controlled extrusion head into layers. The plastic cools and is ready for the next layer. FDM printers are useful for building concept models, functional prototypes, and end-use parts in standard, engineering-grade and high-performance thermoplastics. It's the only professional 3D printing technology that uses production-grade thermoplastics, so parts can be very high in mechanical, thermal and chemical strength and remain environmentally stable. That means complex geometries and cavities that would otherwise be problematic become practical with FDM technology. Other benefits include a technology that is clean, simple-to-use, and office-friendly.
▶ PolyJet technology. PolyJet 3D printing is similar to inkjet printing, but instead of jetting drops of ink onto paper, PolyJet 3D printers spray precise layers of curable liquid photopolymer onto a build tray. As such, PolyJet technology is a powerful additive manufacturing method that produces smooth, accurate prototypes, parts, and tooling. With 16-micron layer resolution and accuracy as high as 0.1 mm, it can produce thin walls and complex geometries using the widest range of materials. Its characteristics may be better suited to prototyping manufactured parts, but it can also be useful when precise, detailed models are needed in architectural settings. It is able to create smooth, detailed objects that convey final-product aesthetics. It can also produce complex shapes, intricate details, and smooth surfaces that incorporate color and diverse material properties into one model with the greatest material versatility available.

Image courtesy of Stratasys, Ltd.
3D printing equipment is available in a variety of sizes for a variety of needs using different types of materials that can make
architectural models.
Architects have routinely created scale models of building designs to serve multiple purposes. In some cases, they have been simple conceptual models to study the relative sizing or massing of a particular design in a given context. In others, they have been detailed explorations into the relationship of spaces, shapes, and materials. In all cases they help with three-dimensional visualization of the proposed designs whether by the design team, the client, the public, or all of these. The process of creating such architectural models has varied based on need and capabilities. Historically, simple in-house model building has been based on cardboard or wooden representations cut with hand tools. More advanced models have been prepared by companies specializing in creating detailed creations based on architects' designs that use machine-cut wood, plastic, or other materials supplemented with features to represent natural features such as trees, terrain, etc. Now, there is also a new option available to any design team—the use of 3D printers to create architectural models of all types and detail. This conceptually simple but revolutionary technology allows new freedom in the design process to explore building designs in three dimensions and in a manner that can be quicker and less expensive than traditional architectural models. Further, 3D printing combines the precision of computerized design simulations with the tangibility of physical scale models.
3D Printing Technology
Over the past 25 years or so, printing technology in general has developed side by side with advances in computer technology. Anyone who has printed drawings or documents on paper during this time has experienced the transformation of ammonia-based “blueprints” and black line prints to computer-generated drawing outputs using pen plotters, inkjet plotters, and laser printers. At the same time, while architects have been immersed in using computer-aided drafting (CAD), those in the industrial design world have experienced computer-aided manufacturing (CAM). This technology has been based on creating 3D objects for prototyping or testing typically by using a subtractive approach. This means that a solid piece or block of material (wood, metal, etc.) is placed in a machine that follows the computerized design instructions to remove or subtract all of the material that is not needed, leaving the final product at the end. It is essentially 3D sculpting via a computerized machining process.
Image courtesy of Stratasys, Ltd.
Conceptual scale models can be created from 3D printers showing the surrounding context of a particular project differentiated by materials from the proposed designs.
With all of the CAD, CAM, and printing advances that have taken place, it is not surprising to see that 3D printing technology has grown up in this time too. The term 3D printer was originally a trademarked name but in 1999, it was allowed to enter the public domain and become a generic industry term. Just as a 2D inkjet printer places ink on paper using the X and Y axes based on a computer file, 3D printers place solid material on a base using computerized information for the X, Y, and Z axes. However, instead of the subtractive process used in CAM, a 3D printer creates objects using an additive manufacturing process which deposits material in a succession of layers from the bottom up. This means that there is no waste—only the material needed to create the object is used. That material is not ink as in a 2D printer, but typically some type of plastic that is heated slightly so it flows through printer heads or sprays through jets and then re-solidifies as it cools or is exposed to ultraviolet light.
Images courtesy of Stratasys, Ltd.
A completed 3D printed model can show the form and mass of a building or focus on a portion with as much detail as needed for design review.
3D Printing Equipment Options
3D printers are available to produce a variety of sizes of printed output, just like ink on paper printers, from small to large format. Small 3D printers are reasonably priced and can be readily incorporated into most design offices on a table or desktop. As a time-saving approach, they can be set up and programmed to run overnight unattended. Larger 3D printers or multiple units may be warranted if a lot of models are created. Alternatively, businesses are available that will do 3D printing (just like paper printing) from CAD files.
Two different technologies are commonly used in 3D printing of architectural models:
▶ Fused deposition material (FDM). This production process occurs as layers of plastic material are placed on top of each other. FDM printers build three-dimensional objects by melting and advancing one or more fine ribbons of plastic through a computer-controlled extrusion head into layers. The plastic cools and is ready for the next layer. FDM printers are useful for building concept models, functional prototypes, and end-use parts in standard, engineering-grade and high-performance thermoplastics. It's the only professional 3D printing technology that uses production-grade thermoplastics, so parts can be very high in mechanical, thermal and chemical strength and remain environmentally stable. That means complex geometries and cavities that would otherwise be problematic become practical with FDM technology. Other benefits include a technology that is clean, simple-to-use, and office-friendly.
▶ PolyJet technology. PolyJet 3D printing is similar to inkjet printing, but instead of jetting drops of ink onto paper, PolyJet 3D printers spray precise layers of curable liquid photopolymer onto a build tray. As such, PolyJet technology is a powerful additive manufacturing method that produces smooth, accurate prototypes, parts, and tooling. With 16-micron layer resolution and accuracy as high as 0.1 mm, it can produce thin walls and complex geometries using the widest range of materials. Its characteristics may be better suited to prototyping manufactured parts, but it can also be useful when precise, detailed models are needed in architectural settings. It is able to create smooth, detailed objects that convey final-product aesthetics. It can also produce complex shapes, intricate details, and smooth surfaces that incorporate color and diverse material properties into one model with the greatest material versatility available.
Image courtesy of Stratasys, Ltd.
3D printing equipment is available in a variety of sizes for a variety of needs using different types of materials that can make
architectural models.
Basic 3D Printing Process
While there are a number of variables in the equipment, material, and output sizes in 3D printing, the basic process is the same in most cases. The beginning point, just as in any architectural modeling process, is the development of a design. That design can be simple for the purpose of determining basic form or massing, or it can be detailed for the purpose of understanding the interactions of different building components. Either way, a computerized design file based on a three-dimensional representation of the building is the starting point. Many architectural designs already start that way using CAD or building information modeling (BIM) software. The beauty of 3D printing is that early designs can be quickly and readily tested, observed, and compared by printing out different concepts or variations.
With a computerized design in place, there are essentially three steps that occur in the 3D printing process for an architectural model:
1. Pre-processing: defining layers. In this step, the design is “sliced” or sectioned into layers. This is accomplished by creating a “build file” based on importing a 3D CAD file into a printing software program installed on the computer. Note that if the finished model is larger than the size of the 3D printing chamber, then it will need to be prepared in parts or sections that can be assembled afterwards. Those sections will need to be identified and treated as separate printed outputs. Regardless of size, some options related to specific material, color, and slice thickness may need to be selected if the 3D printer has multiple choices for these. In some cases, it may also be necessary to pick a “build and support” style to match the requirements of the object being created. Supports may be needed to temporarily hold in place parts of the object that overhang or cantilever out or otherwise need scaffolding style stiffening until the material solidifies. Some of this may depend on the orientation of the model being printed so selecting that orientation may need to be done as well (i.e. printing on its side or even upside down if that is more practical).
Once the choices are made, the preprocessing software calculates sections and slices the design into many layers, ranging from 0.005 inch (0.127 mm) to 0.013 inch (0.3302 mm) in height. Using the sectioning data, the software then generates “tool paths” or building instructions, which will drive the printer or extrusion head. This step may be automatic when using certain software. Once complete, the printing job is ready to be sent to the 3D printer.
2. Production: the layering process. The 3D printer needs to be prepared and ready just like any other printing machine. Most have fully enclosed chambers where the 3D object is created on a base or platen that moves vertically along the Z axis. They also have a place for the plastic material to be loaded, just like loading ink cartridges in a paper printer. The platform on the bottom of the chamber is usually not the place to have the model built, rather, a base made of wood or plastic should be positioned so the finished result can be easily lifted out. Once ready, it can be as simple as pressing “print” or start to allow the chamber and the plastic material to heat up to the appropriate temperatures.
The building process begins with the printing platform, or platen, moving vertically into position. Typically, this platen moves down in measured distances along the Z axis as material is deposited in layers. After each layer is complete, it lowers slightly to make way for the next layer. In the FDM process, the extrusion head, which moves about on an XY platform, lays down a ribbon of material. Two materials may enter the extrusion head—one or more to make the object, and one to support it. Heat is applied to soften the plastics, which are extruded in a ribbon, ranging in size from a human hair to heavy twine. Alternating between model material and support material, the system deposits layers as thin as 0.005 inch (0.13 mm). Each layer of molten plastic is deposited on top of the previous one and flattened slightly by the extrusion head. In most cases, the layers instantly fuse to one another.
The accuracy and precision of the FDM printed object relies on the coupling of material feed rates and extrusion head motion. Both are constantly changing to produce a flat ribbon of material. Drive wheels push the plastic filament into the hot liquefier section of the tip assembly. The pressure forces the plastic through a tiny orifice in the tip, which presses down to flatten the bead. Meanwhile, the head accelerates and decelerates as it travels across the platen. As the head speed changes, the drive wheels adjust the material flow rate. The result is a precise ribbon width that adjusts as required to produce the object. On the highest-performance machines, accuracy or tolerance reaches as high as 0.003 inch (0.08 mm), which rivals the accuracy of injection molding for machinery.
In the PolyJet process, the jet-heads spray a layer of material along the X and Y axes that is essentially tiny droplets of liquid photopolymer instead of the heated ribbons used in FDM. Once in place, this photopolymer layer is immediately cured with ultraviolet (UV) light and becomes solid before the next layer begins. Depending on the size and ability of the printer, as many as three different materials may be mixed at once during the printing process to create different colors, transparencies, or flexibilities. As the PolyJet printing process continues, multiple fine layers accumulate on the build tray to create a precise 3D model or part. Where overhangs or complex shapes require support, the 3D printer builds a removable gel-like support material.
3. Post-processing. When the object or model is complete, the printing chamber can be opened and the model removed. By this time, the supports have served their purpose and can be separated from the model. If a soluble support material is used, then it can be literally washed away in a tank that contains water and detergent. If a washable material is used, it can be jet washed with water. If break-away support material is used, then it manually needs to be twisted, broken, or scraped from the primary model using common hand tools. Once complete, the model is ready to use.
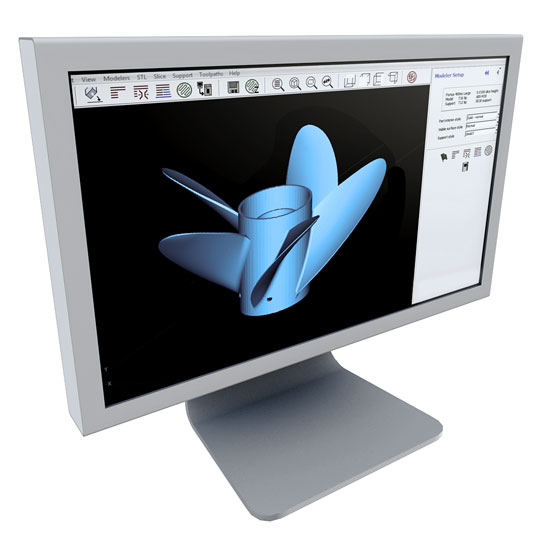
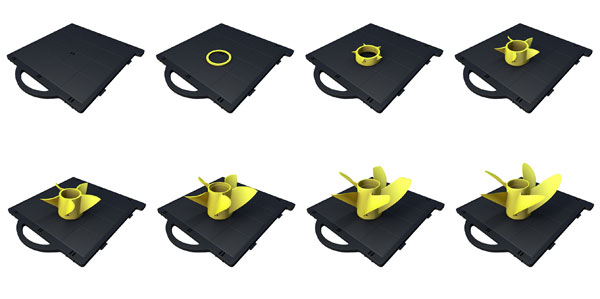
Image courtesy of Stratasys, Ltd.
The additive process of 3D printing is based on using a computerized file to slice an object or model into three-dimensional layers that are placed sequentially from the bottom up.
Material Options
For architectural models, the most appropriate and common printing materials to use are thermoplastics which can respond to the small amounts of heat used in the 3D printers. There are, of course, a wide range of such plastics with a correspondingly wide range of characteristics and capabilities. Different types of models may require that different types of plastic be used or different presentation needs may dictate different appearances. The choice of plastics will depend on the type of printing technology being used, namely FDM thermoplastics or PolyJet photopolymers.
FDM Plastics
A notable feature of plastics used for FDM 3D printing is the inherent strength that they can offer. That means wall or features that are actually very thin when printed to scale can retain their rigidity and integrity. Nonetheless, some support elements during production may still be needed to allow the proper shapes to be printed. This group of plastics includes such well known polymers as ABS or nylon and is commonly available in a range of compressive and tensile strengths. They are also readily be provided in a range of colors, although white, black, and neutral/tan are the most common.
Photopolymers
This group of plastics offers a range of specialty capabilities. Some are rigid while others are more flexible. Some are solid opaque color while some are clear. Mechanical and thermal resistant properties vary according to the plastic material selected as well. This group includes plastics similar to polypropylene, high-density polyethylene (HDPE), polystyrene, Plexiglas, polycarbonate, and even EPDM. Bio-based plastic products are also available. The choice of photopolymer material does not need to be limited to a single plastic. Rather, it can be useful to mix materials to provide variety in models as needed. For example, plexiglass windows could be printed that fit into openings in opaque walls printed separately, or they could be printed in the same job with no assembly required. Overall, photopolymers offer a wide range of variations on visual and finish options.

Image courtesy of Stratasys, Ltd.
Using 3D Printed Models as Design Tools
With an understanding of the workings of 3D printers, including the range and capabilities of the materials used, design firms can take advantage of this technology throughout the design process. Many firms have been constructing 3D study models by hand for years and find it to be a useful way to analyze and assess designs. They are also extremely useful for communicating design concepts among the design team, to clients, or to building occupants. The down side has often been the amount of time required to build the models, not to mention the studio space required to do the work, the materials needed, and the varying skills of those making the models. 3D printers overcome all of those shortfalls while retaining the benefits of having a tangible, 3D model in place to look at, touch, assess, and communicate with. Many firms that have brought 3D printers in house have experienced dramatic time savings by as much as 50 to 80 percent compared to building models by hand. That usually translates into comparable cost savings on the order of 40 to 75 percent, leaving more hours to spend on providing other services. It also means that it is economical to produce multiple models, particularly when changes are anticipated or needed as the design develops. Since the machines are fairly compact as are the printing materials, they take up far less space than a full modeling studio. Further, the quality of the output is much more consistent based on the precision of the CAD files and printing software.


Photos courtesy of Stratasys, Ltd.
Large, detailed models can be created to scale for display purposes. Mitekgruppen (Mitekgroup), a Swedish design firm hired to create a 3D model of the city of Stockholm, Sweden, completed the project in a fraction of the normal time by using a 3D printer and Google Earth.
Note that physical models have never been used in place of design and construction drawings, but as a supplemental design and communication tool. In this era of building information modeling, where a building is built virtually from computerized intelligent components in three dimensions, physical models are still a supplemental tool. While BIM may be the ultimate basis for designing and constructing the building, not everyone will relate to the images on a computer screen or 2D printed output the same way as a 3D physical model. The tangible and tactile nature of the model offers a different way to experience the design that is usually easier for clients and the public to understand and interface with. It is also a useful tool for the design team who can readily observe aspects of the design on a physical model while addressing other items in a computerized model.
With all of the above in mind, designers and firms can benefit from 3D printing at each stage of the design process.
Conceptual or Early Design
Early in the design process, it is common to use quick study models to assess building massing or analyze forms. Often those studies are done in the context of the building site. Hence, it is possible to use 3D printing to first model the area surrounding a project site, perhaps using available computerized information from Google Earth or GIS software. From there, different study models can be placed in the contextual model and be readily assessed. For projects that involve renovations or additions to existing buildings, CAD files that may already exist for the building can be used as the basis to print the current conditions. These contextual models can then be used in conjunction with CAD or BIM generated designs to help assess and analyze different options. From there, selected designs can be chosen to be printed and placed in the contextual model for further review.

Image courtesy of Stratasys, Ltd.
3D printers can be used to work on existing buildings such as the Salt Lake Temple in Salt Lake City, Utah, shown above.
Since conceptual models at this stage of the design may be simpler and less detailed than later on, small desktop 3D printers may be appropriate to use to produce small-scale study models. The material used may be a simpler, opaque plastic in a single color to help with massing and form evaluation.
Detailed Design
As an architectural design develops, whether for a new building, a renovation of an existing building, or for a multi-building complex, the focus often moves to the design of specific building areas or coordination of different building systems. Here, 3D printers can be used to create models of selected areas at a larger scale for more detailed scrutiny. For example specific areas or details can be 3D printed for coordination and avoidance of conflicts between building systems (structure, HVAC, architectural, etc.) but also for determination of meeting overall design goals. It is also quite possible to print out full interior or exterior details for things like window and door treatments, specialty construction, or complex design elements.

Image courtesy of Stratasys, Ltd.
Small custom pieces can be produced with great precision on a 3D printer for use in models or even for use in a constructed building.
If custom-designed components are being investigated, the 3D printer may prove to be very valuable, just as it is in designing and prototyping manufactured parts for other industries. To prove a particular design, a functional precision prototype can be made on the 3D printer, perhaps with full-size or half-size sections if the custom component is not too large. The printed parts can then be assessed for performance and engineering qualities in addition to other design criteria. Producing a functional prototype in this manner typically takes from a few hours to overnight. The significance is that it can allow for flaws to be caught before they become costly fabrication changes. In this way, the model is not only a design representation, but it may become part of the basis for fabrication as a design mock-up or prototype.
In some cases, if plastic components are appropriate for use in the constructed building, it may be worth directly printing the needed number (assuming a manageable quantity) and providing them to the contractor for installation. This may apply to select custom decorative features for example where a code acceptable plastic can be used. It may also apply to certain functional custom elements. The benefit is that small custom elements which might have been particularly costly to produce or fabricate, can now be incorporated very economically. This is enhanced if the design calls for variations of the component, since each piece can be revised or customized as needed without any significant cost change.
Final Design and Detailed Presentation
Once a design is finalized, there can be the need for a final, updated, presentation model. That model may be used for fundraising purposes, for leasing purposes, or simply to communicate the vision of the project while construction takes place over any number of months or years. In these cases, updated sections can be printed in the preferred level of detail and pieced together to create the whole. Depending on the printing process used, different features, details, colors, and materials can be readily incorporated. The level of detail available allows for accurate scale models to show specific architectural components such as surface textures and railings. Large models printed in sections can be bonded together with a wide range of epoxies or solvents so the completed model looks as if it were printed as one piece. If the finished model is expected to be on display, it can be printed using durable materials selected to withstand damage from sunlight, touching, etc.
Part of the beauty of using a 3D printer for models all through the design process is that the model can progress alongside the design. This is particularly true when the model is created in sections or segments that can be swapped out. The contextual model will likely stay the same, but different sections of the new or renovated building may change and need to be replaced. Since the 3D printer relies on CAD files which can usually be very easy to revise, a revised model portion can be equally easy to print out. Further, some projects require a model that allows for each floor of a multi-story building to be looked at. The model can be printed by floor and stacked up to show the whole building, and then opened up for viewing by unstacking the sections. If a particular floor changes, but the others don't, then just that one floor needs to be reprinted and inserted.
Conclusion
Creating architectural models with 3D printers offers numerous advantages over conventional hand-built models. 3D printing of architectural models provides the opportunity to reduce the level of effort in creating a model and more efficiently uses design time, all while producing the level of detail and precision needed for a particular architectural design. Further, they can be tied directly to computer simulation efforts using CAD and BIM software. In essence, 3D printing combines the precision and flexibility of computer simulations with the tangibility of physical scale models.

Images courtesy of Stratasys, Ltd.
Producing architectural models has been shown to be very cost effective with options in printer technology including PolyJet style (upper two photos) and FDM style (lower two photos).
PolyJet and FDM 3D printers are available at cost-effective prices for firms to produce high-quality, detailed architectural models. Their ease of use lets designers produce low-cost models for all design phases. The materials offered by both technologies allow for easy post processing to further enhance model quality. The 3D-printed model can easily allow internal and external visualization at all levels of detail. Large models can also be sectioned into smaller pieces, either for demonstration purposes or to accommodate a model too large for the 3D printer. In the end, the use of this technology can cause a dramatic boost in firm productivity, in the ability to communicate quickly and effectively with clients, and even to secure new work.
Peter J. Arsenault, FAIA, NCARB, LEED AP, is an architect and green building consultant who has authored over 100 continuing education and technical publications as part of a nationwide practice. www.linkedin.com/in/pjaarch
|
| Stratasys manufactures 3D printing equipment and materials that create physical objects directly from digital data, from affordable desktop 3D printers to large, advanced 3D production systems. Manufacturers use Stratasys 3D Printers to create models and prototypes for new product design and testing, and to build finished goods in low volume.
www.Stratasys.com |