This CE Center article is no longer eligible for receiving credits.
Woods, such as western red cedar (WRC), are a natural, renewable, and sustainable building material. In recent years, more architects are incorporating wood into their modern designs to add warmth, texture, and take a more humanistic approach with natural materials.

Photo courtesy of Western Red Lumber Association/© Angus Martin
The Cedar House in Flinders Bay, Western Australia, was designed by Craig Steere Architects and engineered by Cornforth CB Consulting Engineers.
In addition to an increased use of WRC in residential and multifamily housing projects, there is also more WRC currently being specified for projects in public spaces, such as boardwalks, decks, and outdoor structures, because of its durability, sustainability, and beauty.
Architects in urban, suburban, and even rural areas are seeing an increase in requests for outdoor landscaped spaces and wood buildings that provide a warm atmosphere between high-rise buildings made of glass and concrete. This includes public spaces between buildings and areas in parks, as well as courtyards for single-family homes and multifamily residences.
Western Red Cedar (WRC)
WRC products come from trees grown in forests in the Northwest area of North America, and its usage dates back centuries. Native Americans were the first to name it the “Tree of Life.” In the Pacific Northwest, aboriginal people used cedar bark to make rope, clothing, and baskets. Logs from the trees were and still are used for a variety of purposes, including canoes, totem poles, long houses, and planks for roofing and siding.
While its use has been growing, many believe that WRC is only for single-family design. But in reality, architects now specify it for well-designed multifamily buildings, commercial structures, retail settings, hospitality and resort facilities, museums, churches, educational facilities, outdoor structures, and a variety of other projects where beauty and durability are desired.
General Attributes of WRC
WRC is an excellent choice because of its many positive attributes, including appearance, durability, sustainability, and availability.
Appearance
Aesthetically, there really is no substitute for WRC’s natural beauty. Its grain, texture and natural color variation have made it a superior choice for outdoor and indoor applications. Its natural appearance is quite attractive in a variety of commercial and other building types in a range of design styles, including traditional, contemporary, arts and crafts, and modern. Cedar products are available with a smooth, rough-sawn appearance or rougher headed textures.
An unlimited number of standard and specialty profiles of cedar siding, boards, trim, and timbers are made to meet different design needs. Profiles include bevel, shiplap, tongue and groove, and boards for board-and-batten applications. A wide range of thicknesses are available to suit specific design goals.
Durability
WRC is well-known for its longevity and durability due to the ingrown preservatives in the wood. These provide natural resistance to rot, decay, and insect attacks, which means projects built with cedar will last longer. In fact, cedar performs better and requires less maintenance than most man-made materials, particularly plastic composites that simulate a wood appearance.
A wide range of the finishes are available for WRC and add an extra layer of durability. This is discussed later in the article.
Sustainability
When it comes to environmental performance, natural wood is superior to synthetic products in every way. While other building materials generate greenhouse gases, WRC trees actually remove greenhouse gases from the atmosphere. Further, unlike many manufactured or composite materials, WRC is fully biodegradable at the end of its useful life. In recent years, there has been a call for steeper landfill fees on composite materials, thus increasing the popularity of wood and cedar materials.
Perhaps one of the best-known sustainability attributes of WRC is that it is a renewable resource. In fact, WRC comes from some of the most sustainably managed forests in the world. More than 85 percent of timberland in British Columbia, which is the primary source for WRC, is certified by internationally recognized, independent, third-party forest certification agencies. These third-party systems help protect environmental values, such as biodiversity, soil, and water quality.
These forests are managed by private companies that subscribe to the standards of Sustainable Forestry Initiative (SFI), Forest Stewardship Council (FSC), and Canadian Standards Association (CSA). The LEED rating system for green buildings now recognizes all three of these certifications.
Versatility
WRC is pitch and resin free, so it accepts and holds a wide range of beautiful finishes, including elegant dark stains, shabby-chic bleaches, traditional solid colors, and naturally beautiful semitransparent stains. WRC offers a wide range of sizes, surface textures, grades, and profiles, both standard and custom, making it easy to incorporate into a wide range of design schemes and patterns. These finishes and possibilities are discussed in more detail throughout the article.
Cost-Effectiveness
Many believe that cedar is an expensive option when specifying a home or outdoor public project. However, the opposite is true. A simple comparative cost analysis shows that it is very competitive with other cladding and siding materials in terms of first costs since the grade, finish, and profile can be selected to suit a full range of budget needs. Furthermore, its long-term durability and low maintenance make it cost-effective over the life of the building. Jeff Jordan, principal with Jeff Jordan Architects, makes this statement about a recent project where cost and other attributes were the deciding factors on the exterior material choice: “Cedar is such a prominent part of the look, and it would have been difficult to find another material that has both a natural appearance and can weather naturally over time.”
Woods, such as western red cedar (WRC), are a natural, renewable, and sustainable building material. In recent years, more architects are incorporating wood into their modern designs to add warmth, texture, and take a more humanistic approach with natural materials.
Photo courtesy of Western Red Lumber Association/© Angus Martin
The Cedar House in Flinders Bay, Western Australia, was designed by Craig Steere Architects and engineered by Cornforth CB Consulting Engineers.
In addition to an increased use of WRC in residential and multifamily housing projects, there is also more WRC currently being specified for projects in public spaces, such as boardwalks, decks, and outdoor structures, because of its durability, sustainability, and beauty.
Architects in urban, suburban, and even rural areas are seeing an increase in requests for outdoor landscaped spaces and wood buildings that provide a warm atmosphere between high-rise buildings made of glass and concrete. This includes public spaces between buildings and areas in parks, as well as courtyards for single-family homes and multifamily residences.
Western Red Cedar (WRC)
WRC products come from trees grown in forests in the Northwest area of North America, and its usage dates back centuries. Native Americans were the first to name it the “Tree of Life.” In the Pacific Northwest, aboriginal people used cedar bark to make rope, clothing, and baskets. Logs from the trees were and still are used for a variety of purposes, including canoes, totem poles, long houses, and planks for roofing and siding.
While its use has been growing, many believe that WRC is only for single-family design. But in reality, architects now specify it for well-designed multifamily buildings, commercial structures, retail settings, hospitality and resort facilities, museums, churches, educational facilities, outdoor structures, and a variety of other projects where beauty and durability are desired.
General Attributes of WRC
WRC is an excellent choice because of its many positive attributes, including appearance, durability, sustainability, and availability.
Appearance
Aesthetically, there really is no substitute for WRC’s natural beauty. Its grain, texture and natural color variation have made it a superior choice for outdoor and indoor applications. Its natural appearance is quite attractive in a variety of commercial and other building types in a range of design styles, including traditional, contemporary, arts and crafts, and modern. Cedar products are available with a smooth, rough-sawn appearance or rougher headed textures.
An unlimited number of standard and specialty profiles of cedar siding, boards, trim, and timbers are made to meet different design needs. Profiles include bevel, shiplap, tongue and groove, and boards for board-and-batten applications. A wide range of thicknesses are available to suit specific design goals.
Durability
WRC is well-known for its longevity and durability due to the ingrown preservatives in the wood. These provide natural resistance to rot, decay, and insect attacks, which means projects built with cedar will last longer. In fact, cedar performs better and requires less maintenance than most man-made materials, particularly plastic composites that simulate a wood appearance.
A wide range of the finishes are available for WRC and add an extra layer of durability. This is discussed later in the article.
Sustainability
When it comes to environmental performance, natural wood is superior to synthetic products in every way. While other building materials generate greenhouse gases, WRC trees actually remove greenhouse gases from the atmosphere. Further, unlike many manufactured or composite materials, WRC is fully biodegradable at the end of its useful life. In recent years, there has been a call for steeper landfill fees on composite materials, thus increasing the popularity of wood and cedar materials.
Perhaps one of the best-known sustainability attributes of WRC is that it is a renewable resource. In fact, WRC comes from some of the most sustainably managed forests in the world. More than 85 percent of timberland in British Columbia, which is the primary source for WRC, is certified by internationally recognized, independent, third-party forest certification agencies. These third-party systems help protect environmental values, such as biodiversity, soil, and water quality.
These forests are managed by private companies that subscribe to the standards of Sustainable Forestry Initiative (SFI), Forest Stewardship Council (FSC), and Canadian Standards Association (CSA). The LEED rating system for green buildings now recognizes all three of these certifications.
Versatility
WRC is pitch and resin free, so it accepts and holds a wide range of beautiful finishes, including elegant dark stains, shabby-chic bleaches, traditional solid colors, and naturally beautiful semitransparent stains. WRC offers a wide range of sizes, surface textures, grades, and profiles, both standard and custom, making it easy to incorporate into a wide range of design schemes and patterns. These finishes and possibilities are discussed in more detail throughout the article.
Cost-Effectiveness
Many believe that cedar is an expensive option when specifying a home or outdoor public project. However, the opposite is true. A simple comparative cost analysis shows that it is very competitive with other cladding and siding materials in terms of first costs since the grade, finish, and profile can be selected to suit a full range of budget needs. Furthermore, its long-term durability and low maintenance make it cost-effective over the life of the building. Jeff Jordan, principal with Jeff Jordan Architects, makes this statement about a recent project where cost and other attributes were the deciding factors on the exterior material choice: “Cedar is such a prominent part of the look, and it would have been difficult to find another material that has both a natural appearance and can weather naturally over time.”
WRC Grades and Options
WRC is available in many grades and has various options based on quality and style. Major third-party certifiers, such as the International Standards Organization (ISO), Canadian Standards Association (CSA), and Sustainable Forestry Initiative (SFI), help architects easily compare WRC products and determine which will be the best for the project and the most sustainable for the environment.
Grade systems are determined and recognized by independent agencies so professionals can identify different appearance lumber grades as distinct from structural lumber grades for cedar. These grades include clear vertical grain heart, A, B, rustic, and various types of knotty.
Bevel Siding
Bevel siding is the most widely used cedar type. It is produced by resawing lumber at an angle to produce two pieces thicker on one edge than the other.
Clear Vertical Grain Heart
Clear vertical grain heart is the highest bevel siding grade. The word “heart” in the case of grading cedar refers to the inner wood in a tree as opposed to the narrow outer sapwood between the heartwood and the bark. It is sawn vertical grain (edge grain) and kiln dried. Pieces of the wood have a smooth face of decay-resistant heartwood and do not have inherent natural blemishes or characteristics that affect appearance or performance. These pieces also have excellent dimensional stability and hold finishes exceptionally well. Clear vertical grain heart and Grade A are mostly reversible to a resawn back.
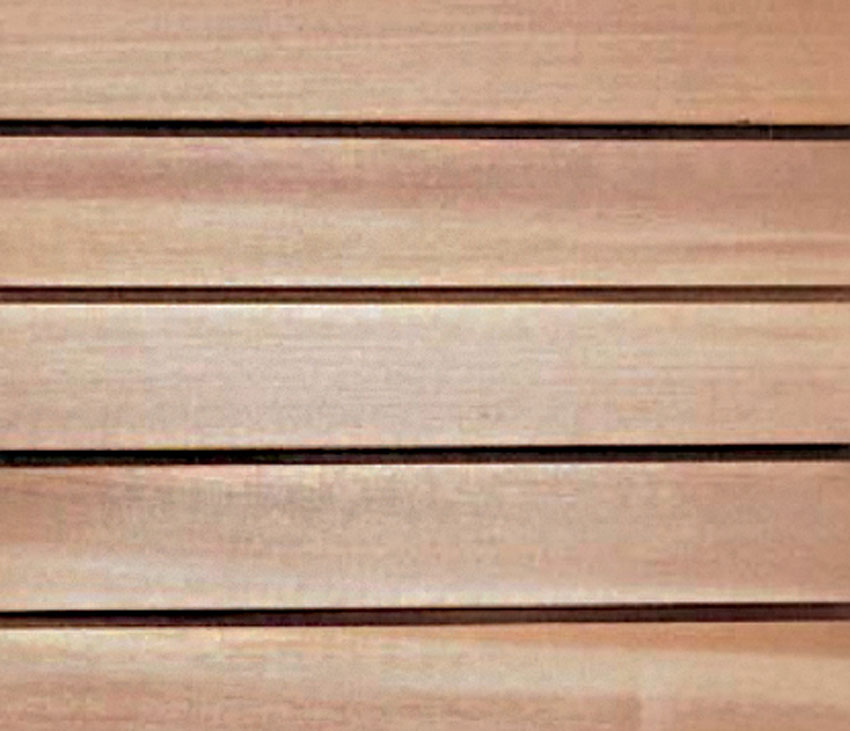
Photo courtesy of Western Red Cedar Lumber Association
An example of clear vertical grain heart WRC, which does not have the knots that are so common to knotty cedar.
Grade A
A grade is a fine appearance grade that allows only slightly more growth characteristics than the clear vertical grain heart. Pieces are of mixed grain, vertical, and flat, and graded from the surfaced face. Typically, A grade cedar is sold with a percentage of B grade.
Rustic
Rustic grade siding is recommended for use as sidewall covering when the distinctive charm of a rustic saw-textured appearance is desired. This grade allows limited characteristics that do not detract from serviceability.
Knotty Cedar
Knots and other natural features define the visual characteristics of the WRC. Select knotty cedar materials show more of the knots on surface areas than other types of cedar products. All knots are sound and tight to ensure they remain intact and stable throughout the lifetime of the material. This cedar is rough surfaced, kiln dried, or unseasoned and smooth or with a resawn texture. Some companies may supply this grade of WRC with knots glued on the reverse face.
Of all the grades available, knotty cedar is growing in popularity for many reasons, including its high-performance capabilities and lower price point. When compared to other grades of cedar, knotty is the most cost-effective. All it takes is a quick square-footage price comparison for many to select knotty cedar over all the rest.
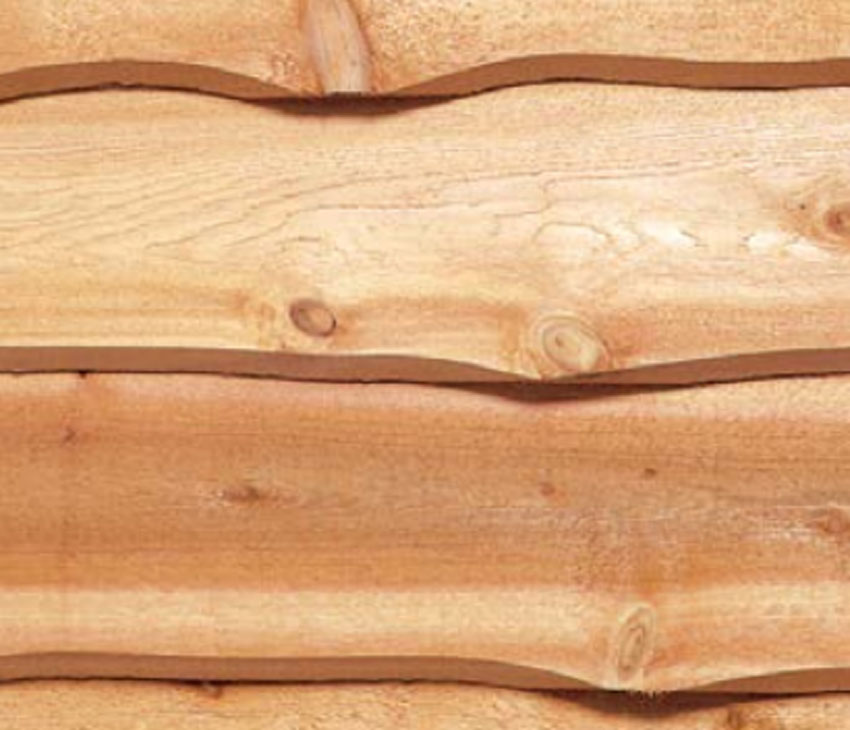
Photo courtesy of Western Red Cedar Lumber Association
Select knotty cedar is available in kiln dried or unseasoned and smooth or saw textured.
Knotty WRC, or Thuja plicata, is ideal for outdoor projects in many situations but especially in high-moisture conditions. Naturally occurring preservatives make it resistant to rot, decay, and insect attacks. A portion of the shipment may require job-site trimming to achieve a tight knot result.
Knotty cedar also provides many visual options from urbane and elegant to rustic and charming, making it an ideal building material for outdoor projects. The knots give it a more natural and earthy feel than clear cedar siding. Growing environmental awareness has certainly pushed its popularity, as has a trend to extend outdoor living spaces to blend in with and complement outdoor areas and natural landscaping.
Not only will it provide occupants and visitors with warm, inviting places, but architects and builders also love that it is light and easy to work with while still durable to withstand the test of time. The material comes in a variety of dimensions. It can be installed vertically, horizontally, or even diagonally, allowing the lines between the panels as well as the knots to create depth and a feeling of being in nature.
Knotty cedar is a material that is often imitated by other manmade materials. However, the aesthetics of natural knotty cedar can never be matched.
Shiplap, Tongue and Groove, and Boards
Other siding patterns include shiplap, tongue and groove, and boards for board and batten applications. The grade names discussed here are similar to the grades in bevel siding: clear heart, A, B, C, and D. Clear heart, A, and B grades are only available kiln dried. C and D grades may be available either kiln dried or unseasoned.
Shiplap patterns are produced and graded to the intended exposed face. Standard tongue-and-groove patterns are usually graded to the smooth face but in most cases are reversible to the resawn back. Boards are available in either S1S2E, meaning boards are surfaced or finished on one side and two edges, or S4S, meaning surfaced on all sides. Specify the desired texture for the graded face.
As with clear products, select knotty tongue and groove is usually graded to the smooth face, but in many cases it is reversible to the resawn back. With all tongue-and-groove and shiplap patterns, be sure to specify the desired edge detail (i.e., joint, fine line, flush joint, or wider reveal).
Boards refers to board and batten, trim, and fascia applications. Boards that are S1S2E are usually graded to the resawn side.
Knotty Timbers
Timbers are available in clear and knotty grades. If a clear look is desired, specify No. 2 clear and better. Knotty timbers are evaluated for appearance, meaning they have sound and tight knots as well as square edges. Structural grades are available and can be furnished by request. Timbers are usually supplied “rough” but may be supplied “surfaced” when requested.
Finishing Options
Unlike some other wood species, WRC is pitch and resin free. This means it is ideal for accepting and holding a wide range of wood finishes, including clear stains, semitransparent stains, solid stains, or paint to protect and preserve appearance and meet a variety of design needs for tonal or finished appearances. Regardless of the type or style of WRC specified, a critical element in creating a durable and attractive exterior siding is selecting the appropriate finish option. There are a variety of finishes available, including transparent, semitransparent, bleaching and weathering, solid stains, and paints.
Transparent
Transparent finishes allow the natural beauty of the wood to shine through while also keeping it protected from the elements. Transparent stains for exterior applications are available in solvent-borne oil formulas and latex formulas. Latex formulas do penetrate the surface and may form a film. Transparent, nonflexible, film-forming finishes such as lacquer, shellac, urethane, and varnish are not recommended for exterior use on cedar. Ultraviolet radiation can penetrate the transparent film and degrade the wood. Regardless of the number of coats, the finish will eventually become brittle, develop severe cracks, and then fail. Transparent finishes in exterior applications have very short service lives.
Semitransparent
Semitransparent stains may be latex or oil based. The semitransparent nature of the stain, due to its low solids content, does not block all ultraviolet radiation, and some will reach the wood’s surface. Latex stains do not penetrate the surface and are not as durable.
Two coats of penetrating oil-based stain on textured cedar will provide longer service life than one coat, but only if the wood will accept the second coat. Stir the stain thoroughly during application to prevent settling and color change. Avoid mixing different brands or batches of stain. Stain boards full length to avoid lap marks.
Latex semitransparent stains do not penetrate the wood surface, but they are easy to apply and less likely to form lap marks. These stains are film-forming and not as durable as oil-based stains.
Bleaching and Weathering
If a truly uniform grey appearance is desired, this effect can be achieved by the use of a commercially prepared bleaching or weathering product. This is essentially a water-repellent finish containing pigments and other additives, which is most effective on textured cedar. To maintain this look, the products may have to be reapplied periodically. Bleaching and weathering products are available in both oil and latex formulas. These water-repellent finishes contain pigments, and they are designed to mute the natural color range in the cedar and provide a more natural weathered look sooner than if the wood is left to weather naturally.
Uncoated, weathered WRC siding or trim can be restored to its original color by applying commercial products called cleaners, brighteners, or restorers. Although intended primarily for restoring horizontal wood surfaces such as decks, these products generally work almost as well on vertical surfaces. Some products are formulated with thickening agents to help the liquid cling better to vertical surfaces.
WRC still performs well in decking and siding applications, even if it is left unfinished to weather naturally. When WRC weathers naturally, it develops a silvery grey look and requires very little effort to maintain the finish. This could be an option for areas that are difficult to reach, such as siding projects on very tall buildings. Some also choose not to use any finishes to reduce any environmental impact from the chemicals applied during other finishing processes.
While natural weathering is a satisfactory finishing option, there are some long-term implications when not applying a finish to a cedar project. In very dry climates, WRC may not weather uniformly.
The weathered cedar can be restored to a state where it can be painted or stained. However, significantly more effort will be required to prepare the surface of the wood for coating.
Solid Stains
Solid-color stains are opaque finishes with fewer solids than paint. Available in a wide spectrum of hues, solid-color stains obscure the wood’s true color but allow some of the natural characteristics and texture of cedar to remain. Solid-color stains perform best on textured surfaces. They are nonpenetrating and, like paints, form a film. A stain-blocking primer should be applied first, followed by a 100 percent acrylic latex-based topcoat.
Solid-color stains may be applied to cedar by brush, roller, or pad. Brush application is usually the best. These stains act much like paint. One coat of solid-color stain is only marginally adequate on new wood. A prime coat with a topcoat will always provide better protection and longer service. The best performance can be obtained if the wood is primed and then given two coats of stain. Topcoats of 100 percent acrylic latex solid-color stains are generally superior to all others, especially when two coats are applied over a primer.
Unlike paint, a solid-color stain may leave lap marks. To prevent lap marks, follow the procedures suggested for semitransparent penetrating stains.
Factory finishing is available in many markets and is highly recommended. Factory-finish applications may be available with finish warranties.
Paints
Paints of all types, such as vinyl-acrylic, modified-acrylic, and oil-based topcoats, are suitable for cedar, but test results show that high-quality 100 percent acrylic latex formulations perform best.
Paint provides the most surface protection against weathering and wetting by water while providing color and concealing some of the wood’s characteristics. Although paint can reduce wood’s absorption of water, paint itself is not a preservative.
Alkyd-oil, stain-blocking primers usually offer the best shield against discoloration by water-soluble extractives. Latex paint, particularly 100 percent acrylic latex formulations, remain more flexible with age and are better able to accommodate dimensional changes by stretching and shrinking with the wood.
Factory finishing is available in many markets and is highly recommended. Factory-finish applications may be available with finish warranties.
Applying Finishes
The application technique, quality and quantity of finish applied, surface condition of the substrate, and weather conditions at the time of application can substantially influence the life expectancy of the finish. The application guidelines suggested here should be followed along with the manufacturer’s directions for the product.
Applying Weathering and Bleaching Products
Weathering and bleaching products refinish the same way as the semitransparent oil-based penetrating stains. Semitransparent latex stains act like very thin paints and may require more extensive surface preparation (scraping, sanding, etc.) before being refinished. Manufacturers’ instructions should be followed carefully.
The application of a finish on WRC is as important for durability and optimal performance as the finish-substrate combination chosen for the job. Finishes can be brushed, rolled, sprayed, or applied by dipping.
When to Refinish
Exterior WRC surfaces only need to be refinished when the old coating has worn thin and no longer affords the wood protection. In refinishing painted or solid-color stained siding and trim, removal of the old coating may be required. This is necessary if, for example, the old finish is severely cracked, peeling, or flaking. These finishes can be removed by a variety of procedures, all of which can be difficult, time-consuming, and expensive processes. Some of these procedures can damage the wood. For example, power washing should never be used for removing coatings from WRC because this process can severely damage the wood surface fibers and make it difficult for the next finish to adhere properly.
Finishing Formulas
When finishing WRC, different formulas of finishing materials are available to be applied to the wood for optimal performances. These formulas vary from market to market based on volatile organic compounds (VOCs), which are organic compounds that easily vaporize at room temperature. Some solvent-borne stains contain high amounts of VOCs. These are well absorbed by cedar and contain mineral spirits. However, due to their volatility, environmental conditions, and local and state laws, these materials are not available everywhere. States like California and Maryland have restricted the use of certain finishing materials and formulas. Before starting a project, make sure to comply with all local and state regulations to ensure safety.
Finishing before Installation
New cedar siding and trim should be protected from the weather before, during, and after construction. Finishing of siding and trim (not decking materials) works best when the product is prefinished on all six sides of the wood prior to installation. Factory finish is preferred.
It is seldom necessary to carry out extensive surface preparation provided the wood has not weathered for more than two weeks and is clean and dry. The moisture content should always be checked as a precaution. The moisture content must below 20 percent. If the wood has been contaminated by dirt, oil, or other foreign substances, it must be cleaned before finishing.
Dirt should be washed from the surface (see section on cleaning and discoloration). For smooth-planed, flat-grained cedar, some surface preparation may be desired. On flat grained wood, the surface should be scuff-sanded with 50–60 grit sandpaper. This procedure will greatly increase the coating’s performance but will not detract from a smooth appearance. Surface preparation is not necessary for clean textured cedar.
When finishing WRC, it is important to follow all manufacturer’s guidelines.
Best Practices for Installing WRC
Installation involves many processes including inspection, storage, fasteners, nailing patterns and placement, and flashing installation.
Inspecting and Storing Materials
As soon a shipment is received, inspect all materials to ensure the proper grade of material for the project. If any of the materials appear damaged in any way, they should not be installed.
Prior to installation, it is important to acclimatize the materials. Since WRC is a natural material, it responds to the environment around it. Cedar siding can swell or shrink as it gains or loses moisture to reach equilibrium with the moisture content of the surrounding air. On the job site, ensure that all WRC siding is protected from direct sunlight, water saturation, snow, ice, dirt, and other elements. Store the siding flat and off the ground on a vapor barrier so that moisture is not absorbed from the lower boards. While it is important to cover the materials, do not completely seal them, as good air circulation is required. Ideal moisture content (MC) for installing WRC is an average of 12 percent MC in most areas in North America.
Determining Hardware
Next, decide which fasteners to use so that the product is properly secured to the building frame and to ensure a durable and long-lasting result. There are various types of appropriate fasteners on the market. Let’s discuss a few options as well as nailing patterns.
Fasteners
Stainless-steel nails are the best choice when installing WRC, especially if the siding is to be finished with transparent stain, semitransparent stain, or bleaching or weathering products. Use No. 304 stainless for general siding applications and No. 316 for seacoast exposures.
Stainless steel, aluminum, and hot-dipped galvanized (as per ASTM A-153) fasteners are all corrosion resistant and can be used to fasten WRC. Other types of fasteners, including electroplated and mechanically galvanized and copper, are not recommended. They can rust, disintegrate, and react adversely to the natural preservative present in cedar, leaving stains and streaks. Hot-dipped galvanized fasteners are only recommended for pre-primed wood that will be topcoated with solid stain or paint.
For best results, use “splitless” ring-shank siding nails. These have thin shanks and blunt points to reduce splitting. Textured heads should be used to reduce the glossy appearance of the nail head.
Proper Nailing Techniques
When installing WRC, hand nailing is preferred. Carefully drive nails into the framing members. To ensure nailing accuracy, run chalk lines to mark framing locations. Heavy nailing distorts the wood and may cause splitting. At mitered corners, near edges, and near ends, nail holes may need to be pre-drilled to avoid splitting. Avoid the use of pneumatic nailers, if possible. If a pneumatic nailer must be used, reduce the air pressure and tap nails flush.
Overdriven nails must be remedied immediately. Fill overdriven nail holes with exterior grade wood putty specifically designed for filling exterior nail holes.
Siding should be fastened to each stud or blocking with nails spaced at a maximum of 24 inches on center. Nail placement depends on the siding pattern and width. The key is to fasten the siding securely without preventing it from moving in response to the moisture content in the air. In general, each piece of siding must be nailed independently. Nailing overlapping pieces together restricts the natural movements of each piece and may cause splitting.
The size of nails to use depends on the type and thickness of siding. Use ring-shank siding nails long enough so that they penetrate solid wood by a minimum of 11⁄4 inches.
Wall Construction
Like all siding materials, WRC performs best when installed properly to a suitable frame. Cedar siding should be securely nailed to framing members, furring members, or blocking between framing members. Standard stud walls generally require no special preparation for horizontal siding installation. Siding should be nailed into wood sheathing and studs or blocking at a maximum of 24 inches on center, and 16 inches on center when siding is installed to furring members or without sheathing. When an airspace between siding and sheathing is desired, nail siding to furring strips, sheathing, and framing. Maximum spacing for furring strips is 16 inches on center. Spacing for furring strips should match the spacing of the studs.
Installing Flashing
Before installing siding, make sure that flashings are properly installed to prevent moisture from entering wall and roof spaces. Flashing is an important line of defense in controlling moisture in wall assemblies. Flashing intercepts and directs the flow of water away from the building to designed drainage paths. Install horizontal flashing extending from the top of all wall penetrations (i.e., all windows and doors) and at any material or material directional change (i.e., bandboards, water tables, or the introduction of any alternative material). The flashing should tilt downward to allow water to drain away from the wall. Siding or trim should be ¼ inch above the flashing ledge. Do not caulk above or below windows and doors. Caulk where siding abuts vertical trim. Note that caulking in lieu of flashing is not acceptable and can allow air and water intrusion to damage the wood.
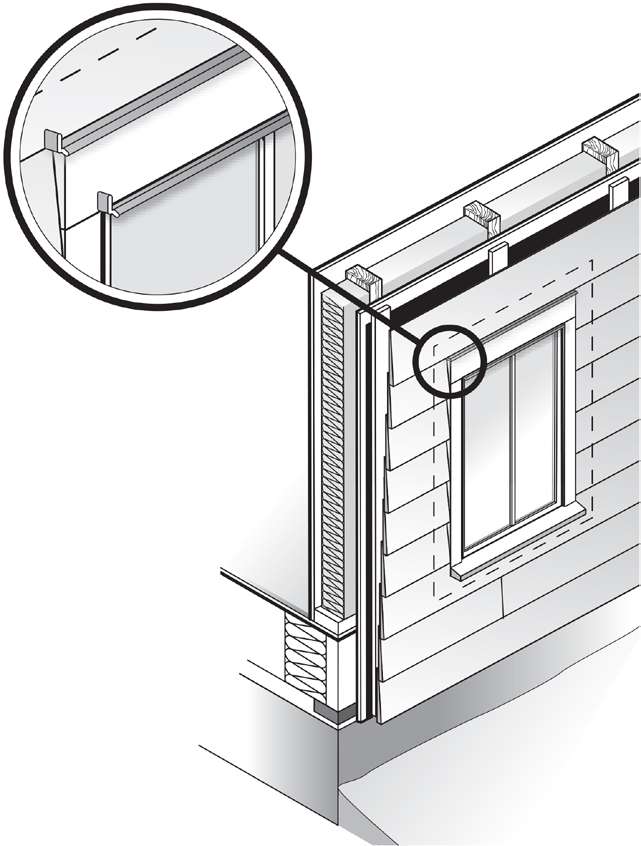
Image courtesy of Western Red Cedar Lumber Association
This corner flashing of a window installation has additional head trim flashing to direct water further outward.
Door and Window Flashing
The purpose of flashing window and door headers is to intercept water behind the siding and direct it to the outside, and to redirect water flowing down the face of the wall to flow away from the wall opening. Moisture can accumulate behind the siding as a result of rain penetration through the siding, water vapor diffusion, or leakage of moist air from the interior or condensation.
An additional head trim flashing is required at the head of the window/door to direct water further outward, beyond the thickness of the window.
Fascia Flashing
The purpose of fascia flashing is to support the shingle edge and to provide a drip edge to prevent water from running back underneath the roofing shingles and down along the fascia and soffit.
Preformed eave flashing/drip edge should be installed under the starter course of the shingle roofing. The extension of flashing supports the edge of shingles. If eavestroughs (rain gutters) are used, the flashing edge also helps to direct the water into troughs. Fascia flashing protects both the soffit and the fascia board, and provides a drip edge at the bottom edge to direct water away from the building.
Caulking
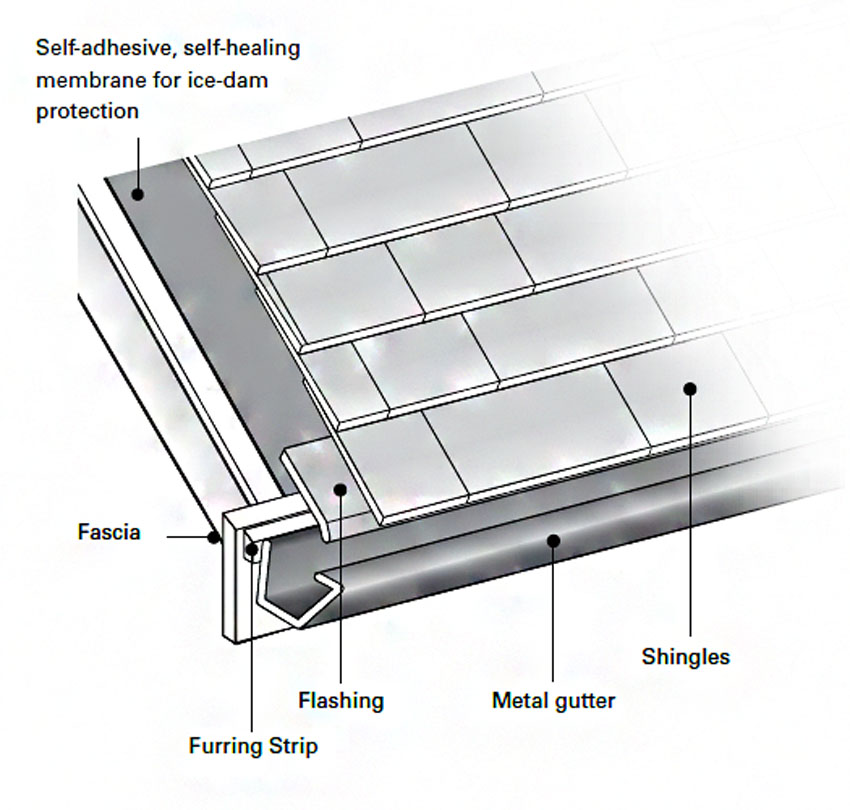
Image courtesy of Western Red Cedar Lumber Association
Shown is an example of fascia flashing in relationship with all other components of a roof, including gutters and shingles.
Use high-performance acrylic latex, acrylic, acrylic silicone, polyurethane, polysulfide, or terpolymer rubber caulks or sealants to seal gaps around windows, doors, corners, and other exterior joints that are exposed to potential water intrusion. Pure silicone and clear caulks do not work well on WRC and are not recommended. Caulking is not a permanent solution and as such requires regular maintenance. If not inspected and maintained, caulking may fail and trap water, causing unwanted air and water intrusion that can lead to damage. Do not rely on caulk as the only barrier to moisture penetration. Do not caulk areas that will prevent moisture from escaping the wall cavity (e.g., above, below windows, doors, and around flashing).
Roof and Ground Clearance
Siding and trim that extend down to a roof (dormers, second floors, etc.) and decks require a minimum of a 2-inch gap to avoid wicking. Trim, such as water table or skirt boards, must be a minimum of 6 inches above the grade.
Installing Bevel Siding (or Clapboards)
When installing bevel siding or clapboards, spacing for the siding should be laid out beforehand. The number of board spaces between the soffit and bottom of the lowest piece of siding at the foundation should be such that the overlap is as per the table below.
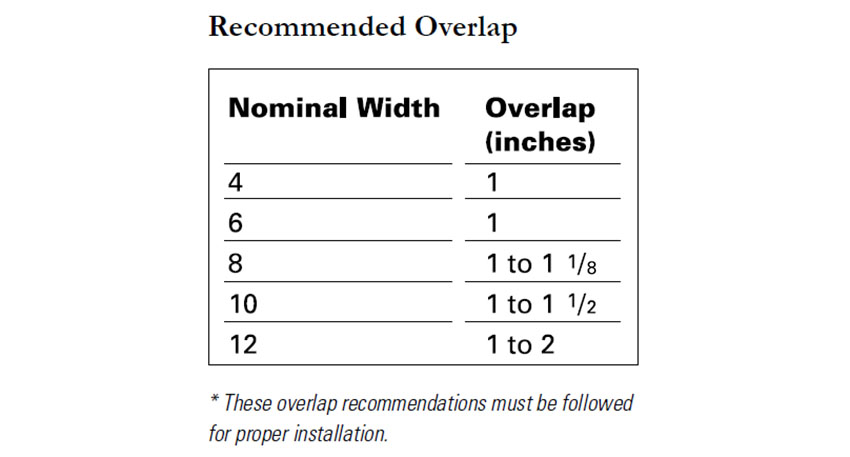
Image courtesy of Western Red Cedar Lumber Association
This table shows the recommended overlap (in inches) when installing bevel siding.
Start with the bottom course using a furring strip to support the lower edge. Each succeeding course overlaps the upper edge of the previous one by a minimum of 1 inch. Rabbeted patterns are self-spacing, but leave a 1⁄8-inch gap to allow for expansion. Where possible, the bottom of the board that is placed across the top of the windows should coincide with the window cap.
Bevel siding should be face-nailed to sheathing and studs with 11⁄4 inches penetration into solid wood using one nail per piece spaced at a maximum of 24 inches on center. Place nail just above the overlap. Take care not to nail through the overlap of two pieces.
Do not reduce the siding overlap recommendations. Doing so could result in damage from wind-driven water. Use the larger overlaps for wider and/or unseasoned sidings to allow for shrinkage and expansion. Take care not to overdrive fasteners. Butt joints between boards should be staggered and meet on studs. Fit siding snugly to other pieces and to trim.
Installing Tongue and Groove
Tongue-and-groove siding can be installed horizontally or vertically. In horizontal application, start at the bottom and work up with the groove edges facing downwards. Siding up to 6 inches wide can be blind nailed with one siding nail per bearing toe-nailed through the base of each tongue. Wider siding should be face nailed using two nails per piece. Nails must penetrate 11⁄4 inches into solid wood.
In vertical application, start at one corner with grooved edge toward the adjacent wall. Use a level or plumb line to ensure that the first board is installed plumb. The grooved edge of the first board may have to be trimmed to ensure a flush fit. Vertical siding is nailed to horizontal blocking lines installed between studs or to furring strips. As with horizontal installation, pieces up to 6 inches can be blind nailed and wider pieces should be face nailed.
Installing Lap Sidings
Lap sidings can be installed horizontally or vertically. For horizontal applications, start with the bottom course and work up with the channels pointing upwards. Allow a 1⁄8-inch expansion gap between pieces if the siding is air or kiln dried. Do not nail through overlaps. For siding up to 6 inches wide, use one nail one inch up from the lap.
Face nail with two nails per piece for 8-inch and wider patterns. Space nails 21⁄2 to 3 inches apart. For vertical applications, siding should be nailed to horizontal blocking or furring strips.
Installing Board-and-Batten Siding
Board and batten is a vertical pattern created using cedar boards and battens of various widths for a wide range of appearances. For nominal 6-inch boards spaced a 1⁄2 inch apart, battens should overlap by a least 1⁄2 inch. With wider boards, increase batten overlap proportionately. While there are no set widths for board-and-batten siding, an attractive combination is 1x3 battens with 1x10 boards.
Siding should be nailed to horizontal blocking lines or to furring strips. Boards up to 6 inches wide should be fixed with one nail per bearing driven through the center of the board. The overlying batten covering the gap between boards should be attached with one nail per bearing, the shank passing between the edges of the under boards. Use two nails per bearing on boards 8 inches and wider, placing the nails 21⁄2 to 3 inches apart.
Outside and Inside Corners
There are three main methods used for outside corners. The choice depends primarily on the desired appearance but also the experience and skill of the installer.
Mitered corners offer a professional-looking finish. They are most commonly used with horizontally applied siding applications such as bevel. Mitered corners require good carpentry skills. They must fit tightly for the full depth of the miter.
Corner boards are a popular and easier alternative to mitered corners. The thickness of the corner board will depend on the thickness of the siding. The most common are nominal 1-inch or nominal 5⁄4-inch thick. Width is a matter of taste and proper proportion. Corner boards are applied with siding fitting tightly against the narrow edge of the boards, allowing for expansion and an adequate caulking bead. The corner boards and the ends of the siding are nailed to the sheathing and corner studs, which anchor the wood for a maintenance-free joint. Designing roofs with an eaves overhang to protect corners from weathering also helps ensure trouble-free joints. Always apply primer or stain to end cuts.
Woven outside corners are a third option for horizontal siding installations. In this case, adjoining wall pieces alternate end-grain exposure.
Field Joints
When butt-jointing siding, cut ends at 45-degree angles to form an overlapping joint. This is particularly important for vertical installation. Ensure joints meet on studs, blocking, or furring strips with the nail penetrating solid wood at least 1¼ inches
Methods for Success
All cedar siding patterns are face nailed, with the exception of the narrow profiles of tongue and groove. Blind nailing is an option with 4-inch and 6-inch tongue and groove in certain climatic conditions. Proper installation techniques are critical to the success of the WRC project, as following best practices can ensure best performance for the product. When installing, ensure that all wood is acclimatized and installation practices follow all local and national building codes and manufacturers’ installation recommendations.
Conclusion
WRC is a durable, versatile, and sustainable material that will provide functional and aesthetically pleasing facades in single-family and multi-family residential homes as well as in public and residential outdoor spaces. With so many grades, finishes, and styles available, there truly is something for everyone.