Duct Installation and Testing


Add Air Diagnostics to Your Company in Eight Steps
Unless you know where to start, adding air diagnostics to your HVAC company can seem daunting. Without a plan, you may even get frustrated and quit before you give yourself a chance to succeed. If this sounds familiar, keep reading as we look at eight steps you can take to help add air diagnostics to your service offerings.
Step 1: Start with Why
Here’s a hard truth; if you can’t explain why you want to add air diagnostics into your company, your technicians will never buy in. We often know what we want to do and how we want to do it, but we don’t know why. So, I encourage you to ask yourself, “Why do I want to add air diagnostics into my company? What’s my purpose and motivation?”
At first, most contractors can’t explain why they want to start air diagnostics. If you’re in this position, grab a pencil and piece of paper. Jot down a few sentences that describe why it’s important to you, your company, and your customers. At first, this act will feel clunky, but the ideas will quickly flow.
Next, consider why air diagnostics are important from a technician’s perspective. Why would they want to do air diagnostics on each call? Why would they care? Just because you say so may work temporarily, but it will rarely produce any lasting change. If your technicians understand why air diagnostics improve their skills, make their lives easier, and increase profits for everyone, they are more likely to accept instead of reject your new idea.
Step 2: Choose a Chief Airhead
To drive the change needed to add air diagnostics, you need to identify a leader. Choose someone who loves a challenge and will keep everyone moving forward when times get tough or busy. The leader, or “chief airhead,” is someone who has a vision for the airside. They see what must happen with the readings and how they can create growth for the company.
This leader might be you, or maybe a senior technician who understands what needs to happen. Choose wisely. Because whoever it is, your chief airhead needs to understand airflow and be the go-to person. If you assign someone apart from yourself this position, make sure you equip and back them up to do the job. Don’t undermine their position by constantly second-guessing them or micromanaging their work. Instead, get out of their way and let their results speak.
Step 3: Purchase Air Diagnostic Test Instruments and Accessories
Air diagnostics start with static pressure — one foundation of airflow. It is the amount of resistance a fan must pull and push air against. Before your team can take any measurements, you need to invest in some test instruments and accessories to measure static pressure. They include:
- Digital manometer
- Static pressure tips and hoses — neoprene or silicone
- 3/8-inch test port plugs
- Small drill/impact gun with a unibit and 3/8-inch drill bit with a sheath/stop
- Thin screwdriver for cleaning out internal duct liner/insulation.
You can typically put together a complete kit with all these items for between $200 to $300. It might tempt you to skip some of these items, but don’t. They each have a purpose.
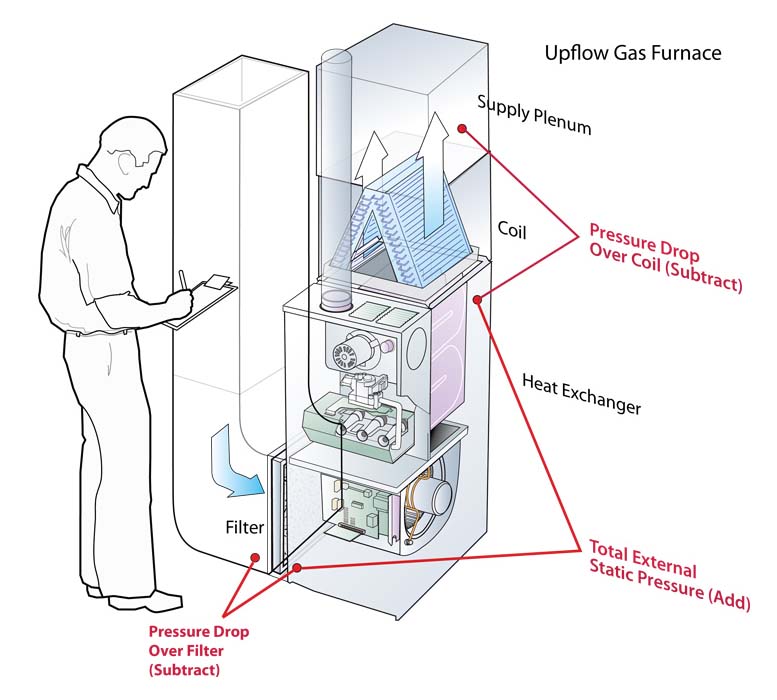
Image courtesy of David Richardson
AIR DIAGNOSTICS: Static pressure testing is a foundational test to start air diagnostics. As you create a system pressure profile, you see which components restrict airflow the most.
Step 4: Teach the Fundamental Skills
As with any new skill, you must practice before becoming a master. Give your technicians time to learn and practice static pressure measurement. It isn’t something where you wave a magic wand and suddenly it happens. The implementation takes time and effort. If it were easy, everyone in our industry would do it.
You may decide to handle this step in your office, training room, or with on-the-job training like a ride-along. The key is to start and allow each technician to begin.
Some technicians will develop quickly, while others take more time and coaching. This pace is normal, so be patient and understanding. Don’t believe that every technician will nail these skills on the first attempt. Instead, give them some grace and equip them with the tools to succeed.
This single step is where you will identify and correct the most common mistakes many technicians make as they measure. Don’t skip this step — it is too important.
Step 5: Identify Equipment and System Information to Gather
For best results, follow a checklist approach and develop a written process. It will assure everyone gathers the same information and takes the same readings. If you need help, email me for a quick start guide and reports for ideas.
It’s best to start with the indoor equipment as the first step. Gather the following necessary data plate information:
- Model and serial number
- Maximum ESP (External Static Pressure) rating
- Input and output capacity (gas-fired furnace)
- Temperature rise range (gas-fired furnace)
- Evaporator coil model number (if a separate component)
After recording the data plate information, perform a visual inspection. Check the cleanliness of the blower wheel, the motor type, and fan speed settings for both heating and cooling operation. Also, pay close attention to the filter size and media type. A lot of airflow issues result from this component.
Finally, record the outdoor unit model and serial number. The capacity of the outdoor unit is important to determine cooling airflow requirements.
For extra insurance, have your techs take photos of anything of interest or concern. It’s also a good idea to get a picture of the equipment data plates.
Step 6: Show Where to Install Test Ports
After documenting the necessary information from the equipment, it’s time to identify test port locations. Most HVAC installations need a minimum of four 3/8-inch test locations to measure pressure readings.
Drilling test ports is one of the most stressful parts of air diagnostic testing for newer technicians. The fear of drilling into a coil, heat exchanger, or electrical component is real. If your technicians don’t overcome this fear, your progress will come to a screeching halt. You can help ease their anxiety by having them learn and practice on old scrap duct or replacement equipment. This step gives them confidence and helps them overcome a big obstacle to testing.
Technicians can also avoid unintentional damage by removing access panels to install ports in them while they’re off the equipment. For any fixed panels that a technician cannot remove, use a 3/8 drill bit, and stop to install the ports. The stop keeps the drill bit from penetrating too far into the equipment or ducts.
Be sure they clear out any insulation with a control screwdriver or scratch awl to ensure nothing interferes with the pressure reading. To minimize questionable readings, stay away from sharp corners, changes in air direction, and the fan inlet. Turbulence in these areas often leads to questionable numbers.
Step 7: Measure Static Pressure
Once a technician has the basic equipment information and test ports installed, it’s time to measure static pressure. Four static pressure readings are essential for proper air diagnostics. They are:
- External Static Pressure (ESP)
- Filter pressure drop (Δp)
- Coil pressure drop (Δp)
- Duct pressures (supply and return)
For newer technicians, focus on ESP as the first test to measure and record. It can become overwhelming if you try to have them take all four readings at once. ESP helps indicate a potential problem, but it won’t identify what it is. The additional readings are necessary to discover the restrictions.
Once your technicians are comfortable measuring ESP, have them gather the other measurements needed to calculate the last three static pressure measurements. As they measure, have them write their readings down on paper so they can see what is happening. It will help them learn and see how pressures change across the airside of the system.
Step 8: Define the Hand-off
Once the technician has the readings, you’re now at a fork in the road. You must decide on what to do with this newfound information. This stage will end the technician’s involvement in air diagnostics for some of you. They will gather the readings as part of their call, let the customer know they found potential problems, and have someone else from your company contact them.
Another path is to have your technicians take additional measurements to gather more information and further the diagnostics. These decisions will depend on the skill of the technician and their ability to discuss findings with the customer. Some techs love to talk with customers and discuss their findings. Others just want to fix problems and leave the talking to others.
Remember, air is the most misunderstood principle in the HVAC industry. Many contractors talk about it, but only the best will learn to measure, diagnose, and repair air problems. If you decide to accept the challenge, I hope these eight steps have given you some ideas that will help you along the way.
David Richardson, serves the HVAC industry as a curriculum developer and trainer at National Comfort Institute, Inc. (NCI). NCI specializes in training that focuses on improving, measuring, and verifying HVAC and Building Performance.