Advancements and Applications in Resinous Floors and Walls


Ensuring successful installations
Installation of successful resinous flooring is time consuming. Design professionals should note that competent and knowledgeable installation of resinous flooring is critical to both meeting design goals and ensuring long term durability of the flooring. Since problems are not usually visible in a newly installed floor, any remediation has to be inconveniently addressed after the building is occupied. Specifying a turnkey flooring system where the manufacture installs its own product makes a lot of business sense.
Mechanical Preparation of the Subfloor
The condition of the concrete substrate is critical to the performance of the floor. There are several mechanical methods for preparing the concrete subfloor before installing the flooring system.
 |
Caption (class="mediumText") Photo courtesy of Stonhard |
Abrasive shot blast. A stream of abrasive material is forcibly propelled under high pressure to smooth a rough surface or remove surface contaminants. It is the standard approach for preparing new concrete so the flooring bonds well.
Diamond grinders. Diamond grinders are the most efficient tools for eliminating trowel marks, smoothing surfaces and rough edges, removing coatings and grinding high spots from concrete surfaces. They should be used in conjunction with HEPA-filtered dust extraction. They are generally used if only a coating is to be applied so the profile of the concrete below will not show.
Scarification. The most severe method is scarifying. Steel and or carbide star shaped cutters mounted in rows around the perimeter of a rotating drum remove high spots and contaminants such as oils and grease. Scarifying can, however, leave a more pronounced profile than abrasive shot blasting that may require smoothing.
Moisture Emission from the Concrete Slab
If flooring materials are installed on a slab before it has reached an acceptable level of dryness, moisture can prevent proper curing or lead to a breakdown due to the development of a saturated high pH environment at the surface of a slab. The affects of high moisture levels in a concrete sub-floor can not only lead to failure of the flooring system but can also lead to costly construction delays, indoor air quality issues and the legal disputes that follow when these problems develop.
Osmotic pressure. Because of increasing osmotic pressure from water passing through a semi-permeable membrane—the concrete in this case—the force of gaseous moisture will build up at the surface of the concrete and can cause blistering of the flooring system.
The most common test required by manufacturers has been the measurement of the Moisture Vapor Emission Rate (MVER) by the calcium chloride method described in ASTM F 1869. A capsule of calcium chloride designed to measure moisture weight gain is placed on the concrete for several hours. The maximum permissible weight gain that ensures the flooring will not be compromised by moisture, depends upon the flooring system to be used. If coatings are to be used, weight gain could be between 1 and 2 lb per 1,000 square feet per 24 hours; for broadcast systems, no more than 3 lb, and for mortar systems 3 to 7 lb. If the osmotic pressure exceeds permissible amounts, an osmotic resistant grout is applied which can reduce osmotic pressure from 15 lb to less than 3 lb. One patch of osmotic-resistant grout 1/8 inch thick will reduce osmotic pressure over 1,000 square feet of flooring.
The MVER test measures moisture pressure from the top 1/2 inch to 3/4 inch of the concrete. Some flooring manufacturers are now requiring that the concrete's internal relative humidity level be tested in accordance with ASTM F 2170. The reason being that measuring the concrete's internal relative humidity helps to determine what the moisture level in the slab will be once the flooring materials are installed.
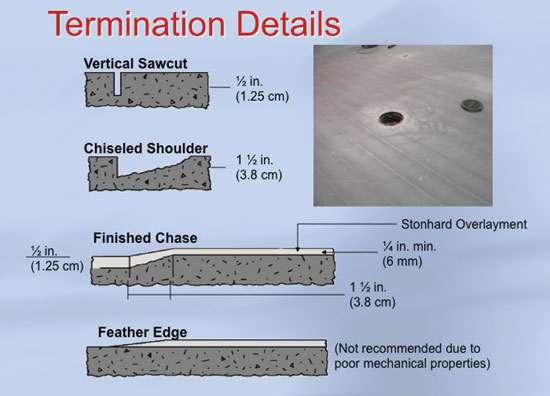
Termination details. Manufacturers recommend that attention be paid to termination details of where the flooring meets doorways, walls, and columns in order to maintain the integrity of the flooring system.
 |
Methods for treating joints. Photo courtesy of Stonhard |
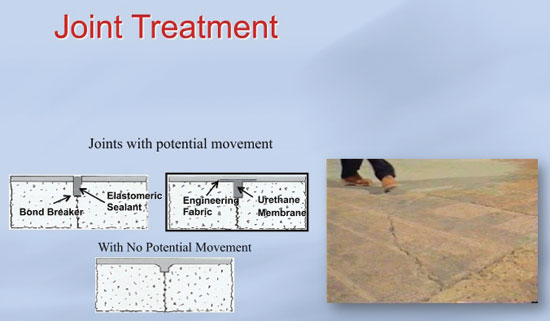
Joint treatments. All cracks should be treated before flooring is installed. Treatment should follow accepted methods according to whether the joint has potential movement or not.
 |
Methods for treating joints. Photo courtesy of Stonhard |
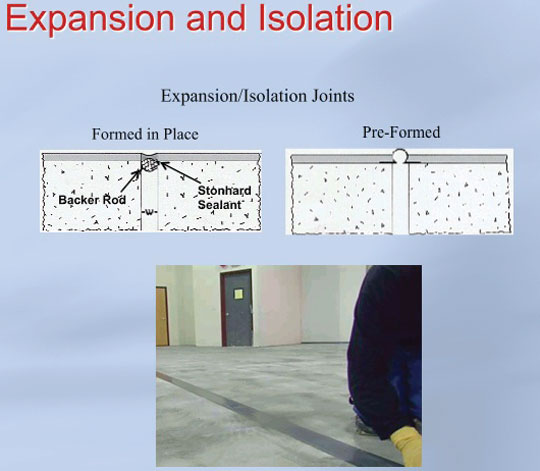
Isolation and expansion joints. Expansion and control joints are required in floors. Expansion joints must extend through both the flooring and the substrate and are designed to accommodate continuing movement in the structure throughout the life of the building caused by expansion and/or contraction due to thermal or other effects.
 |
Expansion and isolation joints are required on all floors. Photo courtesy of Stonhard |
Notice