Floating Floor Surfaces


Wood subfloors are appropriate for locking floating vinyl as long as several things are taken into account. First, the wood surface must be smooth otherwise a suitable underlayment needs to be used. Wood floors over crawl spaces must include ventilation and vapor barriers in those crawl spaces to avoid unwanted moisture from penetrating the wood and potentially impacting the flooring. Wood subflooring that rests on wood sleepers over concrete slabs seems like a good idea, but generally is recommended to be avoided. It would be better to prepare the concrete surface and install the flooring directly over that.
When existing floors form the substrate, then the existing flooring must already be smooth or be able to be made so. Existing resilient flooring can usually be covered easily and will likely form a good base for the new flooring. Exceptions are deeply embossed resilient flooring, which will need a leveler, or cushioned resilient flooring which is not suitable for covering over. If the existing flooring is ceramic tile, the grout lines need to be filled with patching or leveling compound to create a smooth surface.
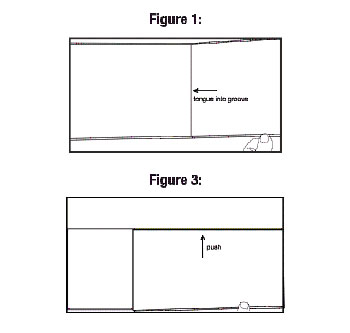 |
Installation process of sliding one edge into a groove then pushing forward to engage the rest of the interlocking mechanism. Image courtesy of EarthWerks |
Once the subfloor is ready, the interlocking flooring installation can begin. It is important that the installer remembers not to apply any glue or adhesive since this is a completely floating floor by design. Instead, they begin by planning ahead and centering the flooring pattern in the room. This will result in cutting pieces only as needed to fit along the sides of the room. In doing so, expansion gaps of 5/16” should be left on each side along walls, etc. which is usually covered over by the wall base trim. One exception is between corridors and adjacent flooring areas which will need resilient transition strips installed in typical fashion. Once laid out, installation usually begins in the upper left corner of the room and moves to the right and down to allow for the interlocking tongue and groove process to work. Essentially, the first piece is placed down then the next piece is held and installed at an angle to engage the interlocking pieces along the short edge.With the short edge in place, the flooring is laid flat and pushed forward to engage and lock into the adjacent piece ahead. This pattern simply continues until all of the pieces are laid in place across the entire area. In all cases, installers should follow manufacturer’s instructions carefully for the proper interlocking process and the recommended means for cutting pieces.
Cleaning and Maintenance
Once installed, the flooring can be cleaned with warm water and any common vinyl floor cleaners. Soap based detergents or abrasive cleaners should be avoided however, since they can damage the surface and alter its appearance or other characteristics. If furniture is scheduled to be placed on the floor soon after installation, then indentations in the flooring can be avoided by using protective devices under the legs or supports of that furniture.
Over time, changes or repairs may need to be made to any flooring and here is where the benefits of the interlocking floating floor become highly appreciated. Changes to the flooring can be readily made by removing furniture and disassembling the flooring tiles or planks starting from the lower right corner and taking the pieces up in reverse order from the installation. Similarly, repairs can be made by removing the tile or planks starting from one side and working over to the area of the damage. A new piece can be installed to replace the damaged piece(s) and then the removed pieces can be re-installed.
Notice