The Many Benefits of Barrier-Free Showers
Explore the nuances of and best practices for creating these trending shower spaces
![]() Continuing Education
Continuing Education
Use the following learning objectives to focus your study while reading this month’s Continuing Education article.
Learning Objectives - After reading this article, you will be able to:
- Describe the connection between barrier-free showers and the design objectives of aging in place or living in place.
- Explain how barrier-free shower spaces comply with the Americans with Disabilities Act (ADA) design standards.
- Identify the basic elements and considerations for incorporating this more accessible barrier-free shower into a new construction or renovation project.
- Specify the right linear drain system for any given project.
Barrier-free bathrooms have been recognized as top bathroom design trends in both 2020 and 2021, and blogs galore in the design and construction industry tout their popularity. Some design trends start because there is a unique need in the market and then catch fire because the new solution is better in so many ways. The rise of the barrier-free shower is a perfect example of this phenomenon. First developed to accommodate the growing interest in aging in place spurred by Baby Boomers, barrier-free showers are now considered the next level in beautiful, luxurious interiors.
All images courtesy of Infinity Drain
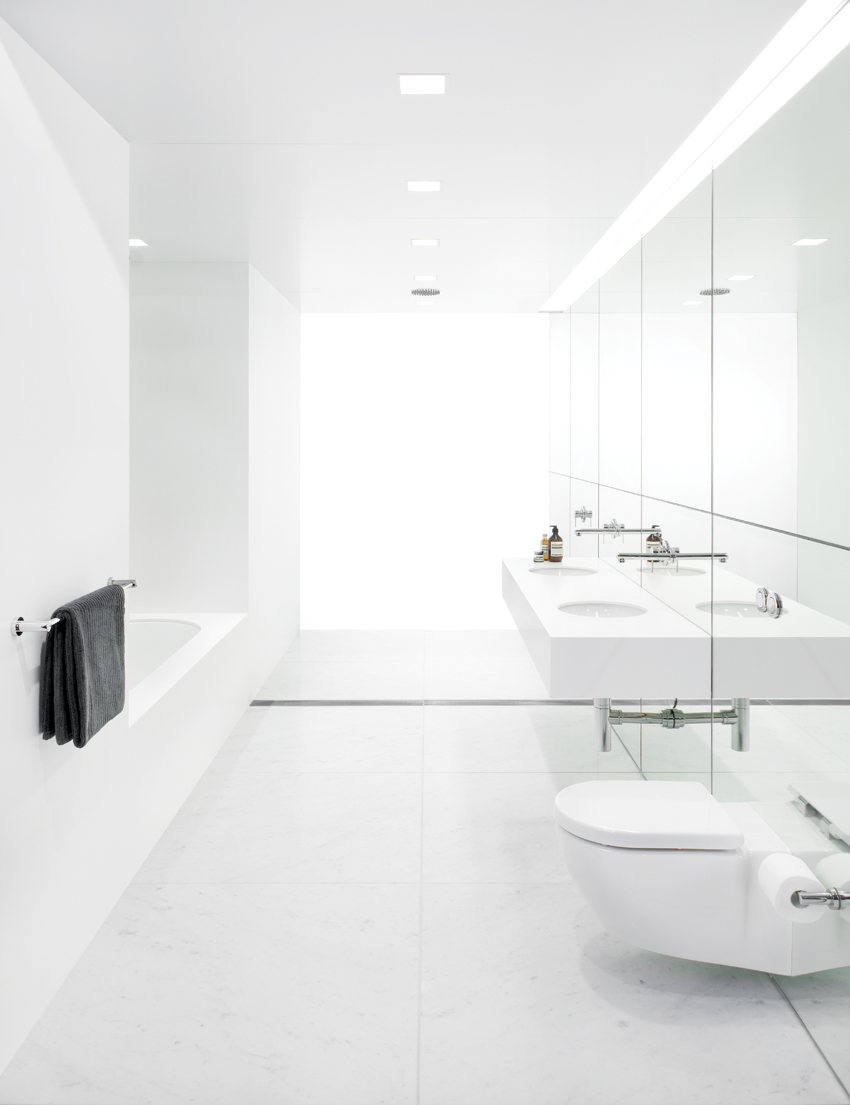
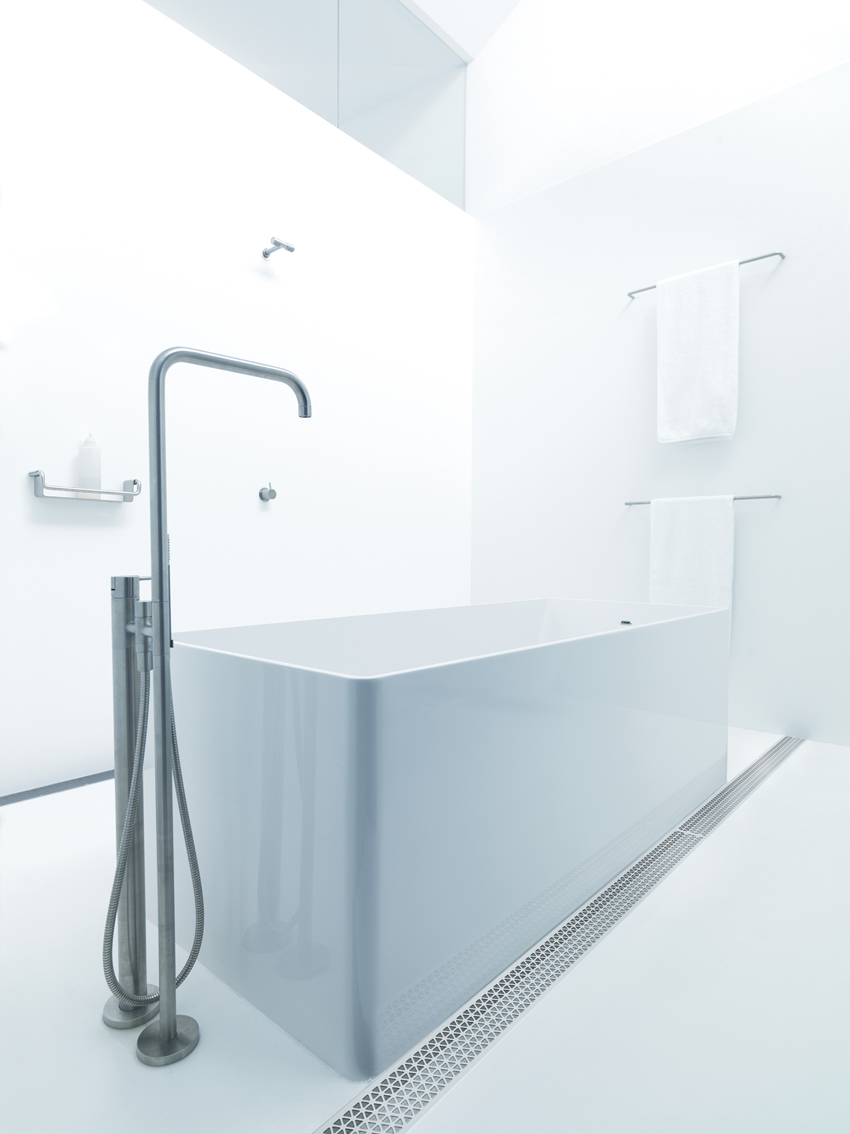
Barrier-free showers designed with a linear drain and single-slope floor pitch create modern and luxurious bathroom spaces that are more accessible and look larger.
This course will take a closer look at the benefits that this aging-friendly and now trending solution can bring to a bathroom, and a few important best practices that will help avoid some of the challenges that can arise during construction.
Introducing an accessible Barrier-Free Shower
The barrier-free shower, also referred to as the walk-in shower, zero-threshold shower, or curbless shower, is a growing trend in bathroom design. The distinguishing feature of this type of shower is that there is no obstacle at the threshold to step or roll over. Barrier-free bathroom design is often achieved with the use of a linear drain system and a single-slope floor pitch. A linear drain is a channel or trench that is built into the floor of the shower. It collects the water and delivers it to the drain outlet, which can be located anywhere along the channel length. With the floor sloped in one direction, the water is aided by gravity and rushes to the far edge of the space, where it is then easily processed.
This barrier-free design offers several benefits over the traditional shower-in-tub and bowl-shaped shower floor with a center drain. These include a more accessible bathroom for people of all ages and capabilities, the removal of a trip hazard, a better overall shower experience, and a shower space that looks larger and is easier to clean.
Beautiful, Bigger-Looking Bathrooms
The barrier-free shower trend may have started to deliver a more accessible type of shower area that made it easier for people to live in place, but it has evolved into an in-demand bathroom feature that allows these spaces to achieve a modern and luxurious aesthetic, while also being more accessible. Architects are finding that these barrier-free bathrooms enable them to use materials that did not fit into a conventional shower-with-a-center-drain solution, and the removal of physical boundaries at the shower eliminate the compartmentalization that before made the bathroom space feel smaller and broken up.
The move from a shower compartment with a standard central drain to a barrier-free shower with a linear drain affects the type of flooring that can be specified in the bathroom. The barrier-free solution offers architects the opportunity to use higher-end materials often found in ultra-modern interiors and five-star spas.
Here is why: When the shower flooring material must accommodate a central drain and four-way pitch, architects will often specify smaller tile or cut large- format tile on a diagonal and then pie-piece it together around the drain. When the shower floor slopes uniformly in one direction, as it does in a barrier-free application, the limitations on tile size and slab material are eliminated. Large-format tiles, stone slabs, or any solid-surface material can be used without being compromised or broken down into smaller pieces.
Barrier-free bathrooms also look bigger, and in real estate, bigger is always better. Instead of having a bathroom broken up into distinct areas, the barrier-free shower creates a seamless transition between the shower space and the rest of the bathroom. This makes the entire bathroom feel larger, even through the total square footage of the space has not changed.
The ADA design standards mandate that roll-in shower compartments shall not have any curbs or edges taller than 1⁄2 inch.
Enhanced Accessibility
Barrier-free showers are more accessible and uphold many of the universal design tenets that ensure products and spaces can be used by as many people as possible. With no curb or barrier obstructing the entrance to the shower, a barrier-free shower offers the most accessible solution for people of all ages, sizes, and physical abilities.
As evidence of this enhanced accessibility, the Americans with Disabilities Act (ADA) design standards specify three types of ADA-compliant shower enclosures. They are a transfer-type shower compartment, a standard roll-in shower compartment, and an alternate roll-in shower compartment. Only one of these ADA-compliant compartments, the transfer type, can have a curb at the enclosure threshold. Any curb or edge in the two roll-in shower compartments must be no taller than a 1⁄2 inch and beveled to make it easier to roll over. Designing a barrier-free shower enclosure would certainly satisfy the limited curb requirements of an ADA-compliant shower compartment.
The ADA also sets minimum guidelines for the size of compliant shower enclosures. The transfer-type shower compartment requires a minimum clearance of 36 inches wide by 36 inches deep. The two roll-in type compartments, which allow for a person to fully roll a wheelchair into the shower area, require a minimum clearance of 60 inches wide and 36 inches deep.
Please note that these measurements are absolute minimums. Larger spaces increase maneuverability and make bathing easier. A barrier-free shower enclosure can be created in any size, enabling architects to realize their design intents in these special spaces.
More Hygienic
Barrier-free showers are also easier to clean. Fewer surfaces, joints, and seams translates to fewer hiding places for mold, mildew, and grime.
More Comfortable Experience
There are a few reasons why the barrier-free, single-slope, linear-drain shower space delivers a more comfortable and refreshing experience than a center-drain scenario. With the center drain, users are often left standing on the drain or in a puddle of dirty water if the drain is slow or even slightly backed up. In addition, a traditional shower, where the drain is in the middle, features a floor with a 360-degree bowl-shaped slope, which creates an uneven surface to navigate while taking a shower. The single slope provides a much more even surface to stand upon and removes water from underfoot more effectively.
CASE STUDY: THE ARMONIOSA ESTATE
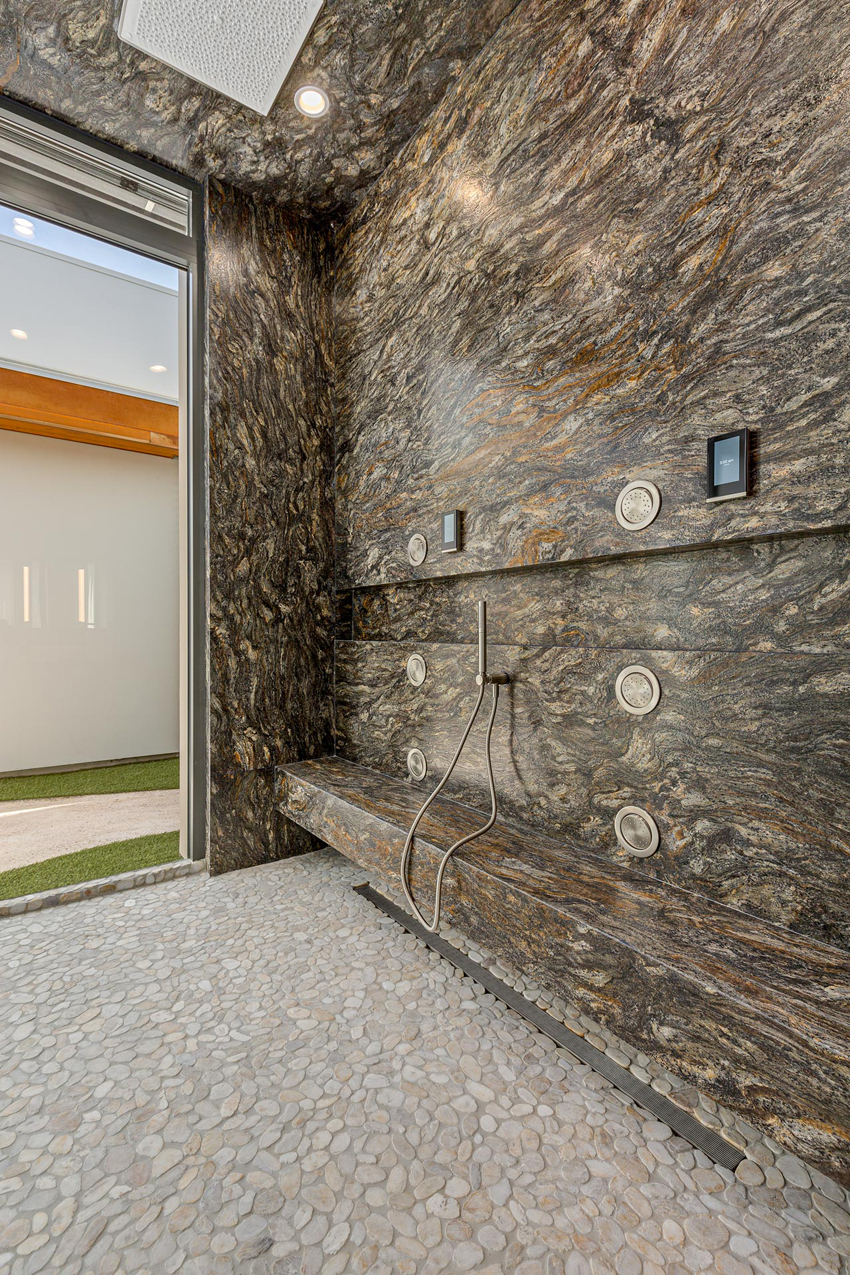
Barrier-free showers in the Armoniosa House were designed with a luxurious stone and marble aesthetic.
Architects are now incorporating barrier-free bathrooms into the most modern and luxurious interiors. The Armoniosa House, for instance, is a 10,000-square-foot estate built on a 2-acre lot in Las Vegas.
Designed in the modern minimalist style by architect Richard M. Cuen, AIA, of RMC Design + Planning with interiors by Kimberly Joi McDonald of Designing JOI and HGTV personality Donna Moss of Donna Moss Designs, this project features high-end materials that complement the desert atmosphere and a carefully curated art collection throughout the house. The grounds boast water ponds, palm trees, cacti sculptures, and a large swimming pool in the courtyard.
For this project, the experienced design team was tasked with delivering more than a stunning interior. The homeowners wanted their home to be a place where the indoor and outdoor environments existed in harmony with one another. The word “armoniosa” actually means “harmonious” in Spanish.
To that end, designers employed eco-friendly, sustainable, and Passive House design principles to create a project that preserved the well-being of the people in the house, operated with incredible efficiency, and controlled the environmental impact of the residence on the surrounding landscape. Much thought was also put into providing a seamless connection between the indoor and outdoor environments. The house’s facade features 6,000 square feet of glass walls that create the continuity between the interior and exterior living spaces desired by the homeowners.
This open concept was carried into the bathrooms as well, where gorgeous barrier-free shower spaces were designed with a luxurious stone and marble aesthetic, built-in seating, inset shelves, and a sleek linear drain.
Types of Barrier-Free Bathrooms: Dry/Wet versus Wet
When designing a barrier-free bathroom space, perhaps the first question that will need to be addressed is whether the bathroom is intended to be a traditional dry/wet space or a full-on wet room. The traditional dry/wet application refers to a bathroom where some space is designed to get wet and manage water, and other spaces are considered dry and not equipped. The wet areas require waterproofing elements and a drain. In a wet room, the entire bathroom is equipped to manage water, which means that the entire bathroom is waterproofed and sloped toward the drain, which is often located in the center of the room or against one of the walls.
While the combination dry/wet space has certainly been the de facto type of residential bathroom designed, the wet room is gaining momentum, especially as barrier-free and open showers continue to occupy space as the hottest bathroom design trends. In a 2020 House Beautiful article titled “What is a Wet Room Anyway?” Dan DiClerico, a home expert for HomeAdvisor, explains: “A wet-room bathroom is a bathroom where all or most of the surfaces are intended to get wet. It is a very space-efficient strategy, since it allows you to cram more functionality—open shower, tub, toilet, vanity—into the same amount of space.”
Beyond space efficiency, a bathroom that is equipped to handle water everywhere also makes a lot of sense, especially for anyone who has ever dealt with an overflowing sink or toilet or other plumbing issue that so often leads to water trespassing into other parts of the house and causing damage. In fact, in many places, like Europe, it is code mandated to have drainage in certain dry areas, such as near a toilet, sink, or water heater. When a water-related emergency strikes, having a floor drain handy offers a simple fix for something that could have been time- and money-consuming to remedy.
There is also an argument that can be made for a wet room being easier to clean. In bathrooms without floor drains, cleaning a bathroom floor requires both the effective application and removal of the cleaning solution. In a wet room situation, the bathroom can be sprayed down and squeegeed. The floor drain takes care of removing the water from the room.
A linear drain is an ideal drainage solution for both dry/wet and wet barrier-free applications.
CASE STUDY: ROCKET MORTGAGE FIELDHOUSE
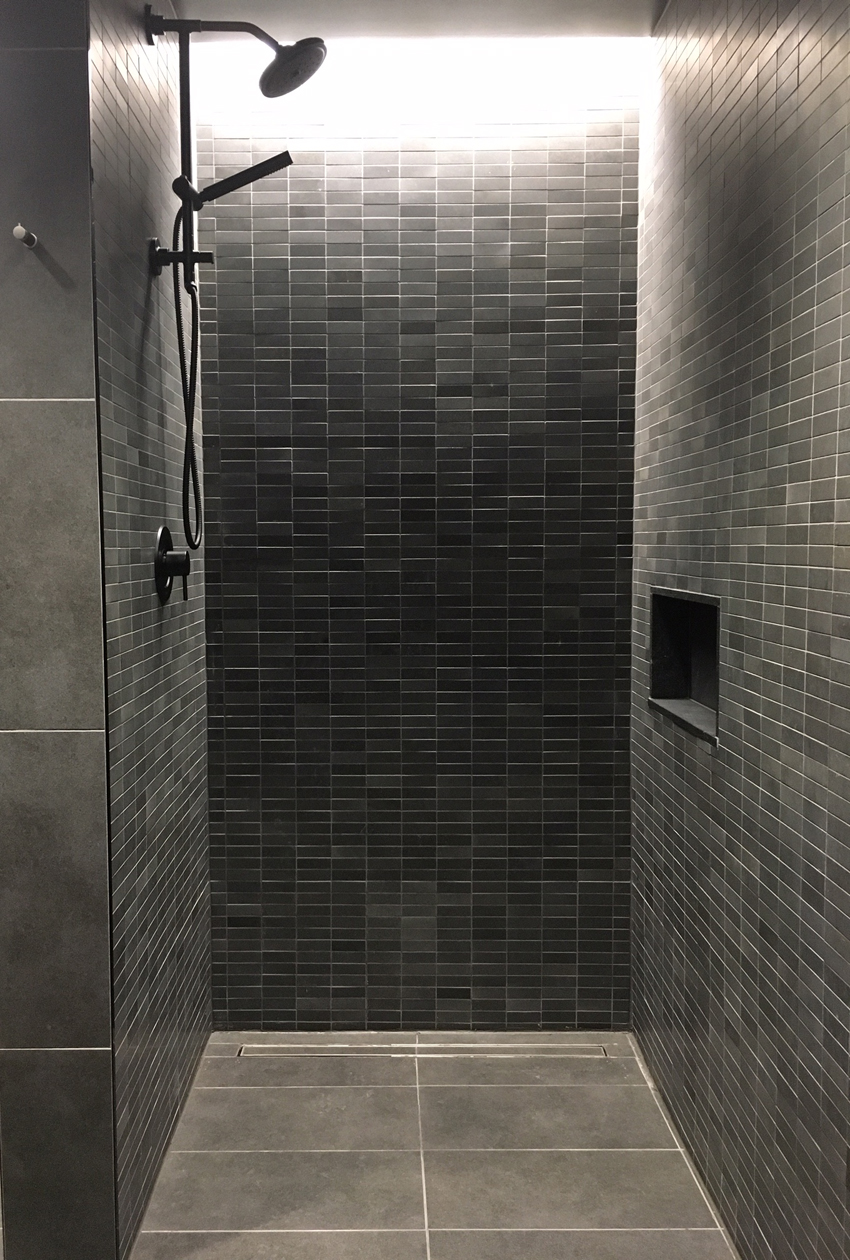
At Rocket Mortgage Fieldhouse, the entire bathroom was designated as a wet room, and the custom linear drains offer increased drainage capacity to accommodate the unique specifications of the NBA.
The Rocket Mortgage Fieldhouse is the home of the Cleveland Cavaliers. Constructed in 1994 as the Gund Arena, the stadium underwent a massive $185-million renovation in 2019, when it was transformed from its original design into the ultra-modern arena it is today. Architectural firms SHoP and ROSSETTI were tasked with creating a more contemporary-looking locker room where the Cleveland Cavaliers could get ready and unwind after home games.
Here are a couple of the highlights. The locker room is now three times bigger, and there is a state-of-the-art sound system. The individual lockers were upgraded with features like shoe compartments that have holes for aeration and hinge-free doors. They are even decorated with etchings of Cleveland’s cityscape. An LED board runs across the locker room so that Cavaliers Coach J.B. Bickerstaff can more directly control the mood of his team.
The decision was made to designate the entire bathroom as a wet room, which is a completely waterproofed area. This meant that the design would incorporate waterproofing measures that extended beyond the shower stall to encompass the whole wet-room area. Drains were incorporated into the shower, changing areas, under the sink, and in the adjoining floors, protecting the integrity of the entire locker room.
In the shower areas, a dramatic combination of subway and large-format tiles in deep grey were selected to create a beautiful and relaxing atmosphere. Specification standards set by the NBA demanded a shower drainage system that could accommodate taller-than-usual shower head heights and an increased drainage capacity to avoid flooding. The linear drains selected for this project were fabricated in a custom length to accommodate the unique needs of this space and the client.
In the end, the tailored drainage solution and the additional wet-room measures ensure that no water damage will occur in the bathroom during the regular use of this space by the team’s incredible athletes.
Designing a Barrier-Free Shower solution
Now that we know why barrier-free showers are exploding in popularity and the types of space where they are found, let us explore how the designs are developed.
One of the most critical objectives to achieve when creating a barrier-free bathroom that will perform as expected is to make sure that the floor heights between the shower (wet area), outside the shower (dry area), and the next room have smooth transitions. Of course, the way the area is waterproofed can pose a major challenge to achieving even floor transitions and a successful barrier-free design.
Step 1: Specify Where the Drain Will Be Placed
The location of the linear drain is another important decision to make when creating a barrier-free shower space. The most popular placement seen in linear-drain applications is to run the drain along the longest wall in the shower compartment, which is oftentimes the wall adjacent to the showerhead, but there are several other options that can be considered and a few common industry terms that will help an architect communicate where the drain should be placed.
Wall-to-Wall Installation
When talking about a linear drain installation, the phrase wall-to-wall indicates that the channel runs the total length from wall to wall, or the full length of the area. This type of installation is aesthetically pleasing as it creates a full and continuous run through an area. Functionally, a wall-to-wall installation prevents water from pooling in the corners of the shower and is an excellent drainage solution for a barrier-free shower when placed at the threshold of the shower.
Flush-to-Wall Installation
Another popular place to install a linear drain is flush against the shower wall. In this position, the drain is normally placed along the back wall of the shower enclosure or the sidewall where the shower head may be located, and water is directed away from the entrance/threshold. This approach removes the need for tiling between the drain and finished wall. It also provides a cleaner visual aesthetic, reducing the number of different layers present on the shower floor.
At the Shower Threshold
When the project calls for a barrier-free shower in a bathroom that wishes to maintain the traditional balance of dry and wet space, it is common to place the linear drain along the threshold of the shower to act as a floor drain for the entire bathroom area. In this scenario, a good wall-to-wall fit is critical so that water cannot flow around the drain and into the dry side. With this type of placement, it is recommended that the dry side of the bathroom be waterproofed and pitched slightly toward the drain.
When Renovating
When the barrier-free shower is being installed during a renovation, options for where the drain can be located may be restricted by certain site-specific conditions, such as the position of the existing waste line and floor-height limitations. For example, when removing a tub to create a large shower enclosure, the location of the tub drain may influence where the linear drain will be installed based on the existing waste line. Remember that, depending upon which way the floor joists are running, it may be possible to relocate the waste line closer to the finished wall.
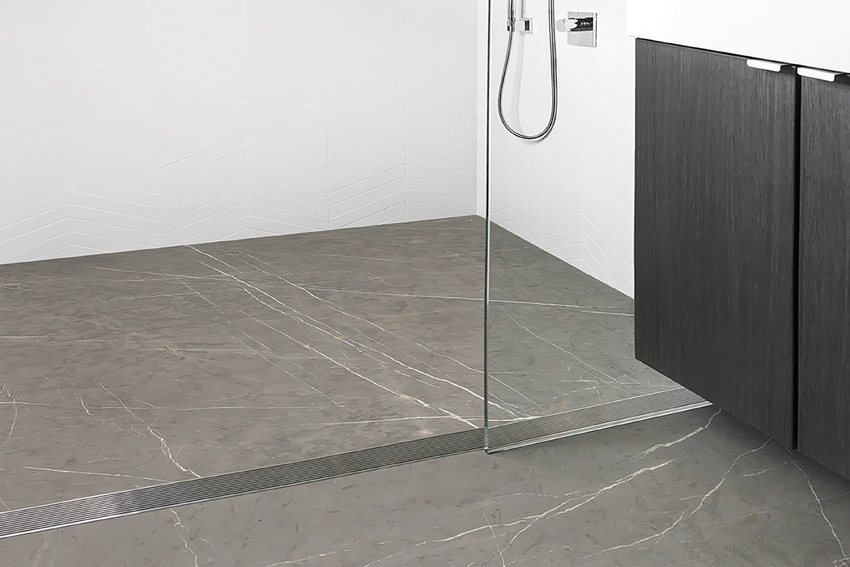
In a wall-to-wall installation, the linear drain runs from wall to wall, the total length of the room.
Step 2: Determine the Appropriate Waterproofing Method
The second step in designing a barrier-free shower space is determining the method that will be used to waterproof the bathroom.
Traditional Waterproofing Methods
Traditional waterproofing methods rely on the application of several layers of various materials to create a watertight solution in a tiled shower. The waterproofing effort begins with the installation of a mortar bed that is sloped toward the weep holes in the clamping floor drain. A waterproofing membrane, often called a pan liner, is then placed over this mortar bed layer and clamped into the drain.
Pan liners can be fabricated from metals, such as lead or copper, or a thick and flexible membrane often made of vinyl or rubber. In some regions of the country, specifically in Southern California, installers will also hot mop the installation. During hot mopping, layers of asphalt and roofing felt are applied on top of the pan liner to create an impermeable layer. Pan liners are not designed to take the direct application of ceramic or stone tile, so a second mortar layer is laid on top of it, and then the tile can be installed.
Accommodating all the different layers included in a traditional waterproofing installation requires a significant buildup of the floor height in the waterproofed area. This makes it difficult to deliver a dry/wet room where the floor heights are equal between the dry and wet areas, which is what is needed to create a barrier-free shower area.
This floor height demanded by traditional waterproofing measures also makes it challenging to create dry/wet and wet areas during renovations because there can be limited floor height available.
Where traditional waterproofing methods rely on a significant buildup in the floor, more modern waterproofing methods employ a liquid or fabric membrane that saves floor height.
Modern Waterproofing Methods
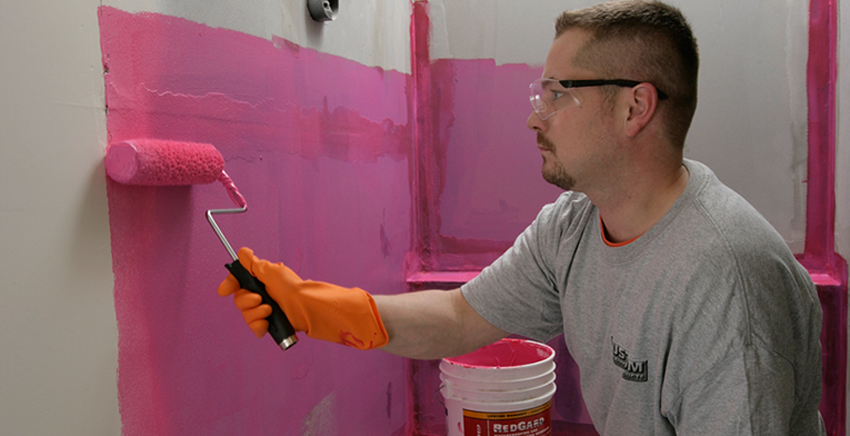
As the demand for barrier-free showers grows, new waterproofing methods are emerging that make it easier to create a level dry/wet floor. These more modern waterproofing methodologies employ either a liquid membrane or a fabric membrane as the waterproofing barrier. The liquid membrane has a yogurt-like consistency and is painted onto the target surfaces. When it dries, it hardens into a rubberized layer. Liquid membrane can be painted onto benches, niches, and even the dry area of the bathroom to create a wet room. The fabric membrane is a nonwoven fleece fabric that is applied to the sloped mortar bed using thinset.
Both the liquid and fabric membranes can have tile directly applied to them instead of requiring the secondary mortar layer. The benefit of these new materials is that they save floor height in the waterproofed area and makes it easier to deliver dry and wet floors that are equal in height.
Another difference between traditional and modern waterproofing is the tradesperson responsible for the installation. While plumbers have installed traditional waterproofing systems, the modern solutions are being installed by tile setters.
Stainless-Steel Shower Bases
Another innovation making it easier to deliver beautiful barrier-free showers is a stainless-steel shower base. This one-piece stainless-steel solution arrives to the job site ready to install and features an integral drain, pre-sloped floor, and is coated with a surface primer so it is ready for tile installation.
This component dramatically reduces that amount of time required to install a new bathroom shower and reduces the need for coordination between the trades. Here is a quick step-by-step explanation of this streamlined installation process. Adhere the base to the subfloor, then level and attach it to the plumbing. Complete the framing around the shower base and secure it directly to the framing. Backerboard is then mounted to the framing and seated on the flange of the shower base. Liquid or fabric waterproofing is applied over the backerboard down to the shower base. Finally, natural stone, glass, porcelain, or ceramic tile is applied to the walls and shower base.
“Waterproofing methods continue to evolve from the traditional to more time-saving solutions that eliminate steps and opportunities for mistakes. Stainless-steel shower bases are the innovative next step in this evolution that makes the installation process easier and the end-result stunning,” explains Jonathan Brill, president of Infinity Drain.
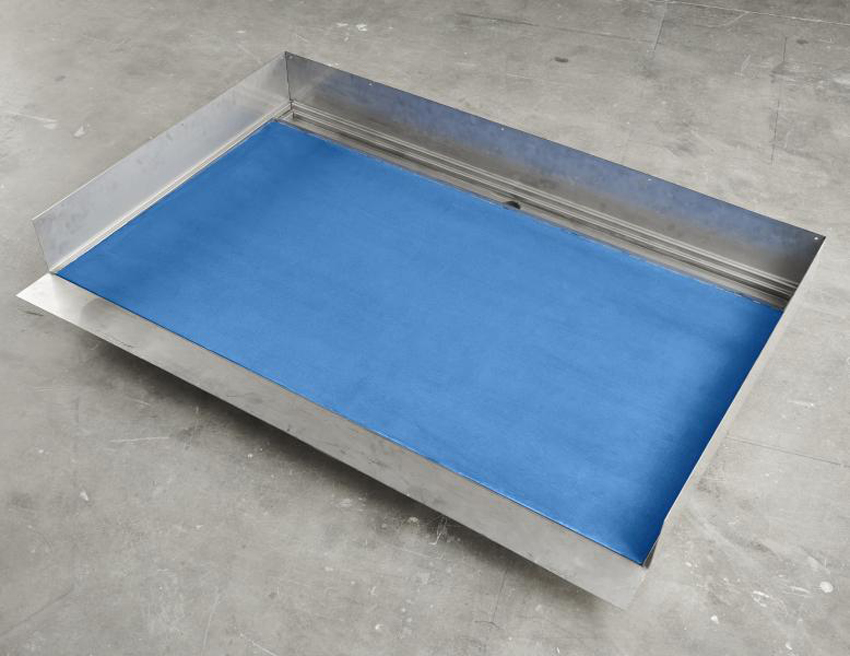
A stainless-steel shower base is an innovative new waterproofing solution that saves time and makes barrier-free showers easier to install.
Step 3: Select the Right Type of Linear Drain System
Once the waterproofing method has been identified, the next step is to select the linear drain system best suited for the project.
In its most basic form, a linear drain system is comprised of the channel and the grate. The layout of the shower area and the waterproofing technique employed on the job determines the kind of linear drain channel that can be used on any given project. There are four basic types of linear drain systems: the fixed-length linear drain, the site-sizable linear drain, the fixed-flange linear drain, and a universal linear drain.
The desired aesthetic coupled with drain placement within the shower area will inform the selection of the decorative grate.
Fixed-Length Linear Drain
A fixed-length linear drain channel is constructed from one single piece of either PVC or stainless steel, depending upon the manufacturer. These fixed solutions also feature a predetermined outlet location, which is either positioned in the center of the channel or offset, and the channels are pre-pitched in the direction of that outlet.
A fixed-length linear drain does not allow for on-site flexibility. When the system arrives to the job site, the size of the drain channel cannot be modified, nor can the location of the outlet be changed. Due to its inherent lack of flexibility, the fixed-length linear drain solution may not be the best choice for a custom home or high-end renovation, but it is a perfect fit for projects that prioritize speedy installation, such as large multifamily or hospitality applications. Since barrier-free applications require a wall-to-wall application of the linear drain system, especially when the drain is placed along the threshold of the shower, custom fabrication may be necessary to achieve the dimension of the shower opening.
Site-Sizable Linear Drain
Site-sizable linear drains allow for more flexibility during installation because both the length of the channel and the location of the outlet can be modified on-site. In fact, the length of the channel can be cut on-site, and the outlet can be located anywhere on the channel run, offering installers the ability to accommodate construction tolerances that can occur during a job.
Site-sizable linear drains may be available in either a PVC or stainless-steel channel. Some local municipalities such as New York, Chicago, and San Francisco require all-metal plumbing components, so the stainless-steel site-sizable linear drain would be acceptable.
A site-sizable linear drain is a good fit for a project that will be installed with traditional waterproofing.
Fixed-Flange Linear Drain
In a flanged linear drain system, the channel shape is different than the channel used in a fixed-length or site-sizable drain. As the name may imply, the channel in this system features a 1-inch flange on all four sides.
This type of linear drain is necessary when modern waterproofing techniques are used. With this system, the liquid waterproofing is either painted onto the flange edge or the fabric is glued to the edge, making the shower watertight. The tile is then applied directly on top of the channel’s flanges.
While the fixed-flange solution is designed to accommodate more modern waterproofing methods, the channel does not offer on-site flexibility. The channel arrives in a fixed length and is pre-pitched toward the centrally located or offset outlet. Similar to a fixed-length linear drain, custom fabrication may be required to achieve a wall-to-wall installation that prohibits water from traveling to the dry side of the bathroom.
Universal Linear Drain
A universal linear drain features a pre-pitched channel with a set length and central outlet location. This type of linear drain system can be specified without knowing the waterproofing technique that will be used on the job: the system works with either a shower pan liner or with liquid/fabric bonded waterproofing methods. This type of linear drain is not compatible with lead pan, copper pan, or hot mop waterproofing applications. Again, this type of linear drain is a set length and may not be appropriate for a threshold installation.
Flush-to-wall installations describe projects where the linear drain is installed flush against the shower wall.
Step 4: Select the Grate Style
In conventional shower spaces, including a shower floor with a four-sided pitch, a center-placed drain, and physical barriers at the threshold to keep the water in the wet area, architects do not often spend much time contemplating the drain that will be used. But linear drains offer a heightened aesthetic that can serve as a design element to enhance the overall look and feel of the bathroom.
This varies by manufacturer, but in general, there are four basic categories of decorative top grate styles: wedge wire, perforated, tile insert, and solid.
Wedge-wire grates have a traditional grid aesthetic. They are typically constructed of grade 316 stainless steel, making them the sturdiest of all the decorative grates. This wedge-wire-style grate can have a load rating of up to 2,000 pounds.
Perforated grates are unique in that they are available in several patterns to complement a wide variety of aesthetics. Typically, perforated grates are the least expensive option and may be constructed of grade 304 stainless steel.
Both wedge wire and perforated grates are ideal for barrier-free installations when the drain is positioned along the threshold of the shower enclosure.
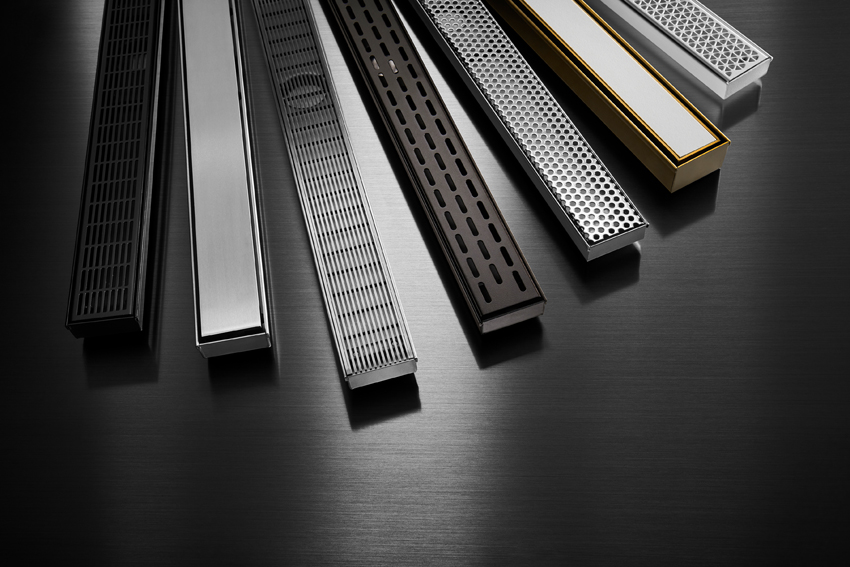
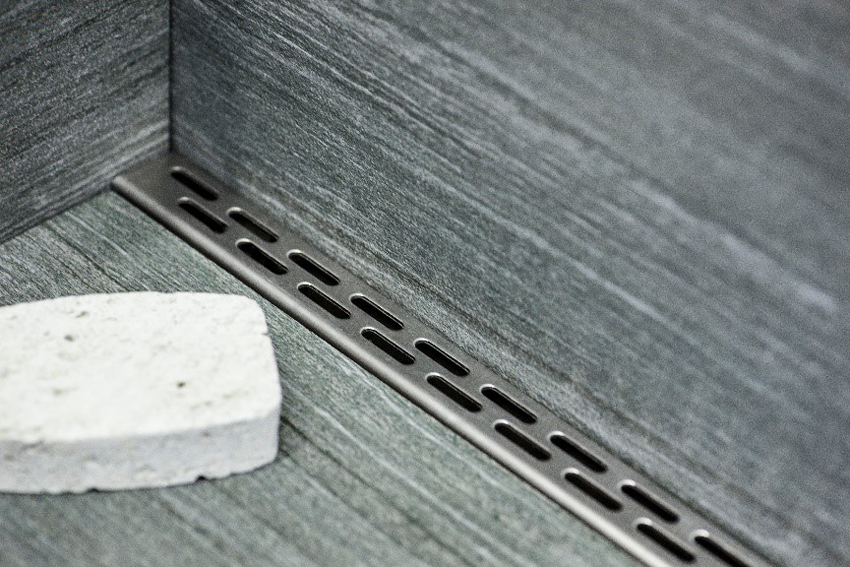
There are several styles of grates for linear drains, including wedge wire and perforated in several patterns.
The tile-insert grate is filled with the tiles used in the larger shower floor, which essentially allows the drain to blend in with the rest of the floor surface. The tile insert tray arrives on-site empty, and the tile setter creates a mini tile floor within the tray. In this style, there is a 1⁄4-inch gap between the tile frame and the linear drain channel. Tile-insert grates are not recommended for barrier-free installations when positioned along the threshold of the shower because of their lack of grate-free area. Water may skip over the plane of the tile insert grate and over to the dry side of the shower.
The solid grate option features a solid stainless-steel top. The water drains around the edges into the 1⁄4-inch gap on all four sides of the channel. This style can also be fabricated in glass. The solid grate option is also not recommended for barrier-free installations where the drain is located along the threshold of the shower.
Best Practices: Start Early, and Put a Linear Drain in the Drawings
When designing a barrier-free shower, perhaps the one aspect that surprises architects the most is how early in the design process the decision must be made. Unlike conventional showers that use curbs or physical barriers to keep the water in place, barrier-free showers depend upon more subtle and design-sensitive measures for water management. The success of the space is related to the height and slope of the waterproofed floors, which may not be something that an architect typically dives into the weeds on. Unfortunately, if the appropriate consideration is not given early on to determine whether the bathroom will be a barrier-free dry/wet room or a barrier-free wet room, decisions will be made about the type of waterproofing that should be used, often by someone other than the architect, and soon the structure of the area will not be well-suited to support a barrier-free space.
Also, while the popularity of barrier-free showers is on the rise, they are by no means considered the default style of shower. This means that any component in the barrier-free shower system that requires something different from a conventional, center-drained, four-way-pitched shower must be clearly addressed, otherwise the construction team will likely install the shower area the way it normally does, which again can be problematic. For example, the waste line is placed where the drain in the shower will eventually be located. If the waste line is installed in the center of the shower, as it commonly is to accommodate the center drain, it will be challenging to install a linear drain flush against the wall or at the threshold of the shower space.
Another important way that designing a barrier-free shower differs from a conventional shower is in the consideration that must be given to the drain. In a conventional shower space, the center drain is often not a detail specified by the architect. In fact, oftentimes the center drain a homeowner ends up standing on while he or she showers was selected by the plumber from the inventory of whatever happened to be on the truck that day. If the intention of the space is to have a barrier-free shower with a linear drain, the architect will need to include the linear drain in the specification.
Lastly, if the intent is to have a barrier-free shower space with a linear drain, it is critical that the intent be captured in the construction drawings. Anecdotally, there have been several instances where an architect loved the look of the linear drain and intended to incorporate it into a shower space, but put the conventional center-drain element in the construction documentation, so the space was built to accommodate a center drain. Unfortunately, swapping a center drain for a linear drain at the last moment is not recommended, as the two elements are not interchangeable.
In short, designing a barrier-free shower, in lieu of the conventional stall, requires more than a change of drain. Best practices have emerged that indicate that architects should consider whether they will be creating a barrier-free shower space early in the design process and then clearly communicate their intent down the channel and in their specification and construction documentation.
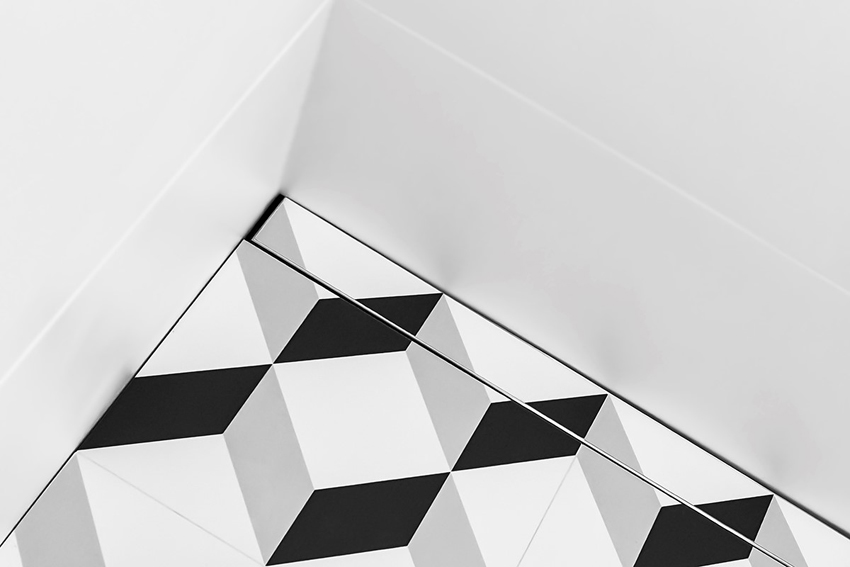
Tile-in drains disappear as if they are integrated into the tile (as shown), and a solid top grate provides a contemporary complement to modern shower design.
Conclusion
Barrier-free showers are being incorporated into more and more residences during new construction and renovation projects. This new design solution offers a wide range of benefits—making the shower space easier to use and more hygienic, enabling designers to use large-format tiles to create beautiful spaces that appear bigger, and ultimately delivering an all-around better experience to people of all ages and abilities.
Whether answering a client’s demand for aging-in-place accessibility or simply creating a sophisticated and luxurious interior, delivering a barrier-free shower that operates as expected can be achieved by considering three key elements. They are: a seamless floor surface at the transition points between the dry and wet areas, how the shower floor will be sloped to efficiently evacuate water from the space, and the drain selection.
To create this barrier-free space, architects must fundamentally change the way they approach the design and specification of a shower in a few important ways. The design of the bathroom, and the decision about whether it will be a barrier-free dry/wet area or a barrier-free wet area, needs to be considered much earlier in the design process, as it directly effects the type of waterproofing that should be used and the location of certain plumbing elements.
In addition, architects will need to be involved in the specification of the linear drain system. The channel of the linear drain will need to be compatible with the waterproofing technique used in the bathroom. There are two types of linear drain systems that work with the traditional waterproofing methods: fixed-length linear drains and site-sizable linear drains. The flanged linear drain should be used when modern bonded waterproofing techniques are employed. The universal linear drain is compatible with most mainstream waterproofing methods.
The grate styles in a linear drain system are decorative and can be selected to complement the nuances of the decor. Wider, more “open” grate patterns or styles are recommended when the drain is placed along the threshold in a barrier-free application. Tile-in drains disappear as if they are integrated into the tile, and the solid top grate provides a contemporary complement to modern shower design.
The design of the bathroom is evolving to be a better space for more people. With barrier-free showers, homeowners can experience improved accessibility and a more beautiful space, and architects already have all of the tools they need to deliver these best-of-both-worlds bathrooms.