How to Design With and Specify Western Red Cedar Siding
Many design choices are available with great performance attributes
![]() Continuing Education
Continuing Education
Use the following learning objectives to focus your study while reading this month’s Continuing Education article.
Learning Objectives - After reading this article, you will be able to:
- Identify the characteristics of real western red cedar related to appearance, durability, and versatility.
- Investigate the different types and grades of western red cedar siding and trim products related to appearance and performance.
- Recognize and select the different common profiles of western red cedar siding and trim for specific project applications.
- Specify appropriate finishes for western red cedar to create final colors, maintain the surface appearance, and support the natural durability of cedar.
The use of wood for interior and exterior surfaces in buildings is part of a long tradition in North America due to the natural abundance of trees and lumber as well as the acquired skills of woodworking professionals. Among the choices of wood species, western red cedar has been prized for its natural durability and stability (comparable to redwood) plus its natural beauty that comes from a fine grain and pleasing natural color. While western red cedar is a regional product of the Pacific Northwest area of North America, it is used in buildings around the world because of these fundamental attributes. The types of buildings that architects select it for include well-designed custom homes, multifamily buildings, commercial structures, retail settings, hospitality and resort facilities, museums, churches, educational facilities, and most other project types where beauty and durability are sought. Like all wood products, there are best practices borne out of years of experience for how to select, specify, design with, install, finish, and maintain red cedar. This continuing education article will explore some of the specific aspects of how architects can successfully, and elegantly, incorporate western red cedar siding and trim into a full range of new or renovation building projects.
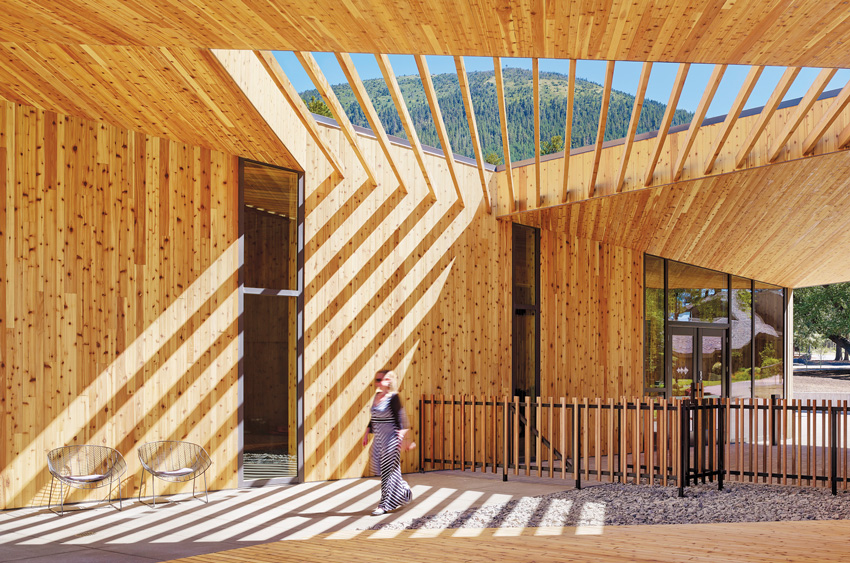
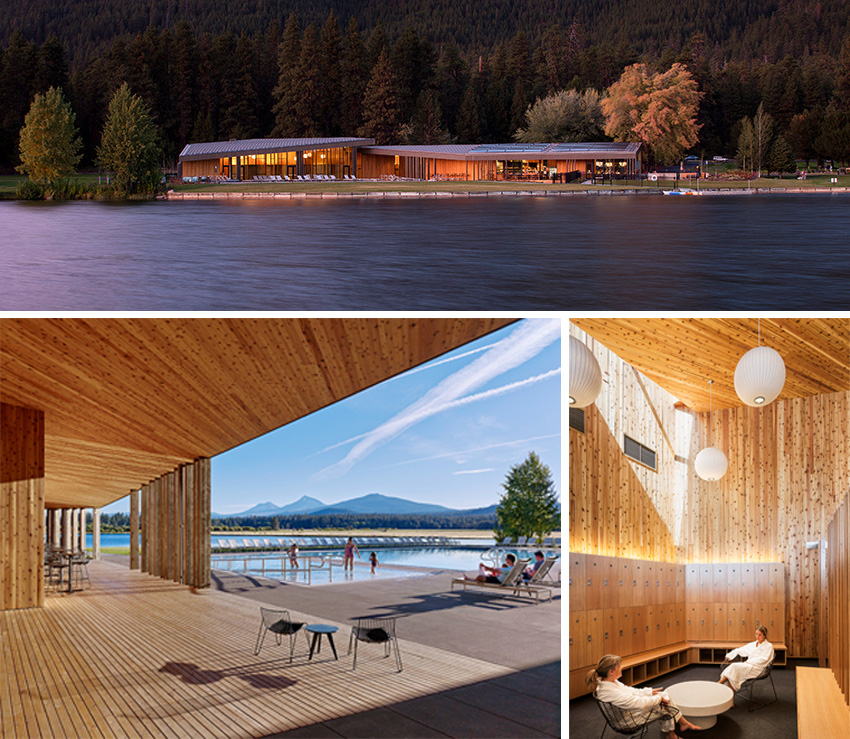
Lakeside at Black Butte Ranch by Hacker; photo by Jeremy Bittermann
Western red cedar is a regional product of the Pacific Northwest, Alaska, and Idaho areas of North America but it is used throughout the United States and around the world to create buildings of enduring natural beauty.
Characteristics of Cedar Siding
Architects, interior designers, building owners, and facility managers have been drawn to use western red cedar (WRC) for some specific reasons. These include:
- Appearance – Western red cedar is real wood with the corresponding authentic appearance of wood. Its grain and natural color have helped it to become regarded as a superior aesthetic imbued with decidedly crisp, yet superbly rich, tonal properties. Because of this superior look, it is often used as the basis for other, non-wood products, to imitate wood. Real western red cedar, however, can create sublime outdoor spaces, provoke cutting-edge architecture and inspire innovative interiors making it quite attractive for a range of design styles including traditional, contemporary, arts and crafts, and modern styles.
- Durability – Western red cedar is well known for its longevity and durability due to the natural makeup of the wood. It has been found to be naturally resistant to rot, decay, and insect attacks, which means anything built with it will last longer and require less maintenance.
- Versatility – Unlike some other wood species, western red cedar is pitch and resin-free. This means it's ideal for accepting and holding a wide range of wood finishes including stains, bleaches, traditional solid colors, and naturally beautiful semi-transparent finishes. Western red cedar also offers a wide range of sizes, surface textures, grades, and profiles—both standard and custom. Therefore, it is easy to incorporate into a wide range of design schemes and patterns.
- Sustainability – Independent studies prove that when it comes to environmental performance, natural wood is superior to synthetic products in every way. While other building materials generate greenhouse gases western red cedar trees actually remove greenhouse gases from the atmosphere. Further, unlike many manufactured or composite material, western red cedar is fully biodegradable at the end of its useful life.
Perhaps one of the best-known sustainability attributes of western red cedar is that it is a renewable resource when harvested and re-planted using sustainable forest practices. In fact western red cedar in North America is sourced from some of the most sustainably managed forests in the world. Siding and trim comes from the Pacific Northwest including Western Montana, Washington, Oregon, Idaho, Alaska, and British Columbia. The largest single source is British Columbia. The Provincial government owns 95 percent of the forest land. These forests are in turn managed by private companies who participate in sustainability certifications such as the Sustainable Forestry Initiative (SFI), the Forest Stewardship Council (FSC), and the Canadian Standards Association (CSA). The LEED rating system for green buildings now recognizes all three of these certifications.
In all, western red cedar provides a building material that is suitable for a number of uses. For purposes of this article, we will focus on its use as an exterior siding product and explore how to use these benefits to achieve excellence in design and construction.
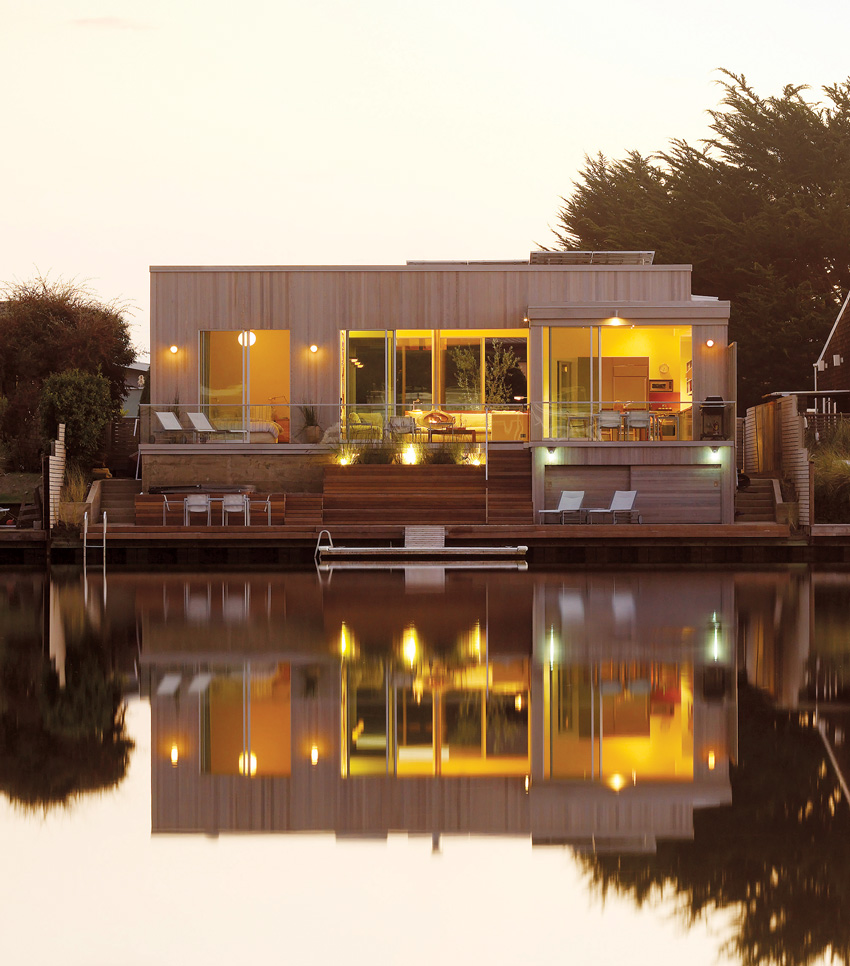
Seadrift Residence by CCS Architecture, Cass Calder Smith; photo: Matthew Millman; San Francisco, California
Western red cedar siding is known for providing great appearance, natural durability, considerable versatility, and proven sustainability.
Grades of Cedar Sidings
Wood is known to be as variable as the trees and forests that they come from. Therefore, the only proven way to specify qualities of wood is to base it on an independent, objective grading process that can categorize different grades of wood quality. This is commonly done for dimensional (structural) lumber based on standards by grading agencies such as the Western Wood Products Association (WWPA), West Coast Inspection Bureau (WCIB) and National Lumber Grades Authority (NLGA) with categories such as “Select Structural,” “Number 1,” “Number 2,” and others. However, when it comes specifically to cedar siding, this grading system for structural lumber and the categories used there do not apply. Instead, these agencies use a separate grading system which identify “Appearance Lumber Grades.” These grading systems use terms like “Clear Heart,” “A Clear,” “B Clear,” and others. The word “Heart” in the case of grading cedar refers to the inner wood in a tree as opposed to the outer sapwood between the heartwood and the bark. Hence, it is important at the outset to recognize that these different appearance grading categories are used.
The people who actually do the inspection of wood products include organizations like the West Coast Lumber Inspection Bureau (WCLIB) or, in Canada, the National Lumber Grades Authority (NLGA). These organizations publish their own rules for determining how to classify a wood product to a particular grade.
They also interface with wood product manufacturers to determine which grades apply to different products such as siding, trim, boards, etc., since not all grades are applicable to all products. Note that many cedar siding products are graded based on the smooth face of the milled pieces. However, some products are sold and used as a reversible item with the option of exposing the re-sawn back. Typically, there will not be a lot of quality difference between the two sides of siding products because they are simply processed differently to have a different face appearance.
It is also important to recognize that after products are graded, they aren’t necessarily sold in packages of only one grade. For example, some grades of siding are not sold only by themselves but are sold in lots with a mix of another, higher grade. In particular, straight B Clear grade is not typically available all by itself, but a small percentage may be included with the next higher grade, which would be A Clear.
In recent years, grading organizations have recognized that not all appearance wood needs to be clear, but that cedar with a knotty appearance is desirable too. While clear, tight grained heart wood generally provides a cleaner, more contemporary look suitable for many designs, knotty grades of cedar are more rustic in appearance and desirable for other design situations. And just as there are categories for grades of clear cedar products, there are also categories for knotty cedar products. (Note, however, that one designation, Select Tight Knot (STK), is not an official grade but a common trade designation. The proper grade classification is “Select Knotty.”)
Types of Cedar Sidings
With an understanding of the difference between structural grading classifications used for dimensional lumber and appearance grading classifications used for exterior cedar siding products, we can now look at the different types of cedar siding products available. They fall into four siding categories as follows:
Bevel Siding
Bevel cedar siding is used for horizontal siding applications in a common clapboard style on many building styles and types.
Western red cedar bevel siding is the most widely used siding type (also known as clapboard siding). It is produced by taking a rectangular sawed cedar board and re-sawing it at an angle to produce two pieces that are each thicker on one edge than the other. This manufacturing process results in pieces with one face textured by the angled saw cut. The other face is typically smooth. Bevel siding should only be installed horizontally, never vertically or angled, since it is not designed to accommodate water runoff in those positions. It is installed with the thin edge facing upward and the thick edge of the next piece placed over it with varying reveals (exposed face area) based on the nominal width of the siding (i.e., 4 to 12 inches). When done properly, it creates an attractive, consistent pattern accentuated by a shadow line with a spacing that varies depending on the width of the siding.
Bevel siding is available in both clear and knotty grades with the clear providing a premium quality appearance for upscale designs and the knotty siding providing a warm, casual, and rustic look. While continuous pieces of siding boards are the norm, it is also possible to use finger-joined bevel siding in clear grades. The finger-joined process allows the bevel siding to be available in longer lengths up to 16 feet, which installers appreciate for the speed and ease of construction with fewer field joints. In most cases, the precision-fitted finger joins are virtually invisible.
Seven grade levels apply to bevel siding. Clear Vertical Grain (V.G.) Heart is the premium grade with a smooth face and all vertical grain sawing with no growth characteristics visible (such as small knots or other grain interruptions). A Clear and B Clear grades allow slightly more characteristics and are of mixed grain. As noted, B Clear is usually only sold as a portion of A Clear siding lots. Clear Rustic grade bevel siding does not have a smooth siding face but instead offers a sawed textured appearance. This grade allows for limited growth characteristics that do not detract from its serviceability, making it middle choice between the clear grades and the knotty grades. Moving to the knotty grades, the premier version is Select Knotty, which includes knots that are sound and tight. It is usually available with a textured face. Smooth face may be available by special order. Lots of Select Knotty may include some amount of the slightly lesser grade Quality Knotty, although Quality Knotty is not typically sold as a grade unto itself (similar to A Clear and B Clear lot sales). Finally, there are proprietary product standards such as Architect Knotty, which is defined by the Western Red Cedar Lumber Association as containing no open characteristics or through defects. It allows the use of adhesives on the reverse side to secure knots and is particularly well suited for factory priming or finishing.
Pattern Siding
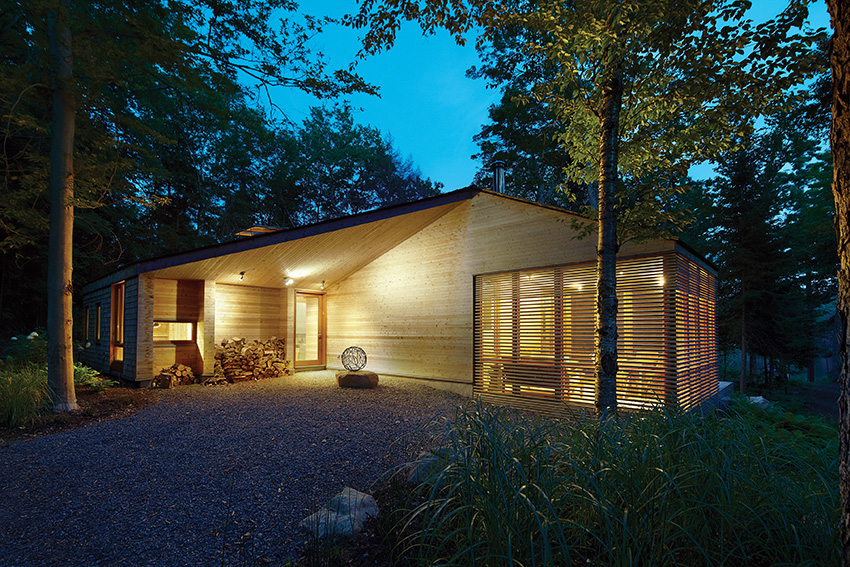
Stealth Cabin by superkül; photo by Shai Gil Fotography
Pattern siding in tongue and groove style can be used in horizontal or vertical orientations to create dramatic effects using clear or knotty grains.
The tradition of wood siding in North America has not been limited to clapboard or bevel siding. Recognizing this, cedar siding is available in two other patterns or basic shapes. The first is tongue and groove siding, which is known for its versatility since it can be installed horizontally, vertically, or diagonally with each method providing a distinct and different look. The joints between the siding pieces can take slightly different forms to allow very tight, narrow joints or slightly wider joints producing a shadow line. Commonly available sizes include 1x4, 1x6, 1x8, and 1x10 in various lengths in seasoned (kiln dried) form. The face of tongue and groove siding can be smooth or saw textured, often produced as reversible.
The second type of pattern siding is shiplap siding. It is similar to tongue and groove but is milled to create a profile such that each board partially overlaps that of the next one. This produces a flat vertical surface with shadow lines, excellent weather protection in all orientations (horizontal, vertical, or angled), and a means to allow for dimensional movement. Channel rustic is a common shiplap profile. Available sizes include 1x6, 1x8, 1x10 and 1x12 in various lengths. It is normally provided in seasoned, knotty grades with a saw textured face, although clear grades can be manufactured to order. Shiplap patterns are produced and graded to the intended exposed face.
Pattern siding is produced in five grade levels. Clear Heart grade is the highest grade with only heartwood on the exposed face. A Clear grade is the same as discussed for bevel siding with some limited imperfections allowed and some B Clear grade included in packaged lots. Select Knotty is again the premium level of the knotty grades with an allowance for some Quality Knotty grade to be included in lots. In some cases, however, the boards may need to be trimmed on the site to yield suitable quality for a particular project. In addition, there are proprietary product standards available such as Architect Knotty and others—check with suppliers for more information on those.
Boards for Siding and Trim
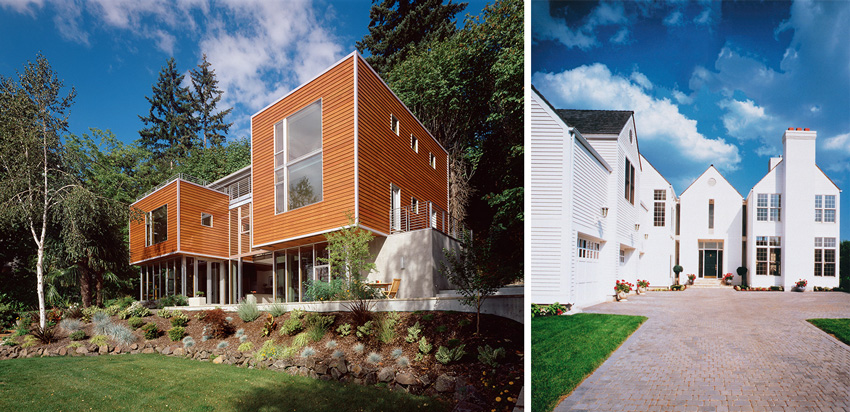
No. 1864 by M-Projects with Larson Shores; photo: Ethan Kaplan
Board siding can be used creatively to create a vertical finish with clean lines and texture.
Flat, milled boards of cedar play a role in siding in two ways. First they can be used to create board and batten siding, which uses wide boards run vertically and narrow boards covering the joints. While a common combination is the use of 1x3-inch battens over 1x10-inch boards, many different sizes are available ranging from 1x2 to 1x12 inches and can be combined to satisfy different design aesthetics. In some cases, the pattern can even be reversed with the battens installed first and the boards over the top to create a recessed channel. In any case, board and batten siding is usually rough sawn, although boards can be smooth surfaced on one face and two edges (designated as S1S2E).
The second use for cedar boards on exteriors is to provide trim for corners, fascia, soffits, windows, doors, and other common trim conditions. As with most other wood trim, cedar boards are available in a variety of sizes including nominal thicknesses of 1, 5/4, and 2 inches and nominal widths between 2 and 12 inches. They can be smooth surfaced or rough sawn textured on the face and can have three or four edges smooth surfaced (S1S2E or S4S designations).
Because of the variety of uses and options, boards can be categorized into any of nine different grade levels—the most number of grade levels for a cedar product. Similar to pattern siding, Clear Heart, A Clear, and B Clear grades are used in the same manner for boards. In addition, two others are also available in C Clear and D Clear with D Clear grade normally only being sold as an acceptable portion of a C Clear lot. These lower grades are still considered quality lumber suitable for exterior building trim and other very visible uses, but they require more jobsite trimming than higher grades. Cedar boards are also available in knotty grades including Select Knotty, Quality Knotty, and proprietary product standards like Architect Knotty—just like for pattern siding.
Choices of Siding Profiles
When using cedar siding on a building project, the design process can include selecting a siding type and grade based on our discussion thus far, but the next step is to choose a preferred profile. As a wood product, WRC can be milled or shaped into many different profiles related to the type of siding selected. The WWPA and WRCLA have published a listing of “Standard Patterns” showing specific profiles and shapes. Some of the most common ones are reviewed here, but others are available, including custom profiles by WRCLA manufacturers.
- Beveled siding: Beveled siding can be milled in a standard beveled shape or can include a rabbeted drip edge along the bottom of the siding. Clear beveled siding is available in thickness of ½ inch, 11/16 inch, and ¾ inch and widths of 4, 6, 8, 10, and 12 inches depending on the specific grade. Plain bevel, knotty grade siding is available in thicknesses of 5/8 inch, 11/16 inch, ¾ inch, and 7/8 inch, and widths of 6, 8, 10, or 12 inches. Rabbeted bevel knotty siding is generally thicker at 11/16 inch, ¾ inch, or 5/4 inch, and in widths of 6, 8, 10, and 12 inches. The very rustic looking wavy edge bevel siding is also typically a thicker and wider product at 7/8- and 15/16-inch thicknesses and 8-, 10-, and 12-inch widths.

Some standard tongue and groove profiles that are available in grades of Clear Heart, A Clear, or Select Knotty as shown above.
- Patterned siding: While tongue and groove or lap siding profiles are fairly common among different wood products, there are some subtle details to the shape of the boards that can have a noticeable design impact. In tongue and groove siding, for example, the shape of the protruding tongue and the recessed groove to receive it from an adjacent piece are fairly standardized to be functional. However, the area right around either of these shapes influences the finished appearance. Flush joint (center matched) patterns produce a tight, monolithic appearance. A V-joint on one or both sides of the tongue and the groove edges provides a different visual look. Other shapes along these edges, like fine line (1/8 inch) are possible too, to provide more variety in the way that lines of the siding are portrayed. In virtually all cases, however, nominal 1-inch thick boards are available in 4-, 6-, 8-, and 10-inch widths.
Lap siding profiles can vary a great deal to provide some very interesting and unique three-dimensional looks. They are also shaped to assure a good overlapping joint that will provide the appropriate weather resistance for siding. As such, they are available in a variety of thicknesses to suit the three-dimensional appearance sought, ranging from a fairly flat or thinner profile to a thicker, simulated “log cabin” look. Regardless of the thickness and the details of the lap pattern, most lap siding is available in 6-, 8- 10-, and 12-inch widths.
- Vertical Siding: As noted earlier, not all siding should be used in vertical configurations. Bevel siding profiles are not appropriate for this installation, even when rabbeted, but board and batten siding works well in vertical designs. Tongue and groove and lap profiles are specifically created to provide interlocking or overlapping joints that make them suitable for all orientations, whether horizontal, vertical, or angled.
- Cedar for Rainscreens: An increasingly popular installation method is to use a rainscreen over a continuous water and air barrier applied to a substrate sheathing. The concept, well proven for many types of buildings, is to allow the outer cladding to “breathe” and allow moisture to drain harmlessly to ground below via gravity. That process requires a gap between the cladding and the barrier to function properly. Western red cedar siding of almost any profile can be used as the cladding in a rainscreen wall assembly, provided it is installed over something to create that needed gap and not directly to the sheathing. The most common method is to use vertical furring strips that are secured over the barriers and into the sheathing and framing at appropriate spacing. The siding is then installed onto the furring strips, creating the needed gap and allowing water and air to flow behind the siding as needed.
In some cases, rainscreens, or even conventional wall assemblies, include continuous rigid foam insulation over the sheathing substrate. This has implications for the installation of the cedar siding and recommended practices published by the WRCLA or the supplier of the siding should be consulted.
Fasteners for Cedar Siding
All siding and cladding products require proper fastening as a critical component for proper performance and appearance over time, and western red cedar siding is no different. On this point, there are some very well developed best practices that should be followed whenever cedar siding is used to assure the intended results are achieved.
The first thing to be aware of is that hand nailing of cedar is recommended instead of pneumatic nailing. This protects the appearance and helps prevent damage from improperly set pressures on nailing guns. The second, and always critical point when working with wood, is the fastener spacing. Typically the spacing for studs or nailing framework is a maximum of 24 inches on center, with 16 inches being common. Nails need to be selected in a size that allows them to penetrate into framing members, not just the sheathing, a minimum of 1¼ inches. The actual size of the fasteners is thus based on the type and thickness of the cedar siding used.
Fastening is an important detail for the successful installation of all types of cedar siding with “splitless” ring shank siding nails of appropriate thickness and length to suit the siding type used.
The actual fasteners require some attention to detail in specifications and in the installation of cedar siding. High quality “splitless” ring shank siding nails are recommended for proper holding power. Textured heads are also recommended to reduce any glossy appearance of the nail head. Stainless steel is the best choice—number 304 stainless for general siding applications and number 316 for seacoast exposures. These are the least likely to corrode and cause visual or performance issues. Hot-dipped galvanized nails as per ASTM A-153 or aluminum fasteners are also corrosion-resistant and can be used as well if preferred. Electroplated and mechanically galvanized fasteners are not recommended since they can rust, disintegrate, or react adversely with the natural preservative present in cedar, thus resulting in stains and streaks.
Finishing Cedar
Western red cedar has a natural beauty that is either enhanced or preserved by using finishes. There are a full array of choices on the type of finish but the first thing to remember is that wood, like many building materials, cannot be taken for granted when it arrives at the project site, In order to assure that the finished, installed siding looks the way it is supposed to, a few general recommendations need to be followed. The most critical one is that cedar siding needs to be stored properly onsite. That means the humidity and temperature should be monitored or controlled first to be sure the wood does not react unduly, but also to allow it to acclimatize before installing. Additionally, if the siding is specified as unseasoned (moisture content of 20 percent or more), then it needs to have time to season properly so that any onsite finishes will be accepted and penetrate the wood grain. The recommended moisture content level at the time of finishing is 12 percent or less, which is typically best achieved through kiln drying at the time of manufacture. Of course, if pre-finished cedar siding is used, then the wood has presumably been properly seasoned and stored, minimizing the sensitivity to site issues as well as saving time during construction.
For cedar siding that is finished onsite, there are essentially four choices to consider regardless of type, profile, or grade:
- Unfinished Siding: Although this choice is not very common, it is quite possible because of the natural ability of cedar to resist deterioration. Over time, it mellows to a naturally weathered silvery grey color on the surface. This may be desirable for reasons related to design, practicality, or sustainability, but it also has some other implications. First, all cedar siding will need some maintenance and any contaminants such as dirt or mold need to be cleaned promptly to avoid damage to the surface. Second, cedar does not weather uniformly in all climates, so it may develop spots or dark blotches. Third, if the decision is made later on to finish the siding after it is weathered, some extensive preparation may be needed to clean and restore the exposed face of the siding first so that a finish can be successfully applied.
- Clear/Transparent Finishes: A clear finish is sometimes used because it preserves the appearance of the natural cedar with minimal change in the color of the wood. Clear finishes are available in water-based or solvent-based formulas, and additives such as fungicides and UV filters can be included for enhanced protection. However, while clear finishes work great on indoor applications they do not resist ultraviolet degradation from the sun in exterior siding. Hence, they will need to be reapplied regularly, usually about once a year. Fortunately, the surface preparation to do so is usually fairly simple. Nonetheless, it will need to be done. Note that transparent, non-flexible, film-forming finishes such as lacquer, shellac, urethane, and varnish are not recommended for exterior use on western red cedar.
Mountain Mall by Centre Sky Architecture, Ltd; photo: Ryan Day Thompson
Semi-transparent stain is used on this resort building in Montana to create a natural, stunning appearance.
- Semi-transparent Finishes: There are two types of semi-transparent finishes, solvent (oil) based and latex (water) based. The solvent-based stains penetrate the wood and do not form a film like paint does and are often considered the best choice for exposed, natural-looking, exterior, cedar siding. They can typically be applied in one coat on smooth face or two coats on textured face with a longer service life than fully transparent stains (two to six years). Latex semi-transparent stains are similar in appearance to solvent-based stains but they don’t penetrate the wood in the same way. Instead, they create a thin film on top which tends to degrade over time and flake off from the surface. That means the surface preparation to re-coat with these latex stains is more involved. Manufacturers are developing better water-based stains in the interest of sustainability and improved longevity, so it is worth checking with suppliers on the latest available products.
- Solid Body/Opaque Finishes: In some cases, paint or solid color stains are desired over cedar siding and/or trim. The first thing to recognize here is that some of the same natural characteristics that make cedar durable can also create unwanted staining of opaque finishes. Therefore a stain-blocking primer coat is always needed when any opaque finish is used. The best way to have that primer applied is in the factory where it can coat all sides of the wood under controlled conditions and assure a uniform, consistent covering. Then, either an exterior paint or solid color stain can be applied, either in the factory or in the field. If applied in the factory, it typically comes with a warranty on the finish on the order of 15 to 25 years depending on the number of top coats. If applied in the field, the warranty, if any, will be based on the manufacturer of the finish.
As with semi-transparent stains, primers, paints and solid stains are available in water-based (latex and acrylic) and solvent-based (alkyd and oil-modified) formulations. It is critically important that the type of primer and the type of final finish are the same—i.e., no oil-based paint or stain over latex primers since they are not compatible. Solid color paint over the proper primer will provide the most control on the final color and the most surface protection of the wood. Solid color stains have similar characteristics but can allow more of the texture of the cedar to remain. There are also some semi-solid stains that reveal the wood grain with an effect on the wood between that of semi-transparent and opaque stains.
Clearly there are many options for creating a final design appearance for a building with cedar siding. However, regardless of the finish type, the final design details and the exposure to variable weather conditions will ultimately impact the actual service life of finishes.
Conclusion
The exterior finish of a building is the visible face that is most often experienced by the people who use the building and the general public. It is a significant and integral part of the total design of a building and a critical component in the long term weatherability and durability of the building. Western red cedar siding is a wood siding choice that benefits from a well-developed industry with the experience and the offerings to provide a variety of versatile products to work with. Understanding the types, profiles, and grades of cedar available can help architects create designs of virtually any style. Recognizing the inherent durability and characteristics related to fastening and finishing allows specifications to be written to assure long lasting results. Overall, western red cedar is a sustainable material of choice for siding on projects of all types and in virtually any location around the world.
PROJECT: LAKESIDE AT BLACK BUTTE RANCH
Photos courtesy of WRCLA: Western Red Cedar Lumber Association/Jeremy Bittermann
Location: Black Butte, Oregon
Owner: Black Butte Ranch
Architect: Hacker
Structural Engineer: Madden & Baughman
Project Type: Resort facility
The Project: Black Butte Ranch is a destination resort community that sits in between the Cascade Mountains with sweeping views of seven prominent mountain peaks. At the northern tip of the ranch is Big Meadow, which is home to horses and cattle—the origins upon which the ranch was founded. Further south lay dense ponderosa and aspen tree forests which affords privacy for the community, as well as a natural setting characterized by a close relationship to nature. Distinguishing Black Butte Ranch is its adherence to the history, character, and environment of the surrounding area, all of which have been crafted into the design and ambiance of the buildings, golf courses, and other planned areas. Located in the heart of the ranch property, the Lakeside pool and spa facility features dramatic views, shade from the summer sun, walk-up counter service for the bistro, a 24-person hot tub, sauna, and fitness room. The goal for this project was to revitalize this Lakeside facility, giving new life to the original main lodge and pool area, and setting a new standard for resort design in the region.
The Design Challenge: The architect found the primary challenge was to honor the natural setting of the site: a sublimely beautiful volcanic landscape where people can see newly formed land before it is eroded by time. The area borders the moist climate of the Cascade Mountains to the west and the crisp, dry air of the high desert to the east. “Such a beautiful and pristine site presents a profound responsibility to design buildings that not only complement but also enhance their surroundings,” says Corey V. Martin, design principal at the architectural firm Hacker who designed the renovated the Lakeside facility.
The Design Solution: The architect was inspired by the naturally beautiful site to design the ranch in a way that builds upon and preserves the surroundings. This deep appreciation for the land led Martin and his team to ensure all aspects of the project minimized energy use and environmental impact. They achieved this by integrating green design, energy efficient technology, and, of course, choosing wood from sustainable resources. Their main priority was selecting a wood species with proven performance. Select Knotty cedar was chosen for the award-winning project, offering a warm texture that harmonizes with the natural environment. The fact that Western red cedar is also really beautiful served as an added bonus. “The project was designed with this material in mind, and its use is integral,” explains Martin. “Another material would have felt foreign to the place and the concepts we were working with.”
The Results: Referring to the owners of Lakeside, Martin states, “They understood why western red cedar was the right material for this place, but they did not realize that it could be used in such a dramatic way, so the project has exceeded their expectations for quality and beauty and garnered much attention because of it.” It’s no surprise Lakeside at Black Butte Ranch has earned multiple awards. This vacation ranch building brilliantly blends Western red cedar based architecture with the breathtaking landscape.
Peter J. Arsenault, FAIA, NCARB, LEED AP, is a practicing architect, green building consultant, continuing education presenter, and prolific author engaged nationwide in advancing building performance through better design. www.linkedin.com/in/pjaarch
|
|
The Western Red Cedar Lumber Association represents quality “Real Cedar” producers, distributors, and retailers throughout North America. Founded in 1954 and known as “the voice of the cedar industry,” WRCLA offers extensive resources to assist with selection, specification, application & quality standards. www.realcedar.com |