Projection Screens Made Simple
The basics of providing a maximum viewing experience
![]() Continuing Education
Continuing Education
Use the following learning objectives to focus your study while reading this month’s Continuing Education article.
Learning Objectives - After reading this article, you will be able to:
- Discuss the various factors that must be considered in selecting or specifying a projection screen for a specific project.
- Identify four viewing categories that conform to standardized ANSI/
INFOCOMM 3M-2011. - Explain the implications of the relationship between the gain of the screen surface and the projector throw distance ratio on image quality.
- Specify the correct screen format, size, model, and viewing surface for a given type of presentation.
Audiovisual (AV) communication is critical in today's world. Business, medicine, entertainment, and education are just a few fields that depend on AV technology to inform, teach, and train their constituents. Rather than the traditional lecture model, AV creates a stimulating and interactive environment which is more conducive to learning. According to the U.S. Department of Labor OSHA Office of Training and Education, “retention of information three days after a meeting or other event is six times greater when information is presented by visual and oral means than when the information is presented by the spoken word alone.”
Maximizing the learning potential of the AV experience involves designing an effective projection environment. Today, that environment depends heavily on the right projection screen, even more so than the type of projector. There are many types of projection screens on the market today, but effective screens share a common trait: They reproduce an image so that everyone in the room can see it—or read it—easily. Choosing the screen that can attain that objective can be a complicated process however. This article will present an overview of projection screens and serve as a primer on the various factors that must be considered in selecting the appropriate screen for a given situation.
What You Need to Know: The Basics
Effective purchasing decisions depend on a variety of factors, including budgetary considerations, the size of the room, type of presentation, as well as more technical concerns including the screen type, screen size, aspect ratio, screen model, and viewing surface for the application. Before a projection screen can be properly selected, systems designers must know what type of content will be viewed and if the system will be used in various ways. Other considerations include the seating configuration, ambient light levels around both the screen and the viewer, and the dimensions of the viewing room, including ceiling height.
 |
The projection screen is a major influence on the quality of the viewing experience. Photo courtesy of Draper Inc. |
Screen Types
Screen type is a basic building block of an effective projection environment. There are five basic screen types.
Electric Screens
Screens are motorized to facilitate lowering and retracting the viewing surface. There are two basic styles: recessed and surface mount. Recessed screens are installed above the ceiling with the bottom of the screen case flush with the finished ceiling. Some of these have trim flanges as part of the case construction that helps complete the installation. Certain models have trap doors to conceal the slot from which the fabric travels while other models are designed to have an open slot at all times. The units with trap doors have either gravity-operated doors or motorized doors. The screens with open slots will have smaller cases and are less expensive.
Some recessed electric screens have two-piece construction; the cases may be shipped, installed, and wired in advance of the viewing surface. The case can be installed during the construction phase without the possibility of damage to the viewing surface. The viewing surface can be added at a later date when the construction has ended.
Wall/ceiling models are surface mounted and are designed with a finished appearance that is aesthetically pleasing and designed to be seen.
To ensure a perfectly flat viewing surface, some models of electric screens are made with tab tensioning technology. This is a construction method that keeps tension on the viewing surface in all directions, ensuring a flat projection surface. This is particularly important when precise and detailed images are being shown. This method is more expensive than the traditional, non-tab tensioned construction. Non-tensioned screens continue to offer quality images at a lower cost for general viewing.
Electric screens have several control options. Typically they are supplied with a line voltage wall switch. Low-voltage control is an option with the low-voltage controller as either an external module or built into the screen motor. Low voltage can be used with a dry contact wall switch, Ethernet, serial communication, and infrared or radio frequency wireless remote. Third-party touch panels are also compatible with low-voltage systems.
Efforts should be made to order the screens with the proper amount of extra drop—additional material at the top of the screen surface—to ensure the best lay flat conditions. Screens are built and tested according to the amount of drop that is ordered. That can be adjusted slightly but adjustment may adversely affect the lay flat qualities.
Changing ceiling height or adding obstructions such as pendant light after screens are ordered could affect proper image height—the screen may not be able to adjust to those changes and in a worst case scenario may have to be replaced.
Manual Screens
Manual screens come in styles similar to those of electric models but typically have either a handle to pull them down, or a crank for tab-tensioned models. Like electric screens, manual screens must be ordered with the correct amount of black drop so they will lay as flat as possible, and altering the ceiling height or adding obstructions may jeopardize the screen's effectiveness.
 |
Manual screens may be either wall or ceiling mounted. Photo courtesy of Draper Inc. |
Fixed Screens
Permanently tensioned to the frame, fixed screens provide a contemporary, theatre-like appearance wherever a permanently mounted front or rear projection screen is required. The viewing surface is flat, which translates to superior picture quality. Because of their simple design and the fact that they are not being rolled up or motorized, fixed screens represent a less costly option. They are typically wall mounted or flown.
Rear Projection Screens
Rear projection screens work well in applications which afford high ambient light. The projection system is placed in a dedicated dark room behind the screen where there is no competing light. While the system achieves an image closer to a flat panel display, a considerable amount of real estate is required behind the screen. Screen surfaces can be either flexible or rigid with various tints of glass or acrylic. Mirror/frame systems are available where the manufacturer can design a custom frame for the application to help reduce the amount of space required behind the screen.
Portable Screens
Portable screens are available in a variety of types. Lightweight models can be carried and typically allow the screen material to be pulled up out of the case. For larger sizes there are folding models that require minimal assembly, with major events often featuring extra large models that require more complicated assembly by a team of people.
Screen Size
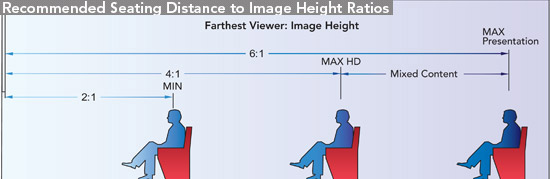
How large should a projection screen be? That is a key consideration, and specifiers should be aware that there are different ways of selecting the proper screen size for an application. Many designers use a few rules of thumb for commercial applications based on how the system is going to be used and what type of content will be viewed. Keeping the closest seat to no less than two times the image height will prevent the image from exceeding the audience's primary field of view. The distance to the farthest seat should be no more than six times the image height for presentations and basic video. The distance should be four times the image height for critical content, spreadsheets, and high-definition (HD) presentations. If there is an even mix of content, a distance of five times image height is recommended.
Film content is much wider than most commercial systems and will shrink vertically as in most flat panels used in the home. Consequently it is advisable to go up a size from what is initially calculated, or down in ratio. Many people try to use a flat panel as the primary display in a multipurpose room; however, flat panels are usually not large enough to meet the above-mentioned criteria. While flat panels may seem fine in a small room during video conferencing, for reading data and presentations the sizes are typically not large enough.
The diagram below shows the recommended seating distance to image height ratios dependent on system use and nature of the content. The distance to the back seat is important as it determines the size of the screen. In many conference rooms, the top executive takes a seat at the back of the conference table. If there is a flat panel that is not large enough to allow the data to be read comfortably, the person at the back will have difficulty in following the presentation.
 |
|
Image courtesy of Draper Inc. |
Another issue involved in selecting the proper size of the screen is aspect ratio. The aspect ratio of an image describes the proportional relationship between its width and its height, and is commonly expressed as two numbers separated by a colon, as in 16:9. The aspect ratio of the screen is dependent on the content used most often for the application and the native aspect ratio of the projector. If there will be mostly HD content, then a 16 by 9 screen and projector would be recommended. Typically, it is best to match the aspect ratio of the screen to the aspect ratio of the projector. A wider aspect ratio screen will allow more source content to remain at constant height, without shrinking vertically. Many colleges that provide film studies in auditoriums use digital-cinema model projectors for the widest aspect ratios possible. This is optimal for film content. Digital-cinema model projectors are designed and optimized for movie theaters, but some models can be purchased for applications where film content is important.
 |
|
Image courtesy of Draper Inc. |
The diagram below illustrates three popular applications for electric ceiling-recessed, electric wall-mounted, and fixed-frame projection screens. Most designers prefer the image in commercial applications to be at least 48 inches above the finished floor, leaving a set amount of space to the ceiling for image height, black drop, screen case, or screen frame. For roller type screens, specifying too much black drop will change the way the screen is manufactured. Large adjustments to shorten the screen height will have a negative impact on the ability of the screen to lay flat. Adjusting the screen downwards could cause problems with flatness and could even pose a safety hazard, if there is inadequate fabric wrap around the roller for safety. It is important not to lower a screen so far that the audience can't see it comfortably.
 |
|
Image courtesy of Draper Inc. |
Screen Surfaces
There are several variables which affect the selection of the proper screen surface for a given application. Each variable must be carefully considered.
The impact of screen tint should be considered when selecting a screen surface. As a rule of thumb, white surfaces are best for dark rooms and wide seating areas and grey surfaces are best for rooms with ambient light.
Matte white is a highly diffusive white surface with minimal ambient light rejecting properties.
Grey surfaces help to reject ambient light. These surfaces absorb more stray light with their darker tint, and help to improve the blacks on the screen. However, these surfaces benefit from more projected brightness since these darker surfaces absorb more whites and bright colors to improve blacks in the image. Selecting a brighter projector will compensate for this while still achieving the benefits of improved blacks.
High-performance screen surfaces are typically a dark grey tint to help absorb stray ambient light and deepen black levels even more than light grey surfaces. They typically reflect light from the projector back to the viewers, while reflecting off-axis ambient light away from the viewers. High-performance screen surfaces may also have a lens structure that can block off-axis ambient light from reflecting toward the viewers—this is most important when light fixtures in the ceiling have been mounted too close to the screen surface. It is always recommended to install light blocking shades at windows.
Retro-reflective surfaces are ultra reflective and typically have higher gains to help increase brightness of older model projectors. These surfaces are designed to reflect light directly back to the light source. They have very narrow off-axis viewing and can tend to hot-spot on many new model projectors.
Recyclable Material
Currently most screen materials are vinyl based and are not recyclable. However, screen materials are available that are recyclable, PVC free, and cradle-to-cradle certified. With many projects striving for LEED certification, specifiers should be aware of the more sustainable options.
Rear Projection Screens
System specifiers should note that flexible rear projection screens are attractive for retrofit projects, as the material can be rolled up, and the frame can ship in pieces for installation on site at reasonable cost. However, there are drawbacks. Designers must allow for proper pressure equalization between the audience space and the rear projection space so that when a door is opened or shut the screen surface does not bounce back and forth. Further, because the material is so thin, the projector fan noise may be heard from the audience, and there are comparatively fewer options in materials. White materials allow short throw distances for smaller spaces, but do not perform well in ambient light. Grey materials work well in ambient light, but need longer throw distances. Rigid materials available in either glass or acrylic, however, do not have issues with pressure equalization and because they are thicker, have good acoustic isolation. Because a film is applied to a substrate, rigid materials offer more choices—films can be customized in tint and combined with shades of glass or acrylic for even more options. These materials, however, are more expensive and unwieldy. Glass is used more widely than acrylic, as the latter is more susceptible to the effects of humidity and can bow. A new thinner “semi rigid” acrylic screen substrate can be rolled for shipment, solving some of the issues with delivery and installation of large rigid rear screens.
Screen Gain
Specifiers must also examine screen gain in selecting a proper screen material. Screen gain is a measure of brightness compared to light reflecting off a block of magnesium carbonate or barium sulfate. This serves as the industry's standard for a gain of 1.0. Screen surfaces typically have a gain of between 0.7 -3.0 depending on application. Screen gain can help increase brightness, but typically reduces off-axis viewing. Matte white is a very common choice with a screen gain of 1.0.
 |
|
Image courtesy of Draper Inc. |
A screen half gain angle is a material spec stating the angle off axis from the center perpendicular at which the image brightness becomes half that of straight on. In the accompanying diagram, material A has a half gain angle of 80°. But if more brightness is needed, material B, which has a half gain angle of 60°, covers the audience well, but steers more light into the primary viewing cone.
Throw Distance
Another consideration in optimal viewing is the projector throw distance, which is the distance from the screen surface to the projector lens. The throw distance ratio is the ratio between the throw distance and the image width and is also called the lens ratio which indicates the type of lens that may be needed with the projector. A typical throw distance ratio when using a projector with a “standard zoom lens” is approximately 1.8:1. Some model projectors can be ordered having various lenses with ratios ranging from 0.67:1 – 7.0:1.
Hot Spotting
There is a relationship between the gain of the screen surface and the projector throw distance ratio. If they are not matched properly, hot spotting could occur. “Hot spotting” means that the image appears overly bright in the center, and dark near the edges. In this situation, the light hitting the outside of the screen is at a shallow angle reflecting light away from the viewers so the outside of the image is less bright than the middle of the image, and a hot spot is created. A good rule of thumb to avoid hot spotting on a white screen is that the gain should never be greater than the throw distance ratio. Grey screens and high-performance screens require even longer throw distances due to their higher transmission of light to the viewer in both front and rear projection scenarios.
The problem is easily corrected by either dropping the screen gain or increasing the throw distance.
Lighting
In a projection system, it is important to look at ambient lighting in two places, at the screen and at the audience. Light hitting the screen washes out blacks and decreases the image contrast. Light in the viewers' eyes competes with projection light getting to the viewers eyes and determines how bright a system is needed.
The more light hitting the screen surface, the more the black in the image gets washed out, decreasing image contrast. Projectors cannot project black, which is the absence of light. They can only project white and color. The only way to get black on any screen is to have a dark room. Only grey and high-performance screens can help improve black in the image. A good target for a commercial application is to have no more than 5 foot candles of ambient light hitting the screen—if there is more, a matte white surface will have difficulty showing a good black. In this case, a grey or higher gain white surface should be considered. If more than 8 foot candles of ambient light hit the screen, a grey or higher gain white surface will have difficulty showing a good black, and a high-performance surface should be considered.
 |
In terms of proper lighting, less than five foot candles is best for commercial projection. Photo courtesy of Draper Inc. |
In most commercial projection applications it is advisable to have 30 foot candles of ambient light on the viewers so they can comfortably take notes or read handouts. Having too much ambient light on the viewer is not good for projection. When there is too much ambient light, the iris in the human eye begins to shut, letting less light in. The projected image will not look as bright. It is important that the amount of foot lamberts, or units of luminance, of projected light coming from the screen is always much higher than the amount of foot candles of ambient light on the viewers. Ambient light on the viewer should never compete with the projected light.
Contrast
Contrast affects how well a viewer can “read” the image. Low contrast reduces image detail and resolution, high contrast increases detail and resolution. Image contrast is even more critical when the application involves high resolutions graphics, medical imaging, control rooms, and CAD applications.
System contrast is an average of measurements of black at different locations on the screen compared to white at different locations on the screen measured in the existing lighting conditions of the application. Ambient light will affect the measurement of black. When measuring system contrast an ANSI checkerboard pattern is used.
The potential brightness of an image can actually be calculated. Brightness is measured in foot lamberts. The basic formula for ft lamberts is ft lamberts = screen gain x lumens / sq ft of image. While this formula measures how bright the image could be, it does not provide information on how well the image will appear. There can be two systems in the same lighting producing the same amount of brightness, but the contrast could be very different between the two if they have different screen surfaces. However, calculating the system contrast ratio will provide specifiers with an idea of the quality of the image in the application in question. Several calculators can provide this information, based on the following parameters.
• Content/Use of the system
• Image Size
• Projector Brightness
• Throw Distance (or Lens Ratio)
• Light level at the screen
• Light Level at the viewer
 |
An ANSI checkerboard pattern is used to determine contrast. Image courtesy of Draper Inc. |
Standards now exist that list the minimum recommended system contrast ratio standards for four different viewing categories. According to ANSI/INFOCOMM 3M-2011, a standard that provides metrics for measurement and requirements for minimum contrast ratios for rear and front projection audiovisual projected image systems, the four viewing categories are:
• Passive viewing. The viewer is able to recognize what the images are on a screen and can separate the text or the main image from the background under typical lighting for the viewing environment. The content does not require assimilation and retention of detail, but the general intent is understood. There is passive engagement with the content, that is, non-critical or informal viewing of video and data.
• Basic decision making. This category essentially applies to presentations. The viewer can make basic decisions from the displayed image. The decisions are not dependent on critical details within the image, but there is assimilation and retention of information. The viewer is actively engaged with the content, such as information displays, presentations containing detailed images, classrooms, boardrooms, multi-purpose rooms, and product illustrations.
• Analytical decision making. More critical viewing of detailed content such as spreadsheets, control room data, and CAD, are required in this category. The viewer can make critical decisions by the ability to analyze details within the displayed image. The viewer is analytical and fully engaged with these details of the content, which can also include medical imaging, architectural/engineering drawings, forensic evidence, or photographic image inspection.
• Full motion video. This type of viewing refers to high-definition content such as is found in home theaters, business screening rooms, and broadcast post-production facilities. The viewer is able to discern key elements present in the full motion video, including detail provided by the cinematographer or videographer necessary to support the story line and intent.
The accompanying diagram is an example of a calculator available to systems designers for calculating the brightness and contrast of a system using various screen surfaces. These standards provide the minimum targets for each application category that designers should try to meet or exceed for optimal viewing. For an application with a mix of content, a value that is in the middle of the categories should be used as a minimum.
System Calculators
Because matching up screen surface capabilities with room conditions and other variables can be a complicated process, manufacturers have introduced web-based tools to simplify the process. Screen surface selectors take into account factors such as projector brightness, light on the screen, projector location, specs and more to narrow screen surface choices to “good,” “better” and “best” and to select the correct projector lumen output and the proper projector focal length to meet project applications. Many calculators also configure theoretical ANSI checkerboard contrast ratios utilizing different screen materials for any ambient room light scenarios.
 |
|
Image courtesy of Draper Inc. |
To facilitate use of calculators, designers should fully understand the terms touched on previously in this article as well as how to conduct basic measurements. Common input to such models includes the following:
Foot lambert units are used to measure screen image brightness. A quality movie theater will have a screen brightness of 12 to 16 ft. lamberts in a darkened room. A new fresh plasma will have an output of approximately 40 to 45 foot lamberts and is normally viewed with some room lights present.
Lumens are used to measure a projector's peak light output. When screen size is increased, screen gain is reduced, and/or ambient light is present, then projector lumens must be increased to maintain a pleasing screen image.
Foot Candle units are employed to measure the amount of ambient light falling directly on a particular area. Typically, a projection system calculator will take into account ambient light on the screen wall and also ambient light directly over the viewing area. Under most room lighting designs, there will be considerably less ambient light on the screen wall than directly over viewing area. It is important to control the ambient light that is entering the viewer's eye point. Bright lighting over conference tables and work stations reduces the human eye's iris opening which in turn allows less screen light to get to the brain. Calculators will account for the ambient light over the viewing area and will issue an alert when a higher lumen projector is required.
ANSI contrast ratio measures the dynamic range between the peak image brightness and the deepest black level that can be measured on an ANSI black and white checkerboard test pattern. This measurement takes into account the totality of projector output, screen brightness, screen gain and room ambient light reflecting off the screen surface back to the viewer. The ANSI contrast ratio is the single most important number when analyzing a proposed projection system as it is a summary of the performance of the screen image quality. Note: ANSI contrast ratio is not to be confused with projector on-off contrast ratios which are typically stated as 1,000:1 up to 30,000:1.
Measuring ambient light in existing rooms. A basic ambient foot candle light meter should be used to measure ambient light in a room. If a projector is already present, it should be turned off. To measure ambient light on the screen wall, the photo sensor disk should be held so the sensor is facing toward the audience, without the body of the person taking the measurement blocking the ambient light and casting any shadows on the sensor. Note the Foot Candle measurement. The next measurement is to record the ambient light over the viewing area. The photo sensor disk should be held so the sensor is facing toward the screen at the viewers eye level. The foot candle measurement should be noted so that it can be entered into the calculator.
To measure ambient light in rooms that have not yet been constructed, manufacturers recommend employing this type of calculator to determine and specify the maximum Foot Candles of light on the screen wall and in the viewing area when the media is in use.
Using a Typical System Calculator
The latest version of calculators will help to select a material by highlighting the material information in a color and changing the 'recommended' box to a check mark. However, the calculator will only do this if all information necessary has been entered in the fields at the top, and all criteria have been met based upon values that are recommended for those applications. For illustrative purposes, a typical calculator will ask the systems designer to complete the following steps.
• Basic information should be entered into the appropriate fields.
• Image height, width, or diagonal should be entered to calculate overall image size or area.
• Enter the projector's stated lumens to be used. A typical calculator should reduce the manufacturer's published specification by at least 20 percent when calculating to account for lamp degradation and brightness variation when using lenses other than the 'standard' zoom lens. This will also build in some margin of error.
• Enter projector throw distance. Typically, the calculator will tell you if the lens used at that throw distance is compatible with that material and will not create a hot spot.
• Enter the type of application. Some calculators will help to select a material using recommended contrast ratio levels for those applications (i.e., Commercial 15:1 or higher).
• Enter ambient light on screen surface. The calculator will use this value to calculate the ANSI contrast of the image factoring in the ambient light falling on the screen. It will help to select a material that exceeds the value used in the application field.
• Enter ambient light directly over viewer. The measurement will be used to compare directly with the value of foot lamberts that has been calculated for each material. The amount of foot lamberts of brightness on the screen should always be greater than the amount of foot candles of ambient light in the viewing area. The calculator will help select a material that exceeds this by 15 or more to build in some margin of error. If there are not enough foot lamberts, the material will not be selected. The calculator may then register the message 'need brighter projector.'
With the required information, the calculator will help to steer the specifier to materials that work well for an application.
 |
Designers are increasingly using web-based calculators for assistance in selecting the proper projection screen. Photo courtesy of Draper Inc. |
| Checklist for Systems Designers |
|
As a checklist for systems designers, following are the parameters that must be known in order to maximize the viewing experience. What you need to know first:
Screen Selection Process:
During the selection of the screen, it is important to consider the following issues:
|
Basic Projection Screen Information for Maximum Viewing Experiences
Audiovisual communication is here to stay and forms an important part of teaching, training and information dissemination in many fields. In order to ensure that viewers receive the maximum benefit from these presentations, basic projection principles should be understood and applied. For assistance in application, many manufacturers offer calculators that can help in selecting the correct screen format, size, model, viewing surface, and other parameters. With a methodical approach such problem areas as hot spotting and poor readability will be eliminated, and a superior image quality will help viewers see, understand, and retain the information presented.
Draper, Inc., is a Spiceland, Ind.-based manufacturer of projection screens, lifts for projectors and flat panel displays, video conferencing solutions, and window shades. Draper has more than 50 years of experience in the audiovisual industry. www.draperinc.com |